今天阐述一下如何在vue中进行配置使用element-ui;
一,配置下载Element
1.首页在电脑上下载好vue,以及npm,可以去相关的官方进行下载。
2.进行配置命令
npm install element-plus --save
如报错:
npm error code ERESOLVE
npm error ERESOLVE unable to resolve dependency tree
npm error
npm error While resolving: vue3_cli_default@0.0.0
npm error Found: vue@3.5.13
npm error node_modules/vue
npm error   vue@"^3.2.8" from the root project
npm error
npm error Could not resolve dependency:
npm error peer vue@"^2.5.17" from element-ui@2.15.14
npm error node_modules/element-ui
npm error   element-ui@"*" from the root project
npm error
npm error Fix the upstream dependency conflict, or retry
npm error this command with --force or --legacy-peer-deps
npm error to accept an incorrect (and potentially broken) dependency resolution.
npm error
npm error
npm error For a full report see:
npm error /Users/rnd/.npm/_logs/2025-05-12T02_23_38_037Z-eresolve-report.txtnpm error A complete log of this run can be found in: /Users/rnd/.npm/_logs/2025-05-12T02_23_38_037Z-debug-0.log
先删除npm uninstall element-ui,运行:
npm uninstall element-ui
再次运行npm install element-plus --save进行安装element
二:在项目的main.js配置全局
import { createApp } from 'vue'
import App from './App.vue'// 引入 Element Plus 和它的样式
import ElementPlus from 'element-plus'
import 'element-plus/dist/index.css'const app = createApp(App)// 使用 Element Plus 插件
app.use(ElementPlus)app.mount('#app')
or或者
import App from './App'// 引入 Element Plus 和样式
import ElementPlus from 'element-plus'
import 'element-plus/dist/index.css'
// #ifndef VUE3
import Vue from 'vue'
import './uni.promisify.adaptor'
Vue.config.productionTip = false
App.mpType = 'app'
const app = new Vue({...App
})
app.$mount()
// #endif// #ifdef VUE3
import {createSSRApp
} from 'vue'
export function createApp() {const app = createSSRApp(App)// 使用 Element Plus 插件app.use(ElementPlus)return {app}
}
// #endif
三:使用与调用Element-UI组件
index.vue中:
<template><view class="content"><el-switch v-model="value" active-color="#13ce66" inactive-color="#ff4949"></el-switch></view>
</template><script>export default {data() {return {value: true}},onLoad() {},methods: {}}
</script><style>.content {display: flex;flex-direction: column;align-items: center;justify-content: center;}
</style>
或者在app.vue中:
<script setup>
// This starter template is using Vue 3 <script setup> SFCs
// Check out https://v3.vuejs.org/api/sfc-script-setup.html#sfc-script-setup
import HelloWorld from './components/HelloWorld.vue'
import Time from './components/Time.vue'
</script><template><HelloWorld/><Time/>
</template><style>
#app {font-family: Avenir, Helvetica, Arial, sans-serif;-webkit-font-smoothing: antialiased;-moz-osx-font-smoothing: grayscale;text-align: center;color: #2c3e50;margin-top: 60px;
}
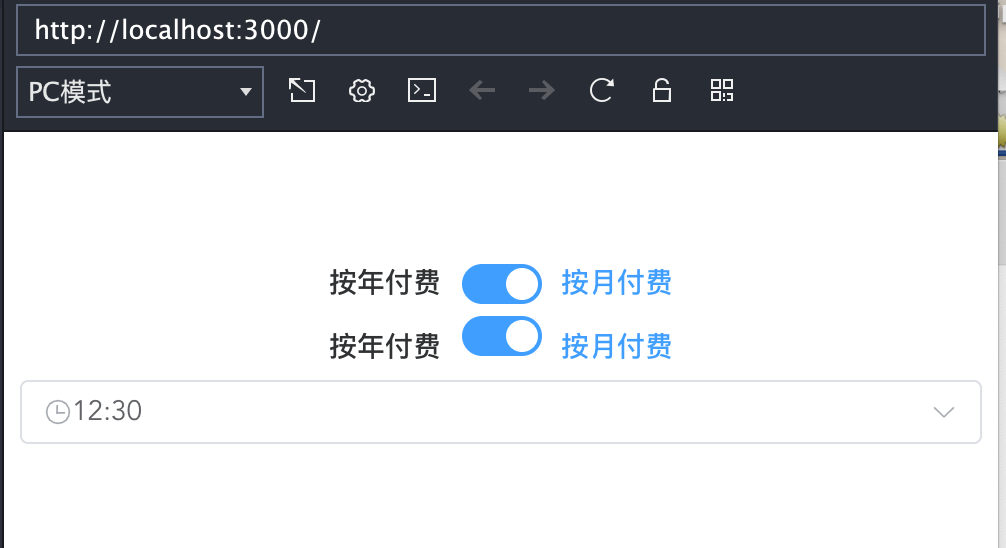
</style>HelloWorld组件如下:
<template><el-switchv-model="value1"active-text="按月付费"inactive-text="按年付费"></el-switch><el-switchstyle="display: block"v-model="value2"active-color="#13ce66"inactive-color="#ff4949"active-text="按月付费"inactive-text="按年付费"></el-switch>
</template>
<script>export default {data() {return {value1: true,value2: true}}};
</script>
Time组件如下:
<template>
<el-time-selectv-model="value":picker-options="{start: '08:30',step: '00:15',end: '18:30'}"placeholder="选择时间">
</el-time-select>
</template>
<script>export default {data() {return {value: ''};}}
</script>
此时运行,看结果
大功告成,继续加油!


)


