点击下载《ACS自助借还服务端模拟工具(源代码)》
1. 前言
在当今科技迅猛发展的时代,自助服务系统已成为提升用户体验和运营效率的关键。为了满足自助借还软件辅助开发的需求,我们精心打造了一款功能强大的ACS服务端模拟软件。这款软件不仅具备接收并处理客户端消息的核心能力,还能根据用户配置智能地回应相应的消息,为开发者提供了一个高效、便捷的测试与验证平台。
ACS服务端模拟软件在设计之初就充分考虑了易用性和可扩展性。通过直观的界面和详尽的配置选项,用户能够轻松设置服务端的行为模式,模拟各种实际场景下的交互流程。能够无缝对接各种自助借还系统的客户端,确保测试的全面性和准确性。
除了作为辅助开发工具,这款软件还具备二次开发的潜力。通过开放的API接口和强大的功能框架,开发者可以根据自身需求对软件进行定制和扩展,将其打造成为真正的ACS服务端软件。这一特性使得软件的应用范围更加广泛,能够满足不同行业、不同场景下的自助服务需求。
2. 功能介绍及使用
软件运行环境:Win10 x64
编译工具:Visual Studio 2022
数据库:Sqlite3
特别说明:
程序运行前记得将源代码目录下的DataServer.db拷贝至exe所在目录,DataServer.db中有初始化的数据哦!
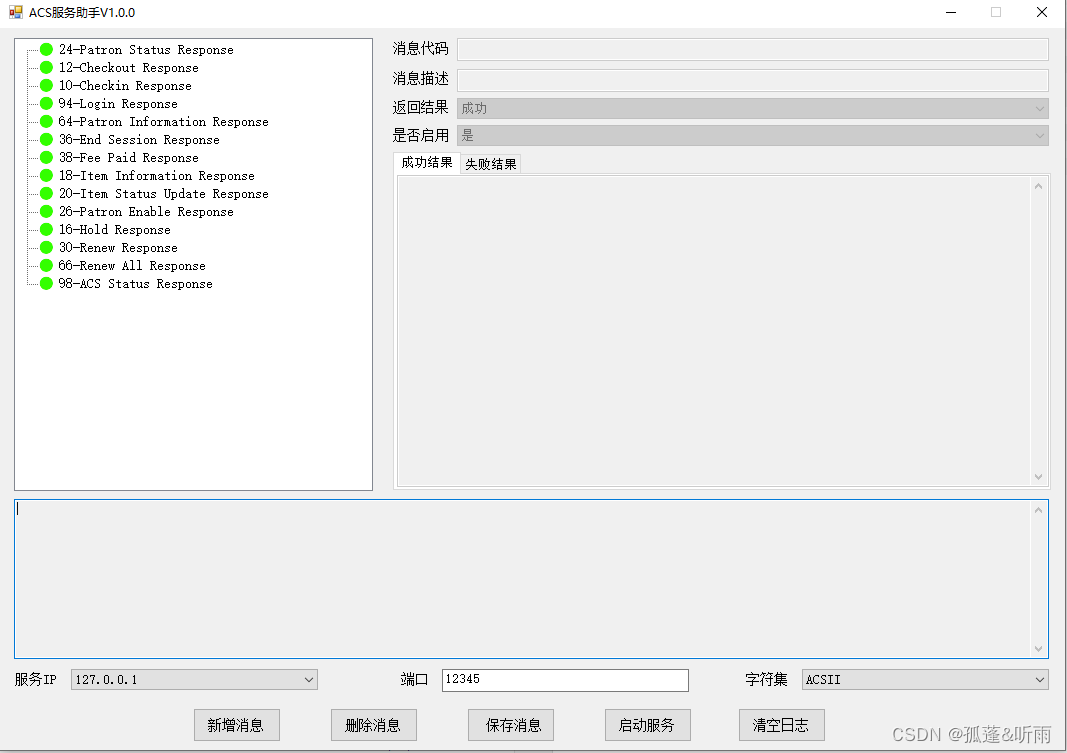
以下为软件主界面。
2.1 新增消息
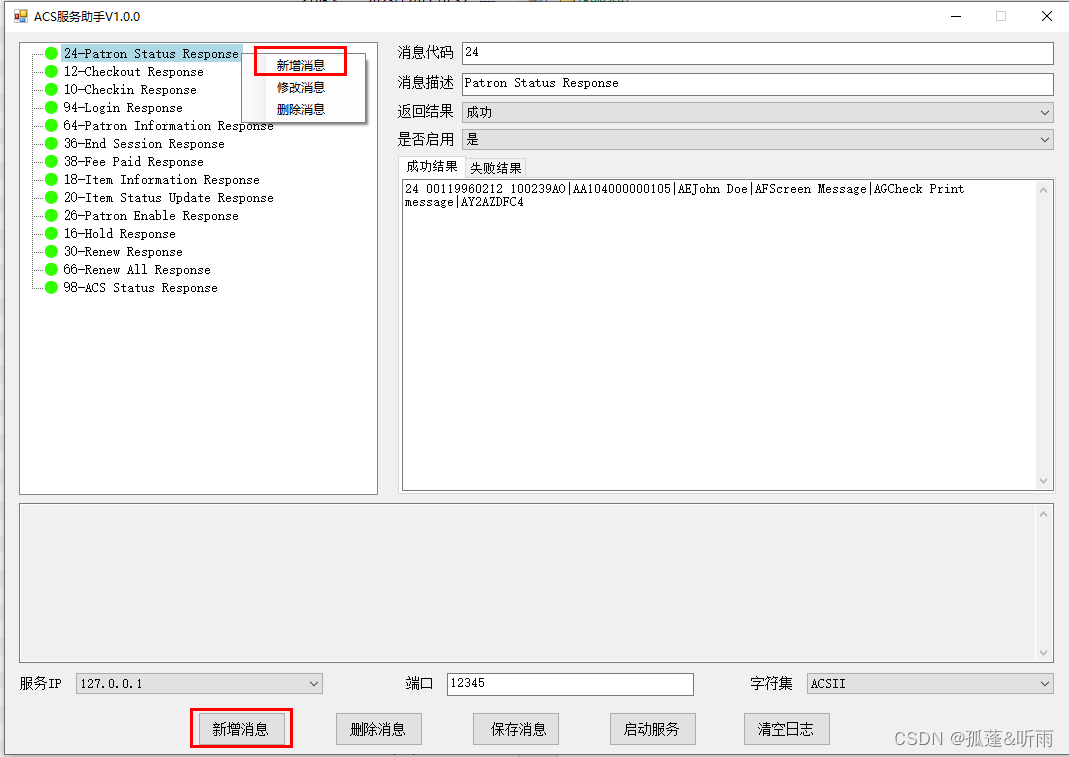
新增接口有两种操作方式:
1、点击已有消息列表,然后单击鼠标右键,点击【新增消息】,然后录入接口所需数据,点击【保存消息】即可。
2、直接点击【新增消息】,然后录入接口所需数据,点击【保存消息】即可。
以下为部分代码片段
//添加接口
private void AddInterface()
{try{string strSql = "select max(id) as id from interface";DataTable dataTable = sqliteDBHelper.ExecuteDataTable(strSql, null);string strId = dataTable.Rows[0]["id"].ToString();int id = 0;if (string.IsNullOrEmpty(strId)){id = 1;}else{id = Int32.Parse(strId) + 1;}strSql = "insert into interface(id, message_code, remark, result, status, success, fail)" +"values(@id, @message_code, @remark, @result, @status, @success, @fail)";SQLiteParameter[] parameters = {new SQLiteParameter{ParameterName = "id",Value = id},new SQLiteParameter{ParameterName = "message_code",Value = messageCodeTextBox.Text.Trim()},new SQLiteParameter{ParameterName = "remark",Value = remarkTextBox.Text.Trim()},new SQLiteParameter{ParameterName = "result",Value = resultComboBox.SelectedIndex},new SQLiteParameter{ParameterName = "status",Value = statusComboBox.SelectedIndex},new SQLiteParameter{ParameterName = "success",Value = successTextBox.Text},new SQLiteParameter{ParameterName = "fail",Value = failTextBox.Text},};sqliteDBHelper.ExecuteNonQuery(strSql, parameters);//增加新节点string name = $"{messageCodeTextBox.Text}-{remarkTextBox.Text}";int status = statusComboBox.SelectedIndex;TreeNode rootNode = treeView.Nodes.Add(id.ToString(), name, status, status);isAddNewInterface = false;}catch (Exception ex){ShowErrorMessageBox(ex.Message);}
}
2.2 修改消息
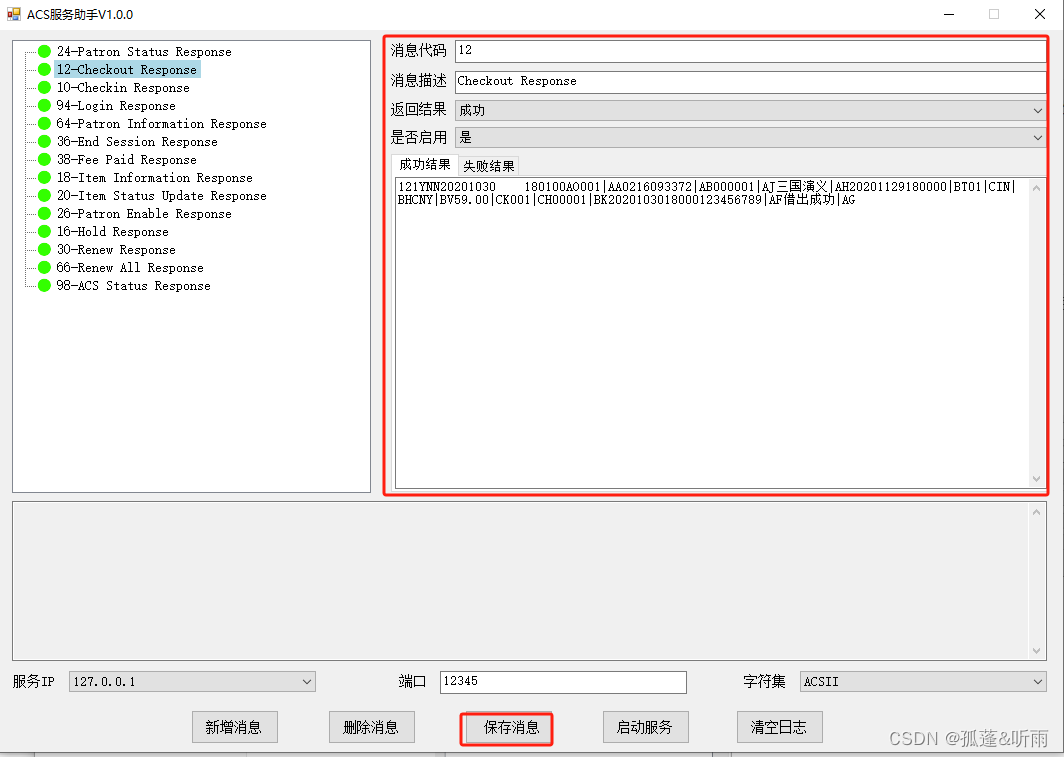
左键单击选中任意消息记录,可以看到该消息的数据已经回显到相应的输入框中,直接修改数据,确定无误后点击【保存消息】即可。
以下为部分代码片段
//修改接口
private void UpdateInterface()
{try{if (currentSelectInterfaceTreeNode == null){return;}string strSql = "UPDATE interface SET message_code = @message_code, " +"remark=@remark, result=@result, " +"status=@status, success=@success, fail=@fail WHERE id=@id; ";SQLiteParameter[] parameters = {new SQLiteParameter{ParameterName = "id",Value = currentSelectInterfaceTreeNode.Name},new SQLiteParameter{ParameterName = "message_code",Value = messageCodeTextBox.Text.Trim()},new SQLiteParameter{ParameterName = "remark",Value = remarkTextBox.Text.Trim()},new SQLiteParameter{ParameterName = "result",Value = resultComboBox.SelectedIndex},new SQLiteParameter{ParameterName = "status",Value = statusComboBox.SelectedIndex},new SQLiteParameter{ParameterName = "success",Value = successTextBox.Text},new SQLiteParameter{ParameterName = "fail",Value = failTextBox.Text},};sqliteDBHelper.ExecuteNonQuery(strSql, parameters);//修改节点int status = statusComboBox.SelectedIndex;string name = $"{messageCodeTextBox.Text}-{remarkTextBox.Text}";currentSelectInterfaceTreeNode.Text = name;currentSelectInterfaceTreeNode.ImageIndex = status;currentSelectInterfaceTreeNode.SelectedImageIndex = status;isAddNewInterface = false;}catch (Exception ex){ShowErrorMessageBox(ex.Message);}
}
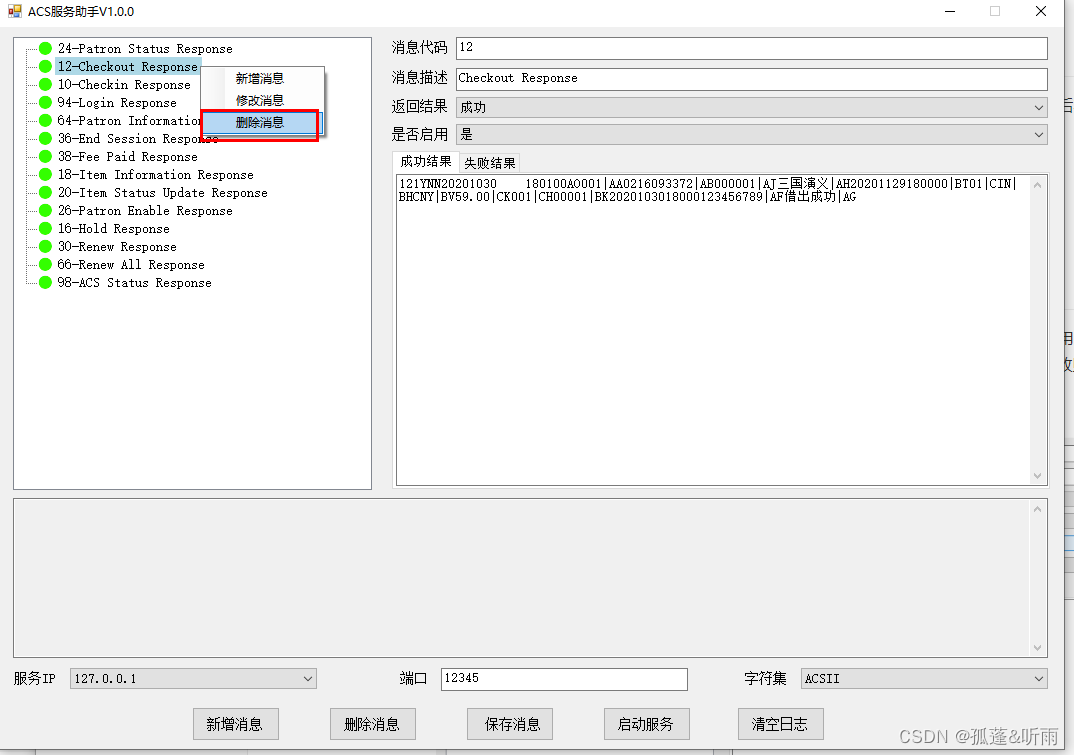
2.3 删除消息
左键单击选中任意消息记录,单击鼠标右键,在弹出的邮件菜单中选择【删除消息】,然后在删除提示框中点击【确认】。
注意:消息删除后无法恢复,请谨慎操作!
以下为部分代码片段
//删除接口
private void DeleteInterface()
{try{string strSql = $"delete from interface WHERE id = '{currentSelectInterfaceTreeNode.Name}'";sqliteDBHelper.ExecuteNonQuery(strSql, null);//移除节点treeView.Nodes.Remove(currentSelectInterfaceTreeNode);isAddNewInterface = false;}catch (Exception ex){ShowErrorMessageBox(ex.Message);}
}
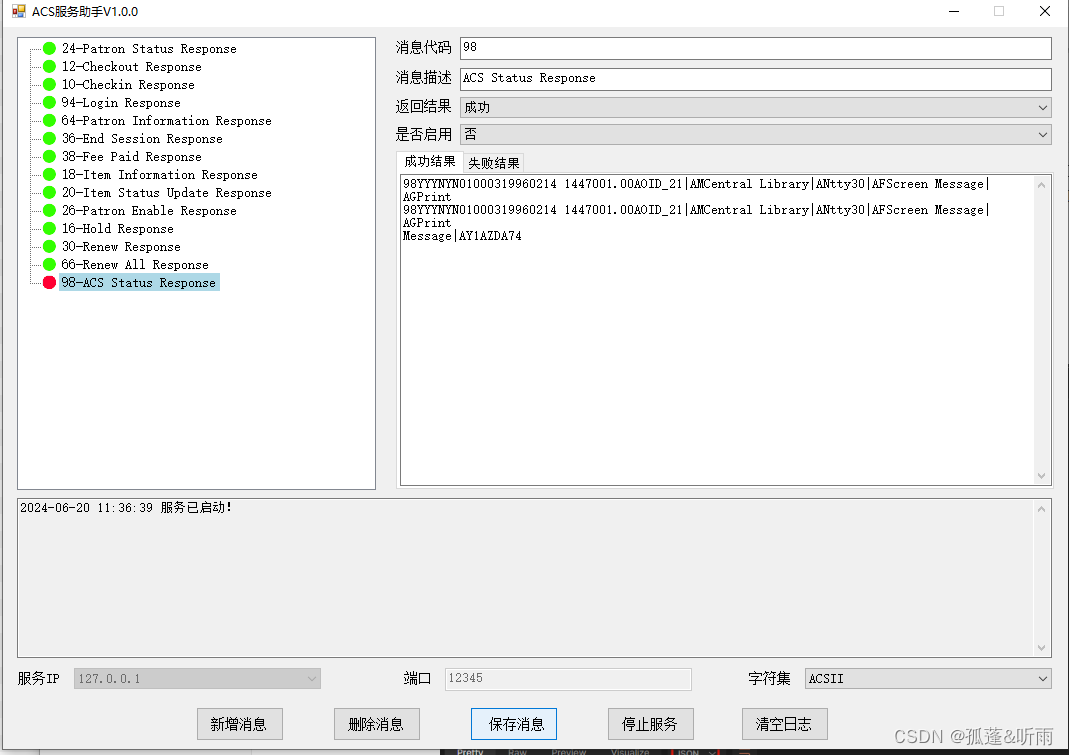
2.4 启动服务
待消息配置完成后,直接点击启动服务即可。所有状态为启用的项目下的状态为启用的接口将会被监听,当有消息请求到来时,会根据回应消息设置的返回结果(设置为成功则返回成功结果,设置为失败则返回失败结果)将数据返回。
以下为部分代码片段
//启动服务
private void startServerButton_Click(object sender, EventArgs e)
{if (isStartServer){isStartServer = false;startServerButton.Text = "启动服务";ipComboBox.Enabled = true;portTextBox.Enabled = true;                SetTipMessage("服务已停止!");tcpListener.Stop();return;}if (string.IsNullOrEmpty(ipComboBox.Text)){ShowErrorMessageBox("请选择本机Ip!");return;}if (string.IsNullOrEmpty(portTextBox.Text)){ShowErrorMessageBox("请输入端口!");portTextBox.Focus();return;}int port = Int32.Parse(portTextBox.Text);if ((port < 1025 || port > 65534)){ShowErrorMessageBox("端口仅能为1025~65534,且当前未被其他程序占用!");return;}startServerButton.Text = "停止服务";ipComboBox.Enabled = false;portTextBox.Enabled = false;SetConfigValue("Port", portTextBox.Text);SetConfigValue("Encoding", encodingComboBox.SelectedIndex.ToString());// 创建一个新的线程来运行监听器tcpListener = new TcpListener(IPAddress.Parse(ipComboBox.Text), Int32.Parse(portTextBox.Text));listenThread = new Thread(new ThreadStart(StartListening));listenThread.IsBackground = true;listenThread.Start();
}
我们使用SIP的客户端程序来测试一下返回结果:

2.5 其他
1、消息的【是否启用】标记用来表示该接口是否启用,启用状态时程序会正常响应并回复结果,【返回结果】用于表示当请求到来时返回的结果为【成功结果】或【失败结果】的内容。
2、左侧消息列表,绿色标记的为启用状态,红色标记的为禁用状态。

3. 总结
ACS服务端模拟软件,作为一款集多功能、易用性、高安全性于一体的开发利器,它不仅完美契合自助借还软件辅助开发的需求,更拥有通过深度定制和二次开发转化为真正ACS服务端软件的潜力。这款软件为各行各业的自助服务提供了高效且便捷的解决方案。借助它,开发者能够轻松模拟各种实际场景下的交互流程,确保客户端的功能和性能得以全面验证。
简而言之,ACS服务端模拟软件无疑是开发者的得力助手,它将为您的自助服务系统注入强大的动能,确保您的业务运行更为顺畅、可靠。
点击下载《ACS自助借还服务端模拟工具(源代码)》


)


