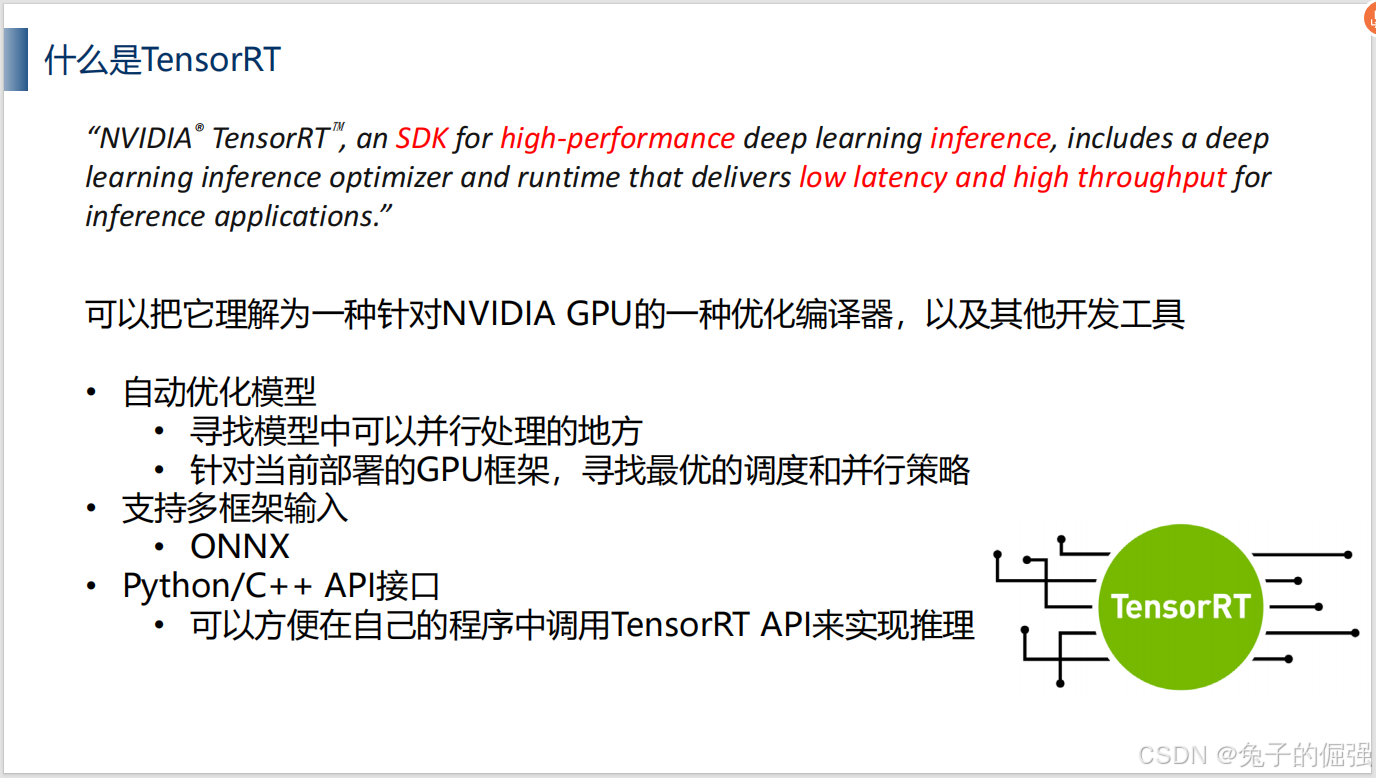
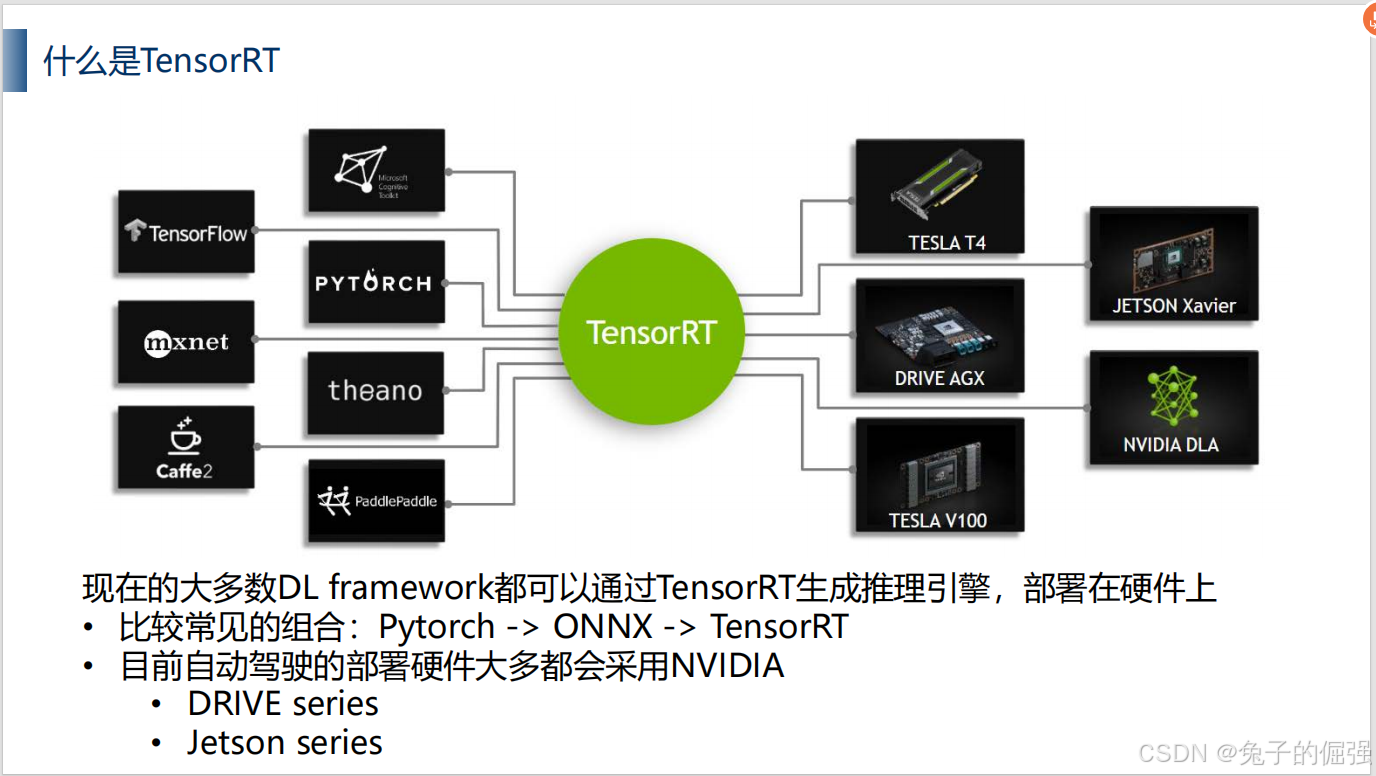
什么是tensorrt?
其他厂商: Qualcomm, Hailo, google TPU
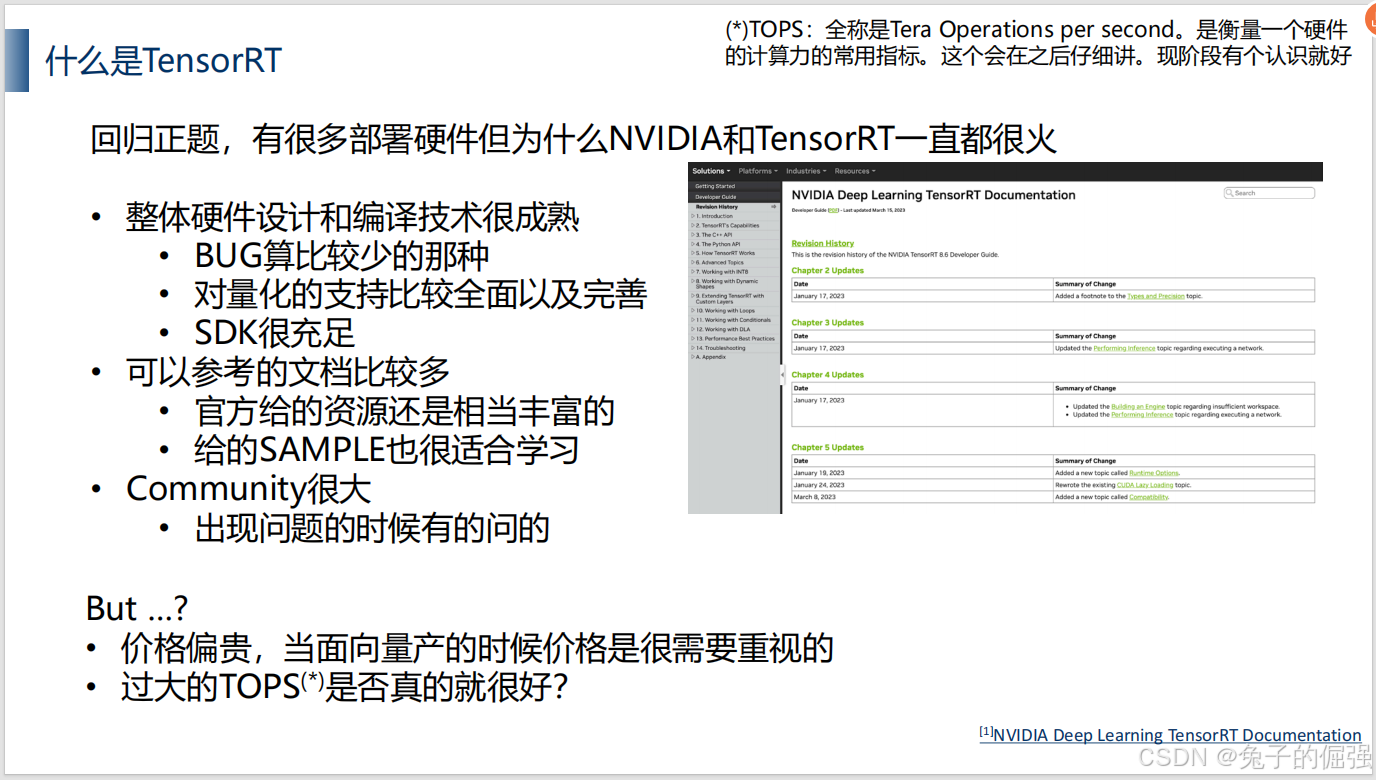
tensorrt的优劣势
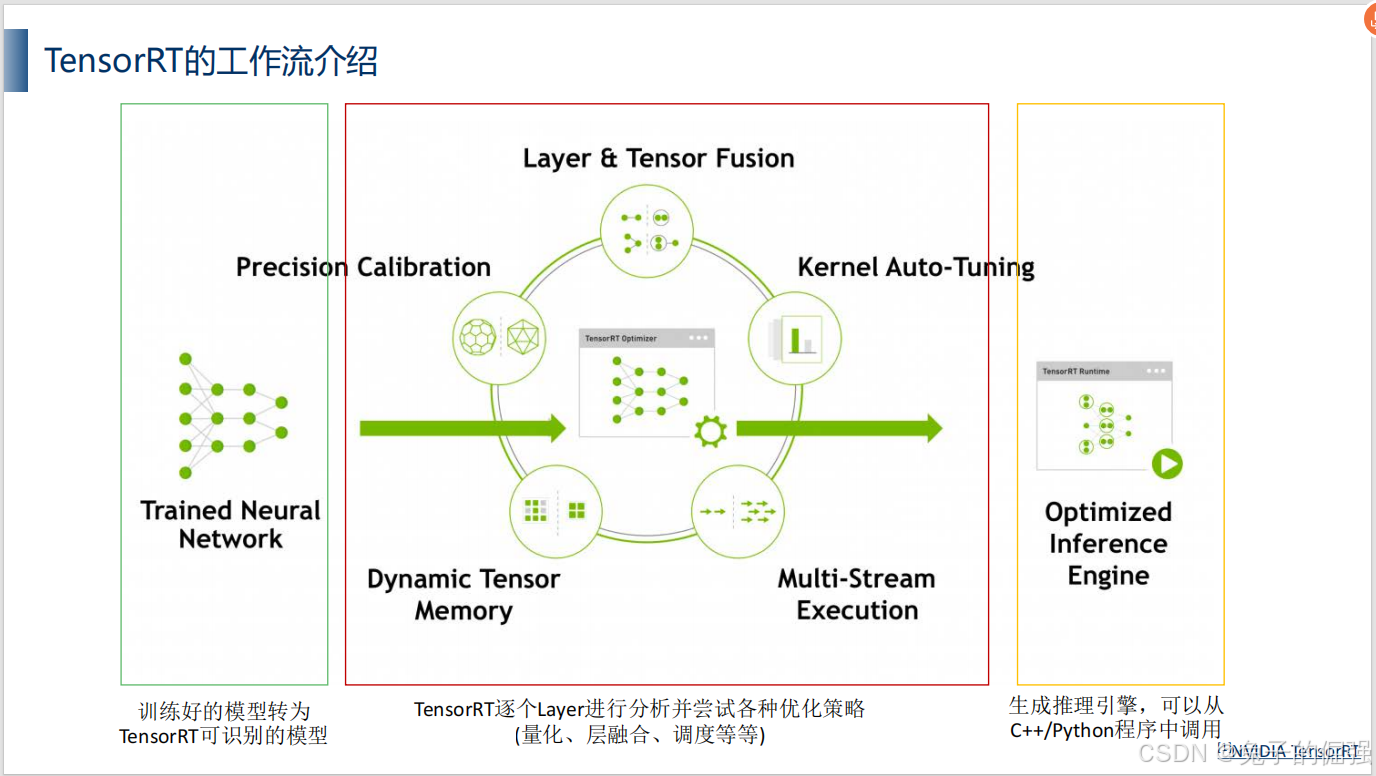
使用tensorrt的pipeline
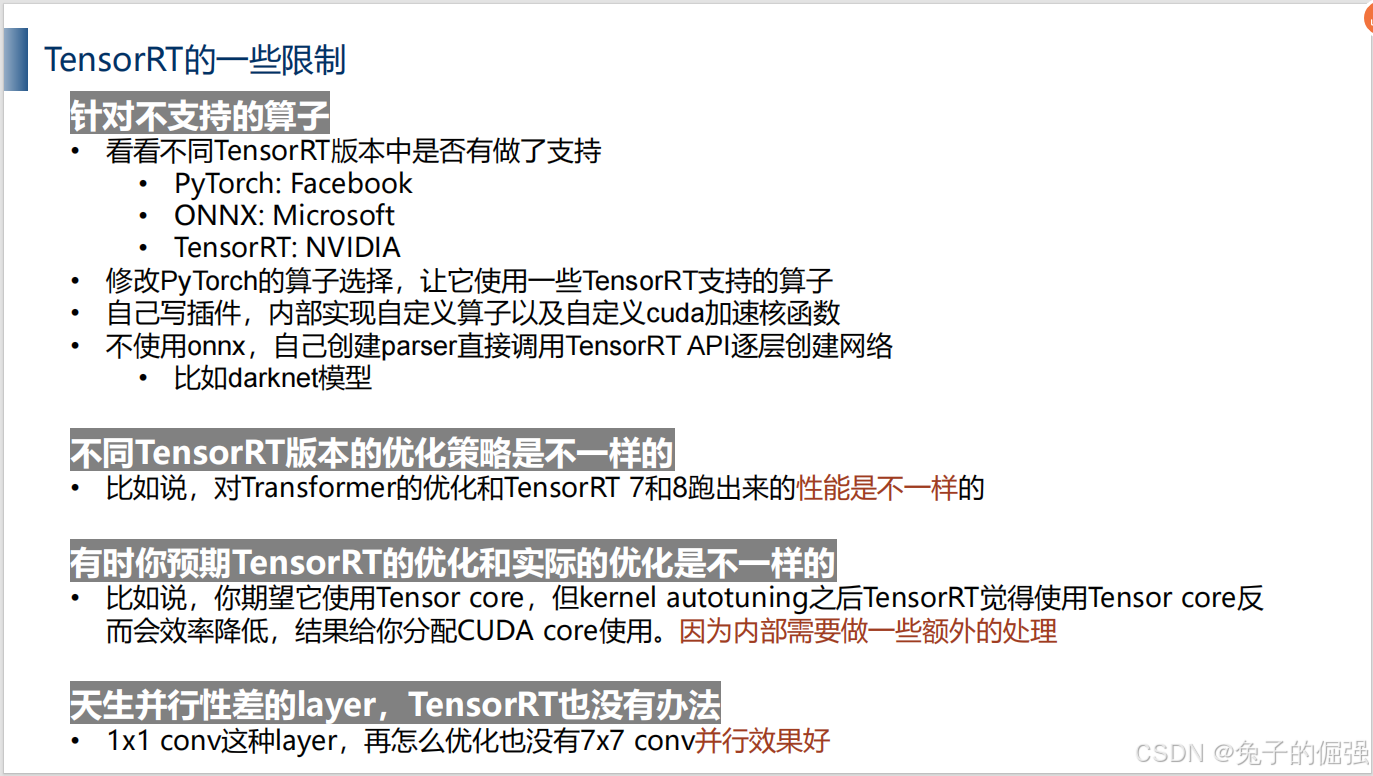
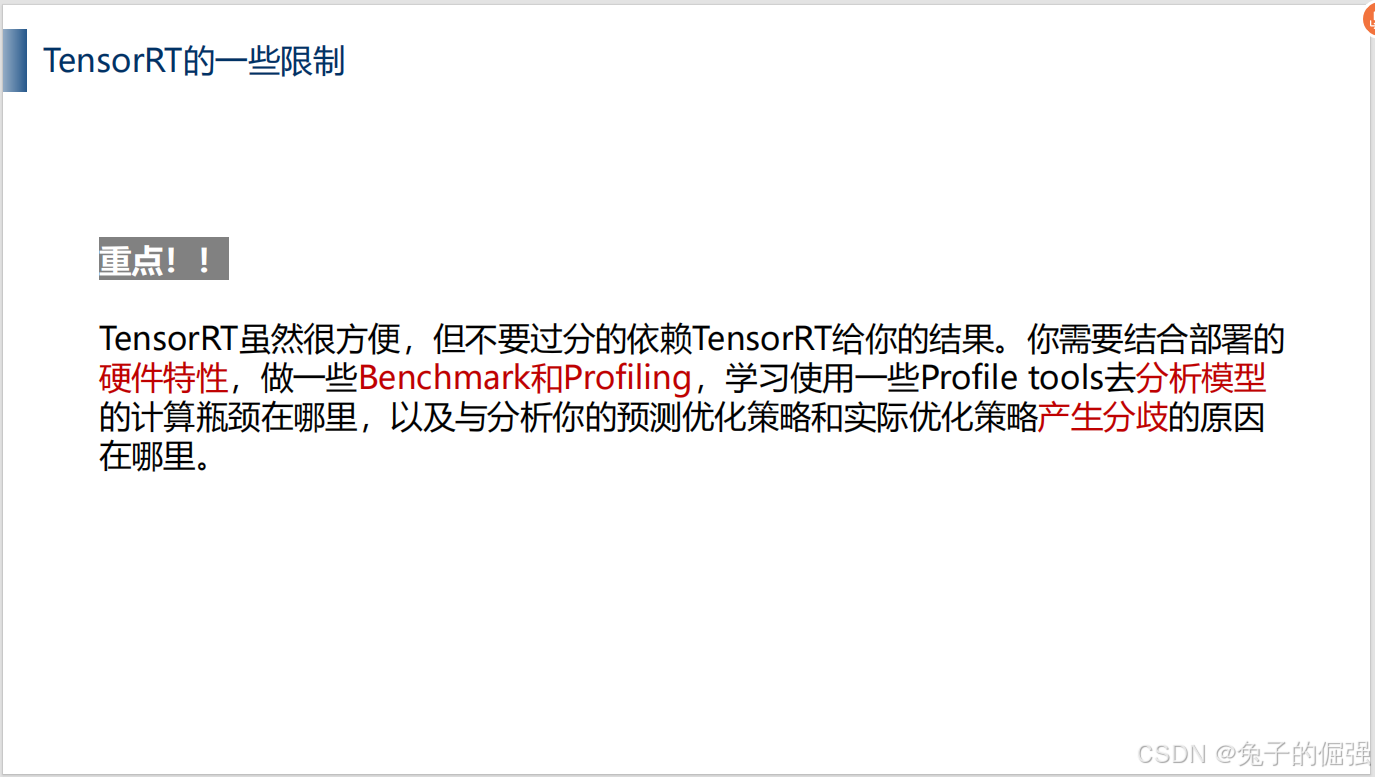
tensorrt使用中存在的问题以及解决方案
tensorrt的应用场景
自动驾驶模型部署需要关注的问题:
边端硬件资源有限
散热(不能水冷)
实时性:15/30fps 局部提高分辨率,CPU与GPU异步
电力消耗:小于100w
tensorrt的模块
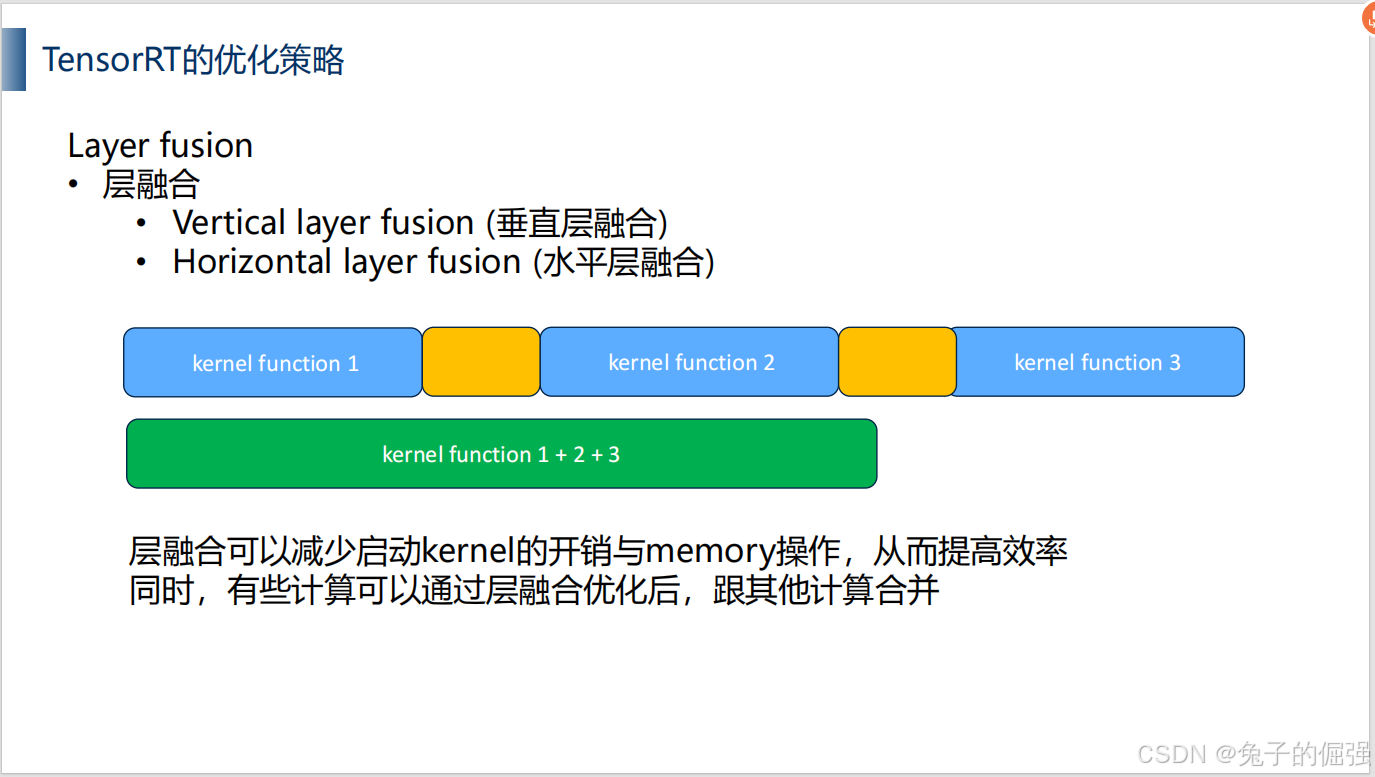
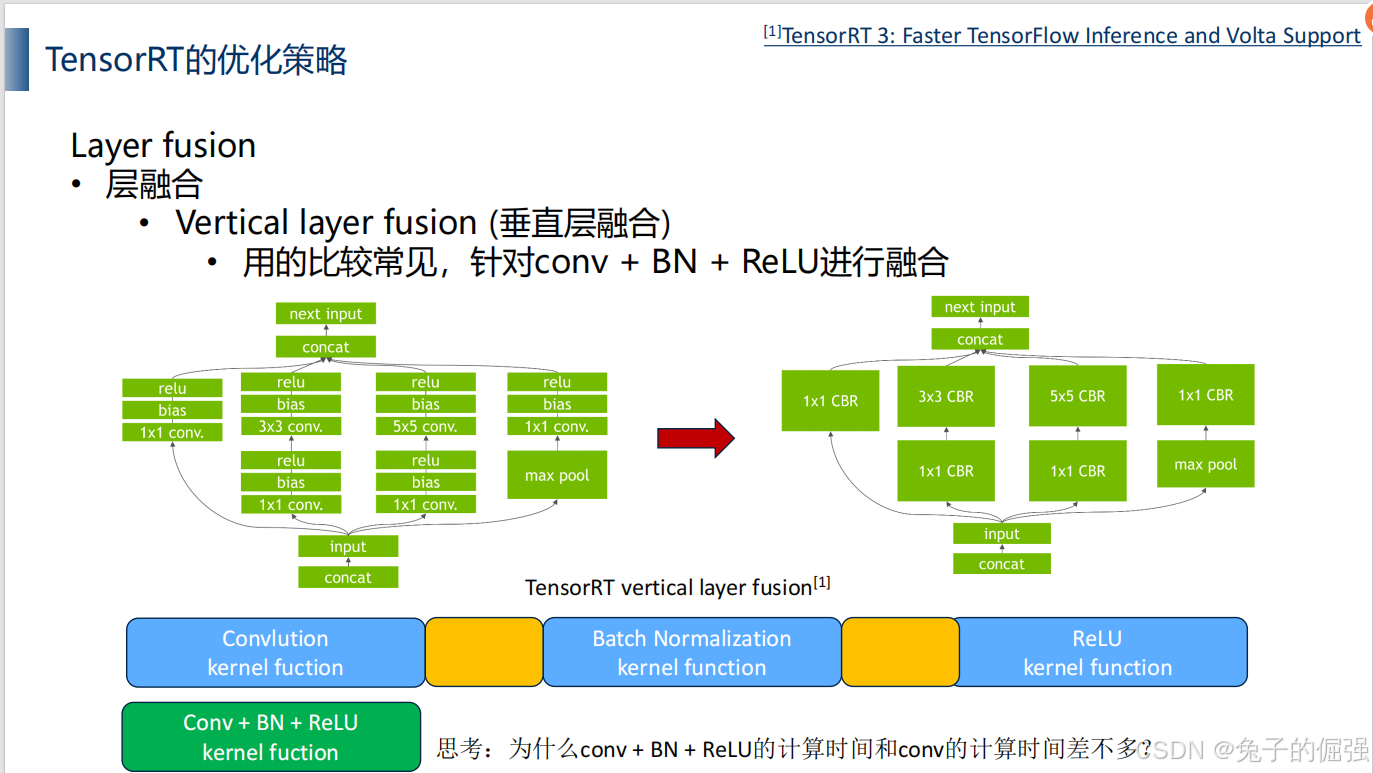
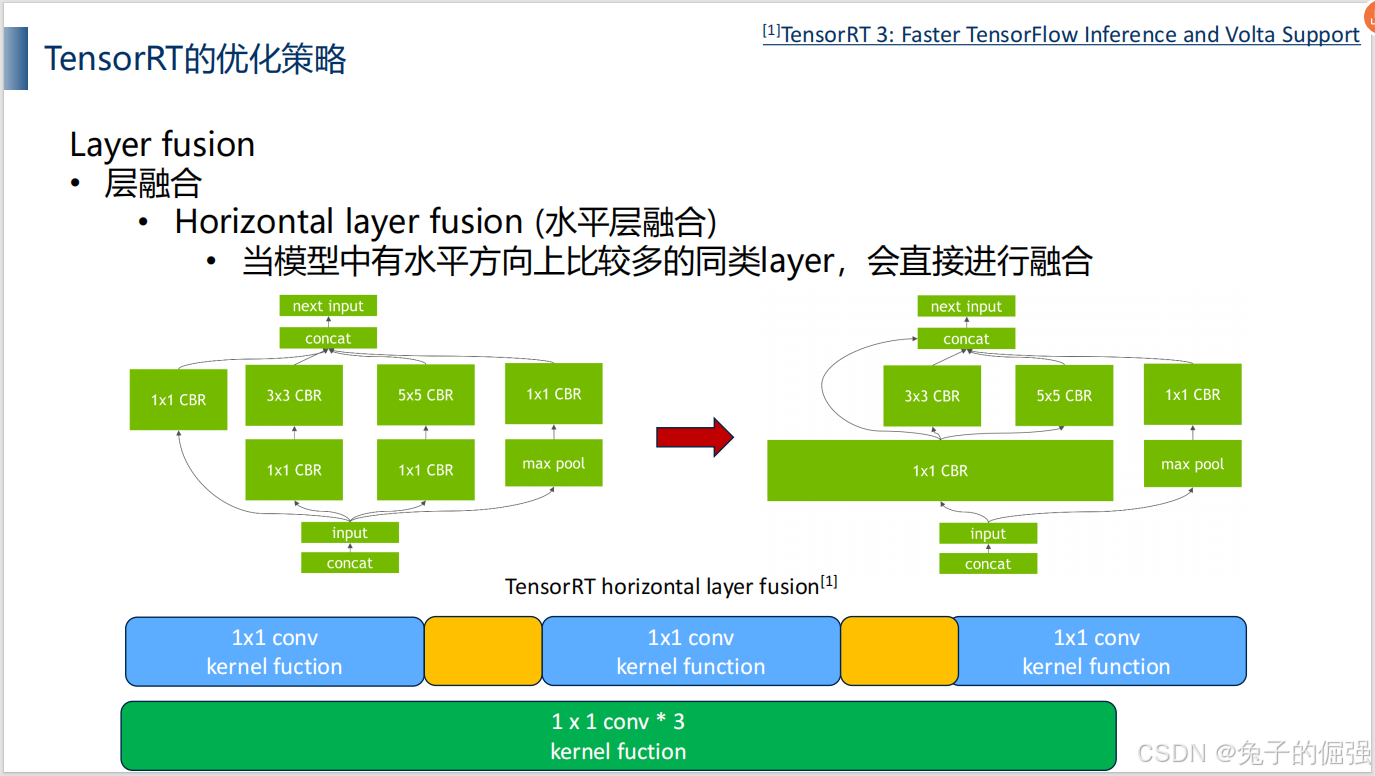
优化策略——层融合
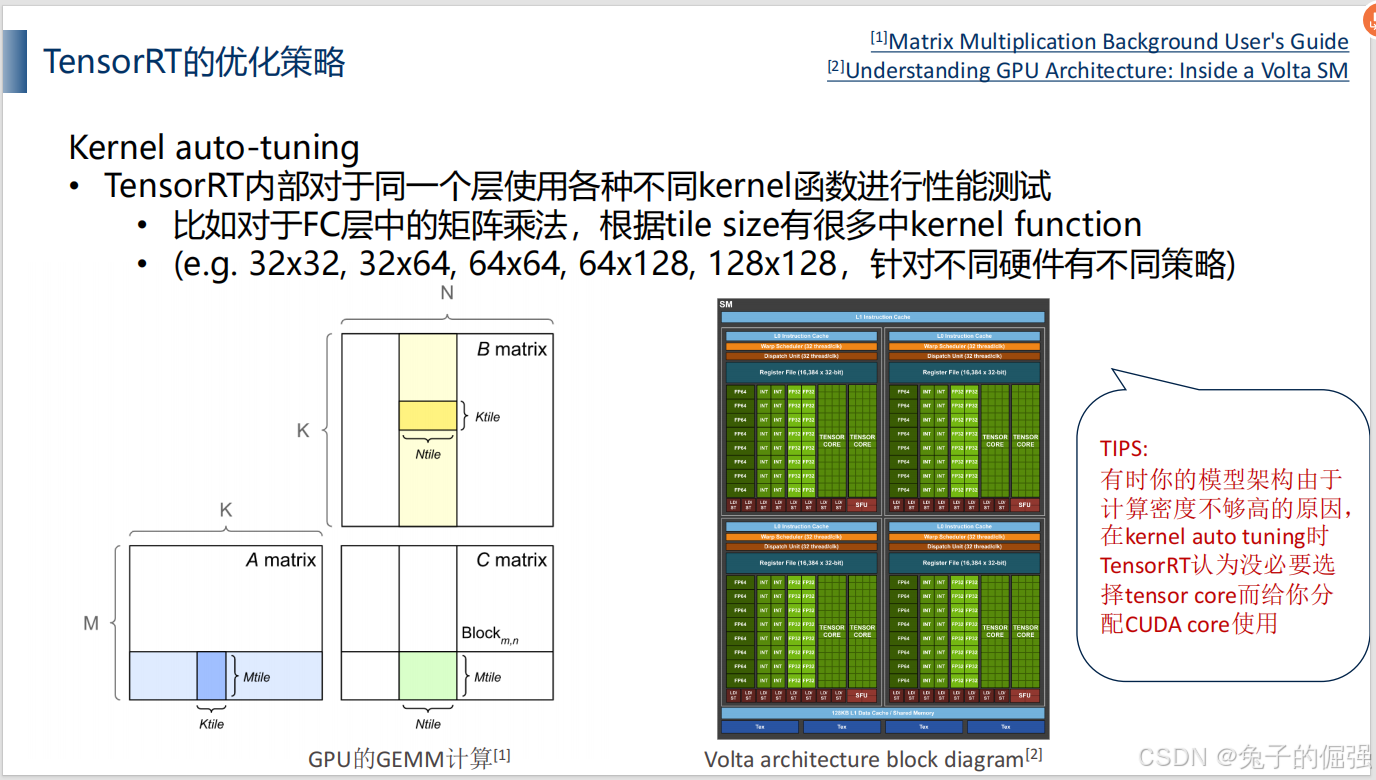
优化策略——kernel auto-tuning
在什么硬件上做部署,就要在相应硬件上做性能分析和优化。
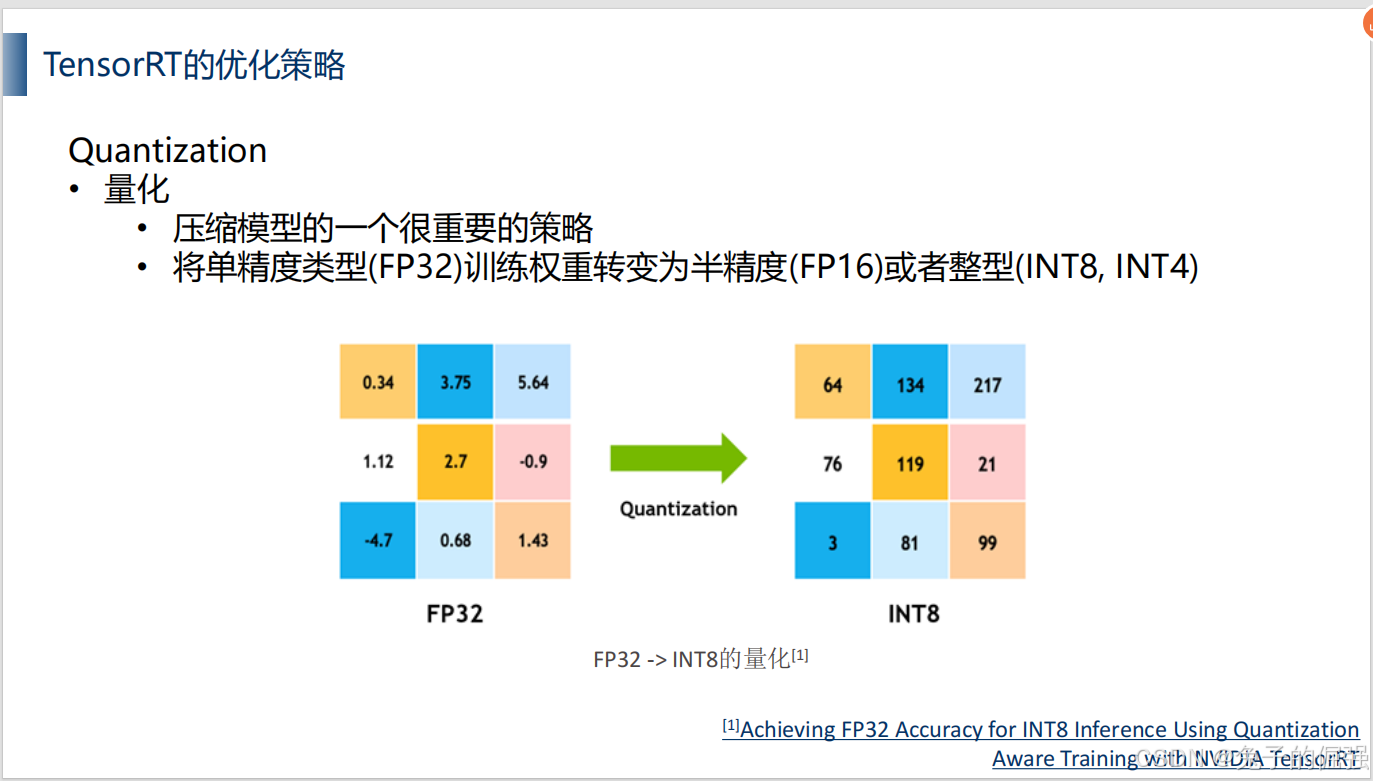
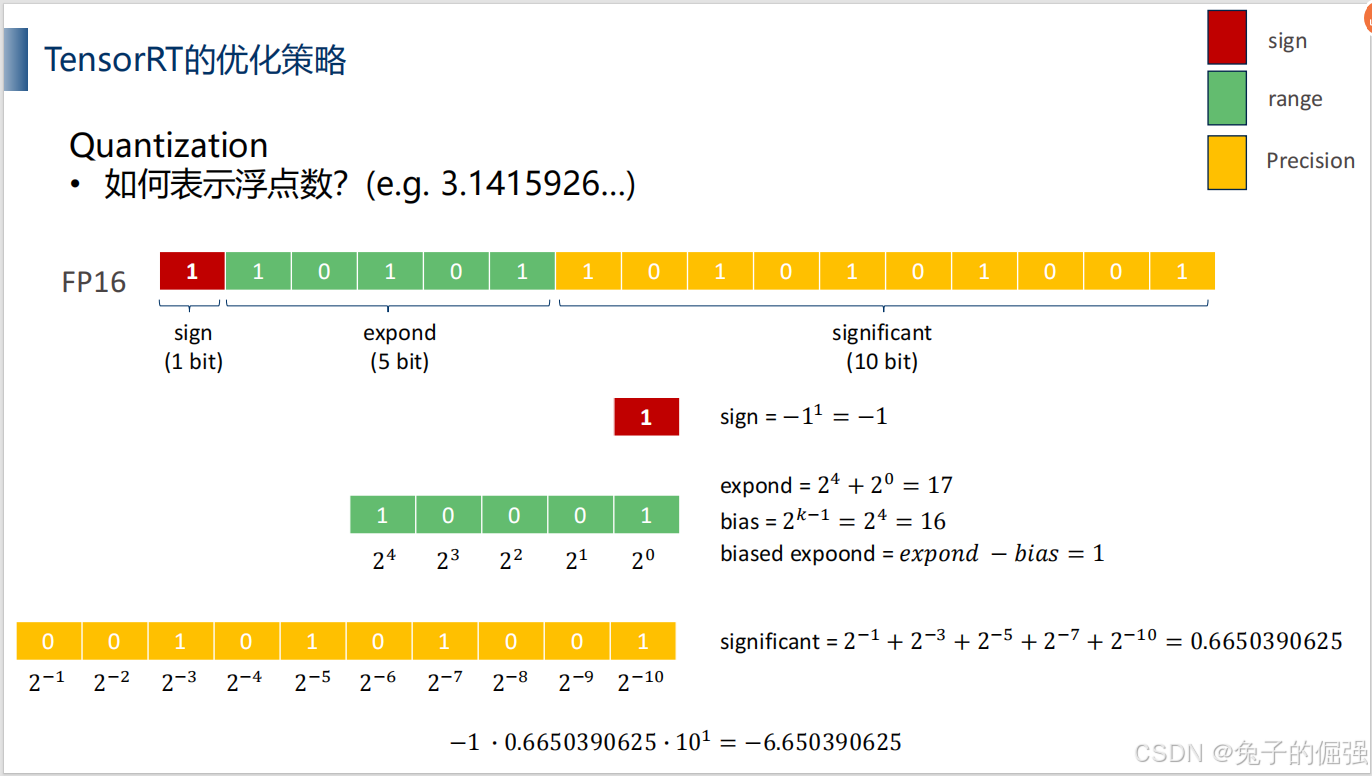
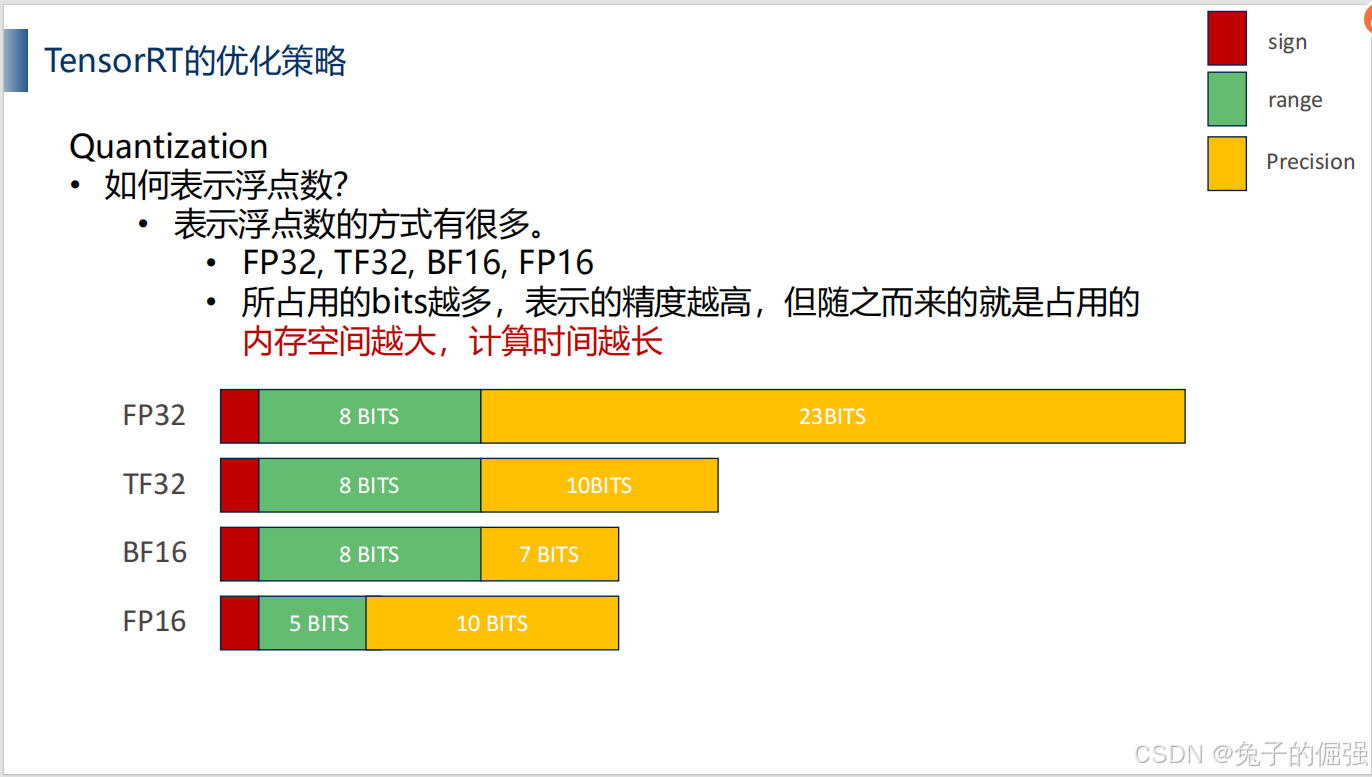
优化策略——量化
计算机中浮点数的表示:
混合精度训练:在Training的时候为了加快速度,也在使用量化的技巧。这个方法被称作Mixed precision training(混合精度学习),Baidu和NVIDIA发表在ICLR2018。
导出onnx,分析onnx
PyTorch导出ONNX的方法,以及onnxsimplify的使用
查看onnx
netron xxx.onnx --host 00.00.00.00 --post 22
导出onnx
举例为主
必要的安装包

torch.onnx.export
import torch
import torch.nn as nn
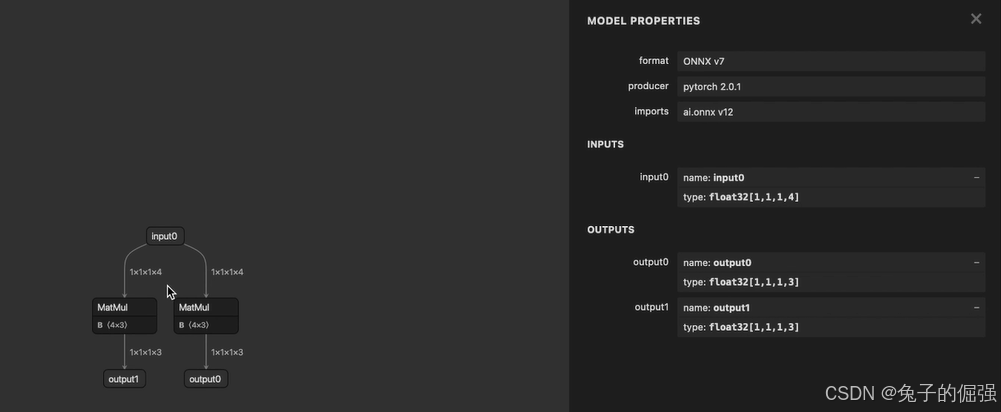
import torch.onnxclass Model(torch.nn.Module):def __init__(self, in_features, out_features, weights1, weights2, bias=False):super().__init__()self.linear1 = nn.Linear(in_features, out_features, bias)self.linear2 = nn.Linear(in_features, out_features, bias)with torch.no_grad():self.linear1.weight.copy_(weights1)self.linear2.weight.copy_(weights2)def forward(self, x):x1 = self.linear1(x)x2 = self.linear2(x)return x1, x2def infer():in_features = torch.tensor([1, 2, 3, 4], dtype=torch.float32)weights1 = torch.tensor([[1, 2, 3, 4],[2, 3, 4, 5],[3, 4, 5, 6]],dtype=torch.float32)weights2 = torch.tensor([[2, 3, 4, 5],[3, 4, 5, 6],[4, 5, 6, 7]],dtype=torch.float32)model = Model(4, 3, weights1, weights2)x1, x2 = model(in_features)print("result is: \n")print(x1)print(x2)def export_onnx():input = torch.zeros(1, 1, 1, 4)weights1 = torch.tensor([[1, 2, 3, 4],[2, 3, 4, 5],[3, 4, 5, 6]],dtype=torch.float32)weights2 = torch.tensor([[2, 3, 4, 5],[3, 4, 5, 6],[4, 5, 6, 7]],dtype=torch.float32)model = Model(4, 3, weights1, weights2)model.eval() #添加eval防止权重继续更新# pytorch导出onnx的方式,参数有很多,也可以支持动态sizetorch.onnx.export(model = model, args = (input,),f = "../models/example_two_head.onnx",input_names = ["input0"],output_names = ["output0", "output1"],opset_version = 12)print("Finished onnx export")if __name__ == "__main__":infer()export_onnx()netron可视化onnx如下:
动态shape
import torch
import torch.nn as nn
import torch.onnxclass Model(torch.nn.Module):def __init__(self, in_features, out_features, weights, bias=False):super().__init__()self.linear = nn.Linear(in_features, out_features, bias)with torch.no_grad():self.linear.weight.copy_(weights)def forward(self, x):x = self.linear(x)return xdef infer():in_features = torch.tensor([1, 2, 3, 4], dtype=torch.float32)weights = torch.tensor([[1, 2, 3, 4],[2, 3, 4, 5],[3, 4, 5, 6]],dtype=torch.float32)model = Model(4, 3, weights)x = model(in_features)print("result of {1, 1, 1 ,4} is ", x.data)def export_onnx():input   = torch.zeros(1, 1, 1, 4)weights = torch.tensor([[1, 2, 3, 4],[2, 3, 4, 5],[3, 4, 5, 6]],dtype=torch.float32)model   = Model(4, 3, weights)model.eval() #添加eval防止权重继续更新# pytorch导出onnx的方式,参数有很多,也可以支持动态sizetorch.onnx.export(model         = model, args          = (input,),f             = "../models/example_dynamic_shape.onnx",input_names   = ["input0"],output_names  = ["output0"],# 允许输入输出的形状不定,batch可以替换成其他名字dynamic_axes  = {'input0':  {0: 'batch'},'output0': {0: 'batch'}},opset_version = 12)print("Finished onnx export")if __name__ == "__main__":infer()export_onnx()
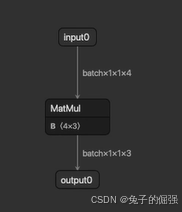
netron可视化如下:
onnxsim
import torch
import torch.nn as nn
import torch.onnx
import onnxsim
import onnxclass Model(torch.nn.Module):def __init__(self):super().__init__()self.conv1   = nn.Conv2d(in_channels=3, out_channels=16, kernel_size=3, padding=1)self.bn1     = nn.BatchNorm2d(num_features=16)self.act1    = nn.ReLU()self.conv2   = nn.Conv2d(in_channels=16, out_channels=64, kernel_size=5, padding=2)self.bn2     = nn.BatchNorm2d(num_features=64)self.act2    = nn.ReLU()self.avgpool = nn.AdaptiveAvgPool1d(1)self.head    = nn.Linear(in_features=64, out_features=10)def forward(self, x):x = self.conv1(x)x = self.bn1(x)x = self.act1(x)x = self.conv2(x)x = self.bn2(x)x = self.act2(x) x = torch.flatten(x, 2, 3)  # B, C, H, W -> B, C, L (这一个过程产生了shape->slice->concat->reshape这一系列计算节点, 思考为什么)# b, c, w, h = x.shape# x = x.reshape(b, c, w * h)# x = x.view(b, c, -1)x = self.avgpool(x)         # B, C, L    -> B, C, 1x = torch.flatten(x, 1)     # B, C, 1    -> B, Cx = self.head(x)            # B, L       -> B, 10return xdef export_norm_onnx():input   = torch.rand(1, 3, 64, 64)model   = Model()file    = "../models/sample-reshape.onnx"torch.onnx.export(model         = model, args          = (input,),f             = file,input_names   = ["input0"],output_names  = ["output0"],opset_version = 15)print("Finished normal onnx export")model_onnx = onnx.load(file)# 检查导入的onnx modelonnx.checker.check_model(model_onnx)# 使用onnx-simplifier来进行onnx的简化。# 可以试试把这个简化给注释掉,看看flatten操作在简化前后的区别# onnx中其实会有一些constant value,以及不需要计算图跟踪的节点# 大家可以一起从netron中看看这些节点都在干什么print(f"Simplifying with onnx-simplifier {onnxsim.__version__}...")model_onnx, check = onnxsim.simplify(model_onnx)assert check, "assert check failed"onnx.save(model_onnx, file)if __name__ == "__main__":export_norm_onnx()
简化前:
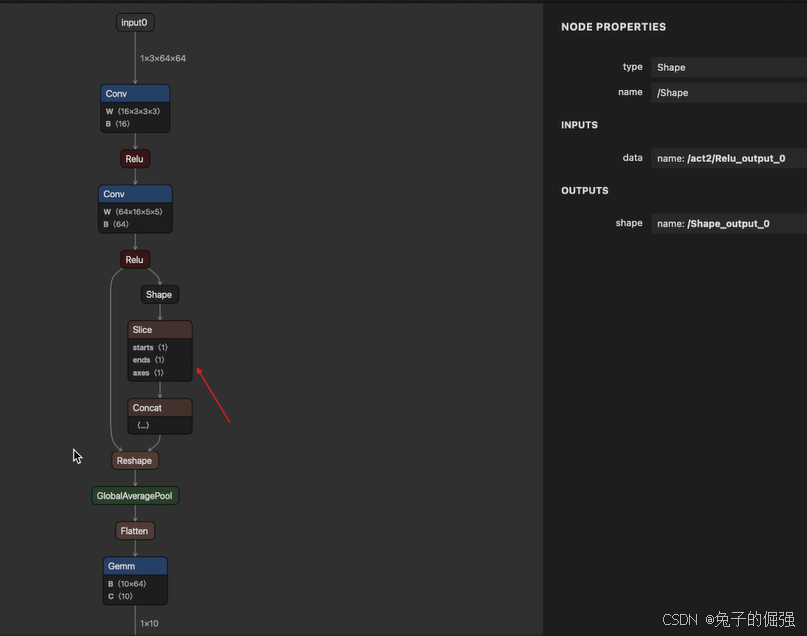
pytorch模型中使用的是flatten算子,而导出的onnx会变复杂的原因:B H W的值不执行到这里是不知道的,导出onnx的时候会做每一步计算的追踪,算出所有计算节点,做一个计算图?
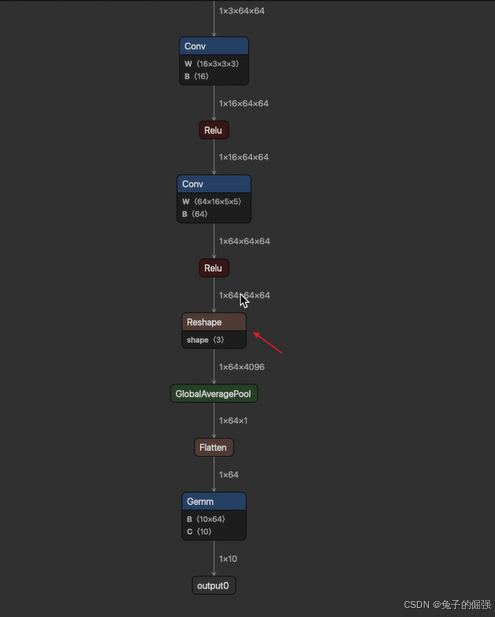
简化后:
torchvision
有许多现成的模型,可以直接调用
import torch
import torchvision
import onnxsim
import onnx
import argparsedef get_model(type, dir):if type == "resnet":model = torchvision.models.resnet50()file  = dir + "resnet50.onnx"elif type == "vgg":model = torchvision.models.vgg11()file  = dir + "vgg11.onnx"elif type == "mobilenet":model = torchvision.models.mobilenet_v3_small()file  = dir + "mobilenetV3.onnx"elif type == "efficientnet":model = torchvision.models.efficientnet_b0()file  = dir + "efficientnetb0.onnx"elif type == "efficientnetv2":model = torchvision.models.efficientnet_v2_s()file  = dir + "efficientnetV2.onnx"elif type == "regnet":model = torchvision.models.regnet_x_1_6gf()file  = dir + "regnet1.6gf.onnx"return model, filedef export_norm_onnx(model, file, input):model.cuda()torch.onnx.export(model         = model, args          = (input,),f             = file,input_names   = ["input0"],output_names  = ["output0"],opset_version = 15)print("Finished normal onnx export")model_onnx = onnx.load(file)# 检查导入的onnx modelonnx.checker.check_model(model_onnx)# 使用onnx-simplifier来进行onnx的简化。print(f"Simplifying with onnx-simplifier {onnxsim.__version__}...")model_onnx, check = onnxsim.simplify(model_onnx)assert check, "assert check failed"onnx.save(model_onnx, file)def main(args):type        = args.typedir         = args.dirinput       = torch.rand(1, 3, 224, 224, device='cuda')model, file = get_model(type, dir)export_norm_onnx(model, file, input)if __name__ == "__main__":parser = argparse.ArgumentParser()parser.add_argument("-t", "--type", type=str, default="resnet")parser.add_argument("-d", "--dir", type=str, default="../models/")opt = parser.parse_args()main(opt)
剖析ONNX架构并理解ProtoBuf
ONNX的Proto架构,使用onnx.helper创建onnx、修改onnx
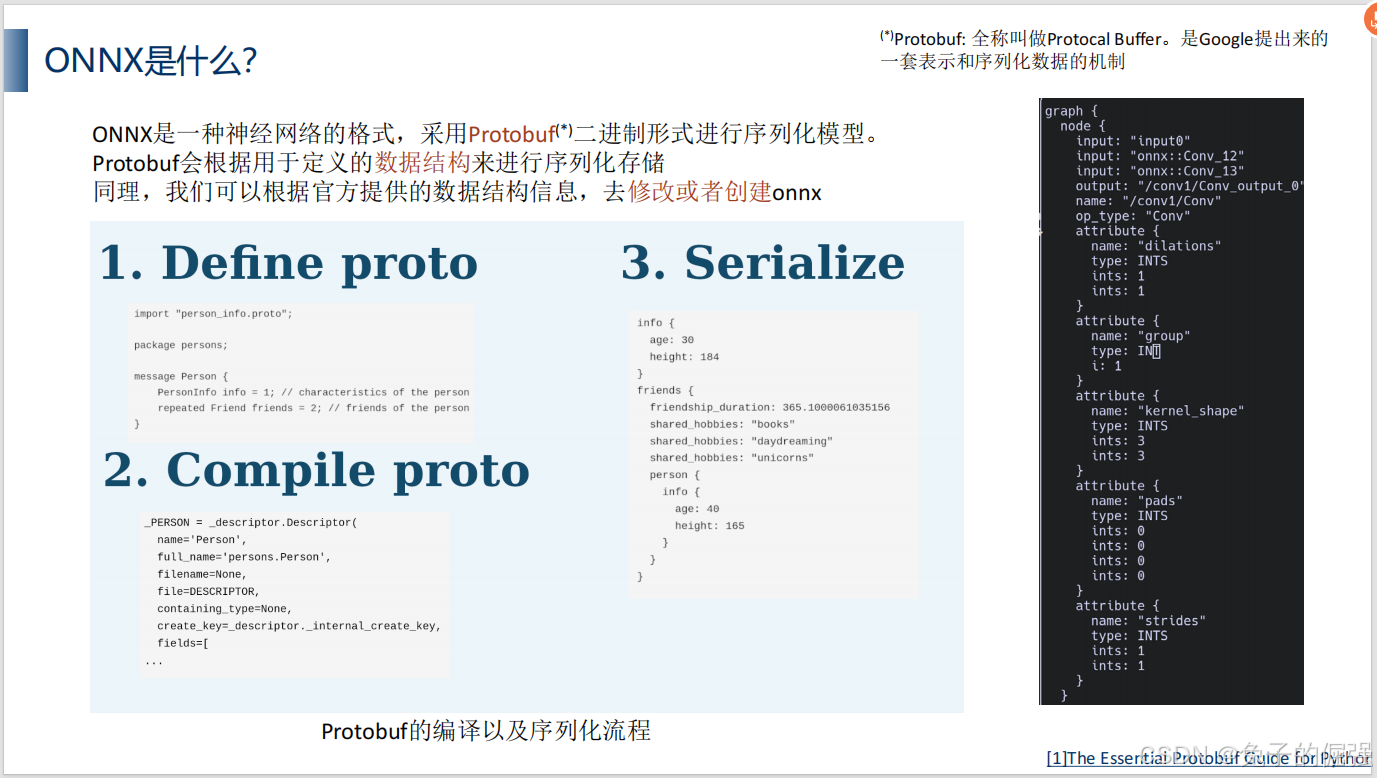
onnx是什么?
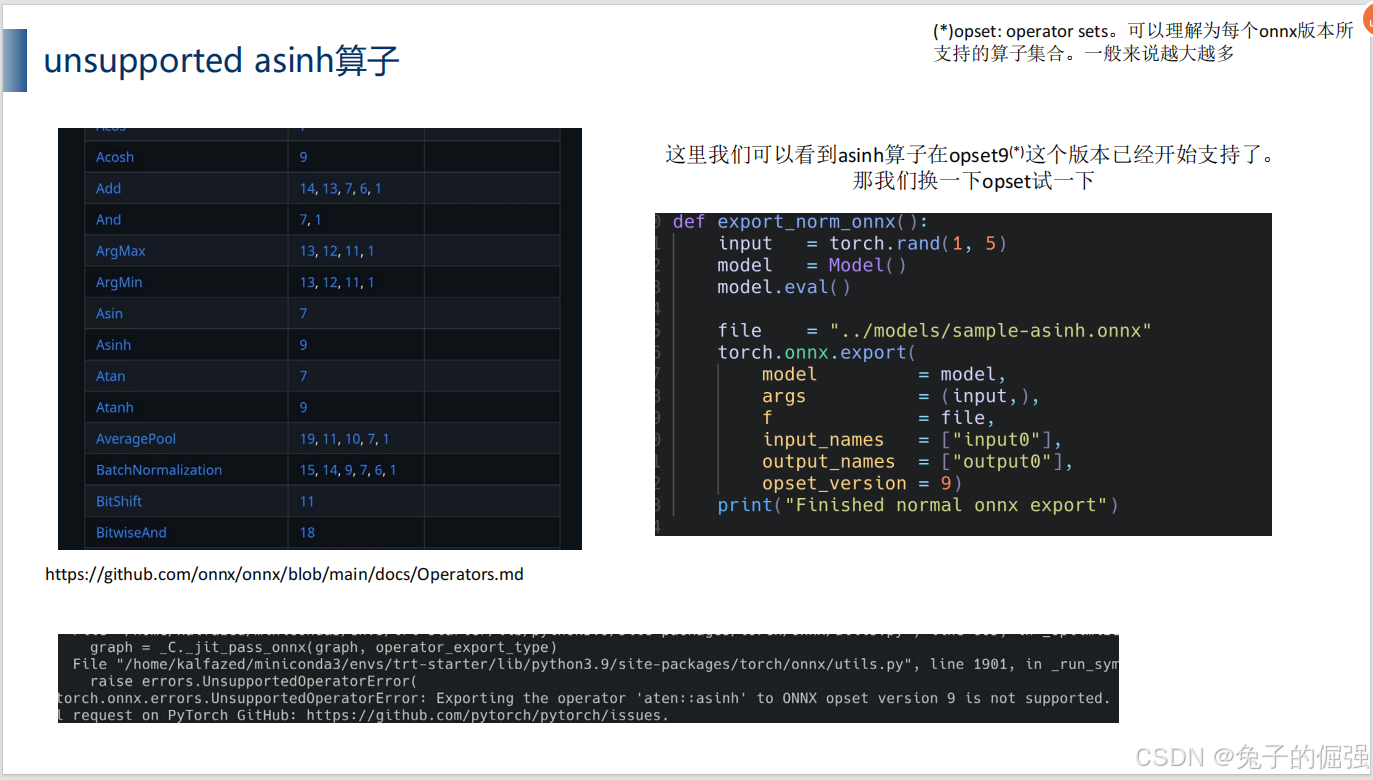
opset与版本对应情况:官网链接
实践发现导出onnx的时候,opset版本的指定与torch版本也有关。
使用onnx.helper创建onnx
import onnx
from onnx import helper
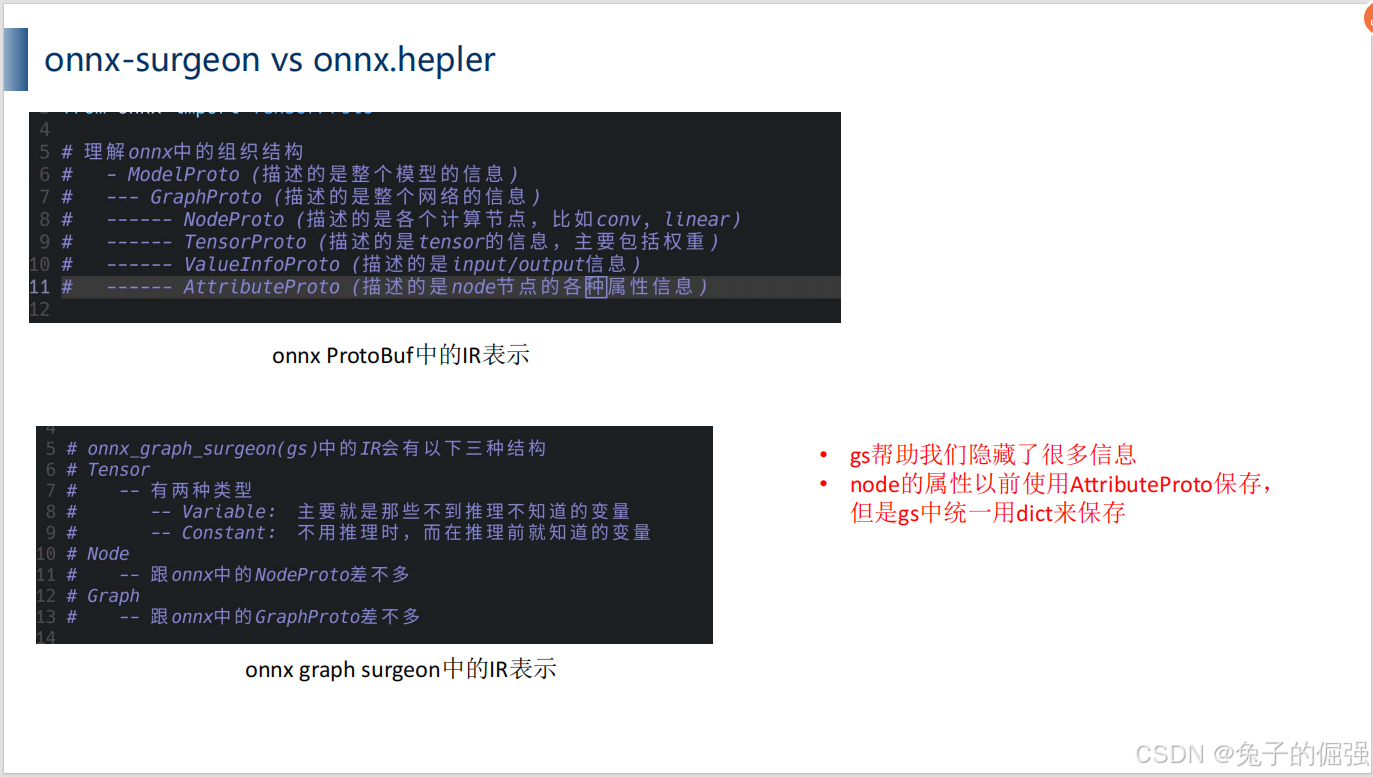
from onnx import TensorProto# 理解onnx中的组织结构
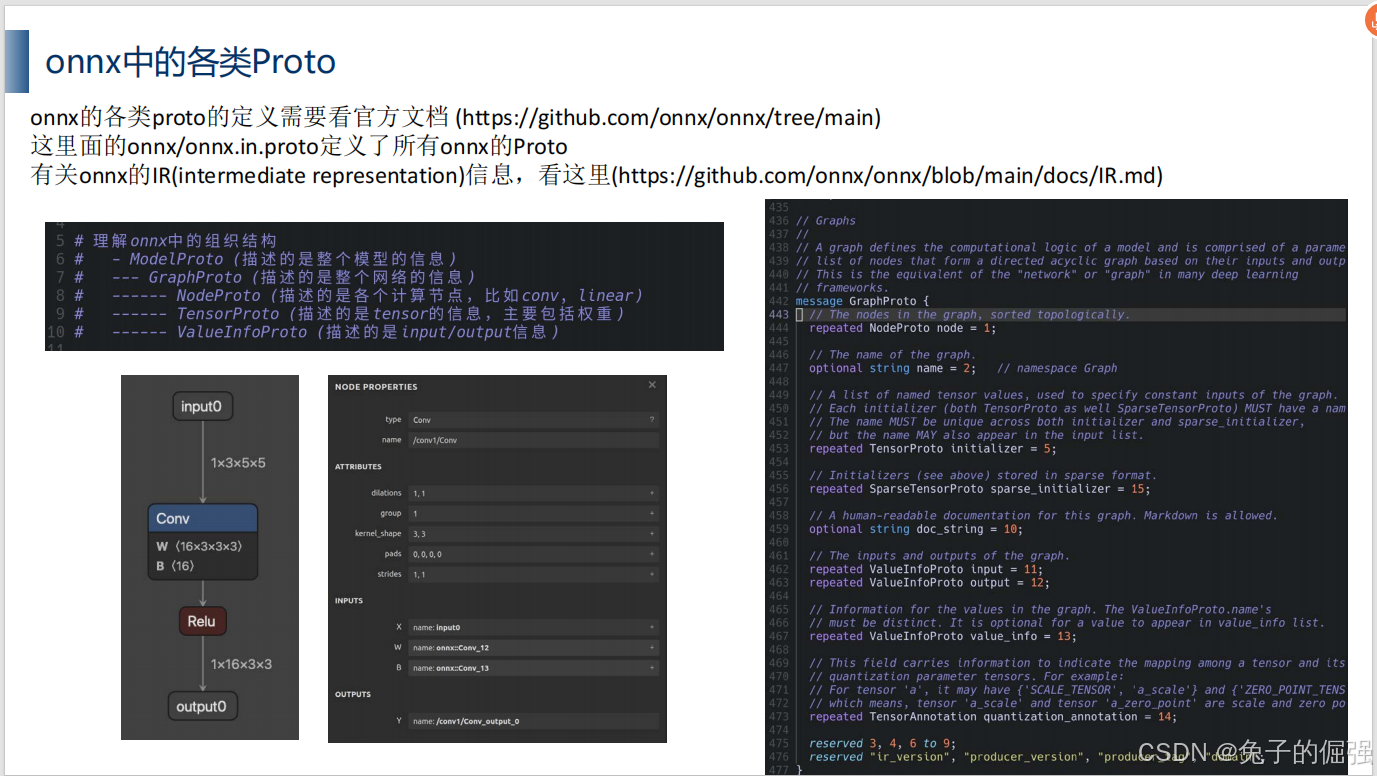
# - ModelProto (描述的是整个模型的信息)
# --- GraphProto (描述的是整个网络的信息)
# ------ NodeProto (描述的是各个计算节点,比如conv, linear)
# ------ TensorProto (描述的是tensor的信息,主要包括权重)
# ------ ValueInfoProto (描述的是input/output信息)
# ------ AttributeProto (描述的是node节点的各种属性信息)def create_onnx():# 创建ValueProtoa = helper.make_tensor_value_info('a', TensorProto.FLOAT, [10, 10])x = helper.make_tensor_value_info('x', TensorProto.FLOAT, [10, 10])b = helper.make_tensor_value_info('b', TensorProto.FLOAT, [10, 10])y = helper.make_tensor_value_info('y', TensorProto.FLOAT, [10, 10])# 创建NodeProtomul = helper.make_node('Mul', ['a', 'x'], 'c', "multiply")add = helper.make_node('Add', ['c', 'b'], 'y', "add")# 构建GraphProtograph = helper.make_graph([mul, add], 'sample-linear', [a, x, b], [y])# 构建ModelProtomodel = helper.make_model(graph)# 检查model是否有错误onnx.checker.check_model(model)# print(model)# 保存modelonnx.save(model, "../models/sample-linear.onnx")return modelif __name__ == "__main__":model = create_onnx()
使用onnx.helper解析onnx
import onnx
import numpy as np# 注意,因为weight是以字节的形式存储的,所以要想读,需要转变为float类型
def read_weight(initializer: onnx.TensorProto):shape = initializer.dimsdata  = np.frombuffer(initializer.raw_data, dtype=np.float32).reshape(shape)print("\n**************parse weight data******************")print("initializer info: \\n\tname:      {} \\n\tdata:    \n{}".format(initializer.name, data))def parse_onnx(model: onnx.ModelProto):graph        = model.graphinitializers = graph.initializernodes        = graph.nodeinputs       = graph.inputoutputs      = graph.outputprint("\n**************parse input/output*****************")for input in inputs:input_shape = []for d in input.type.tensor_type.shape.dim:if d.dim_value == 0:input_shape.append(None)else:input_shape.append(d.dim_value)print("Input info: \\n\tname:      {} \\n\tdata Type: {} \\n\tshape:     {}".format(input.name, input.type.tensor_type.elem_type, input_shape))for output in outputs:output_shape = []for d in output.type.tensor_type.shape.dim:if d.dim_value == 0:output_shape.append(None)else:output_shape.append(d.dim_value)print("Output info: \\n\tname:      {} \\n\tdata Type: {} \\n\tshape:     {}".format(input.name, output.type.tensor_type.elem_type, input_shape))print("\n**************parse node************************")for node in nodes:print("node info: \\n\tname:      {} \\n\top_type:   {} \\n\tinputs:    {} \\n\toutputs:   {}".format(node.name, node.op_type, node.input, node.output))print("\n**************parse initializer*****************")for initializer in initializers:print("initializer info: \\n\tname:      {} \\n\tdata_type: {} \\n\tshape:     {}".format(initializer.name, initializer.data_type, initializer.dims))
onnx注册算子
pytorch导出onnx不成功的时候如何解决(without plugin篇)
onnx导出不成功解题思路

接下来列举第三条:在pytorch注册onnx中某些算子的示例
问题1:onnx的opset中已经支持相应算子,但是导出onnx的时候出现算子不支持
查看当前算子注册情况:
参考路径:/home/user/miniconda3/envs/trt-starter/lib/python3.9/site-packages/torch/onnx
每个人的环境不尽相同,可以按照类似的路径去查找。
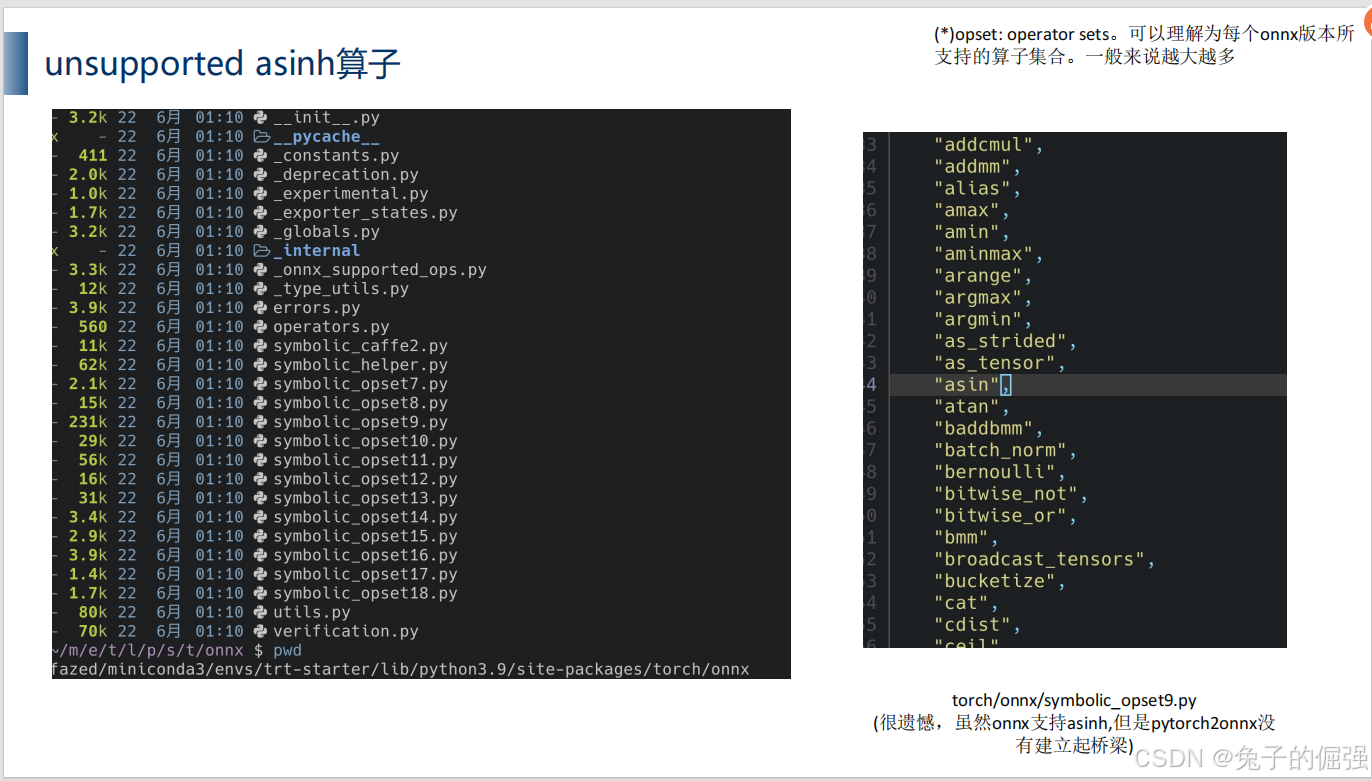
发现在onnx的operators.md中已经支持了asinh算子,但是pytorch2onnx中没有建立起桥梁。
算子注册方法
方法一:
import torch
import torch.onnx
import onnxruntime
from torch.onnx import register_custom_op_symbolic# 创建一个asinh算子的symblic,符号函数,用来登记
# 符号函数内部调用g.op, 为onnx计算图添加Asinh算子
#   g: 就是graph,计算图
#   也就是说,在计算图中添加onnx算子
#   由于我们已经知道Asinh在onnx是有实现的,所以我们只要在g.op调用这个op的名字就好了
#   symblic的参数需要与Pytorch的asinh接口函数的参数对齐
#       def asinh(input: Tensor, *, out: Optional[Tensor]=None) -> Tensor: ...
def asinh_symbolic(g, input, *, out=None):return g.op("Asinh", input)# 在这里,将asinh_symbolic这个符号函数,与PyTorch的asinh算子绑定。也就是所谓的“注册算子”
# asinh是在名为aten的一个c++命名空间下进行实现的# 那么aten是什么呢?
# aten是"a Tensor Library"的缩写,是一个实现张量运算的C++库
register_custom_op_symbolic('aten::asinh', asinh_symbolic, 12)# 这里容易混淆的地方:
# 1. register_op中的第一个参数是PyTorch中的算子名字: aten::asinh
# 2. g.op中的第一个参数是onnx中的算子名字: Asinhclass Model(torch.nn.Module):def __init__(self):super().__init__()def forward(self, x):x = torch.asinh(x)return xdef validate_onnx():input = torch.rand(1, 5)# PyTorch的推理model = Model()x     = model(input)print("result from Pytorch is :", x)# onnxruntime的推理sess  = onnxruntime.InferenceSession('../models/sample-asinh.onnx')x     = sess.run(None, {'input0': input.numpy()})print("result from onnx is:    ", x)def export_norm_onnx():input   = torch.rand(1, 5)model   = Model()model.eval()file    = "../models/sample-asinh.onnx"torch.onnx.export(model         = model, args          = (input,),f             = file,input_names   = ["input0"],output_names  = ["output0"],opset_version = 12)print("Finished normal onnx export")if __name__ == "__main__":export_norm_onnx()# 自定义完onnx以后必须要进行一下验证validate_onnx()
方法二:
import torch
import torch.onnx
import onnxruntime
import functools
from torch.onnx import register_custom_op_symbolic
from torch.onnx._internal import registration_onnx_symbolic = functools.partial(registration.onnx_symbolic, opset=9)# 另外一个写法
#    这个是类似于torch/onnx/symbolic_opset*.py中的写法
#    通过torch._internal中的registration来注册这个算子,让这个算子可以与底层C++实现的aten::asinh绑定
#    一般如果这么写的话,其实可以把这个算子直接加入到torch/onnx/symbolic_opset*.py中
@_onnx_symbolic('aten::asinh')
def asinh_symbolic(g, input, *, out=None):return g.op("Asinh", input)class Model(torch.nn.Module):def __init__(self):super().__init__()def forward(self, x):x = torch.asinh(x)return xdef validate_onnx():input = torch.rand(1, 5)# PyTorch的推理model = Model()x     = model(input)print("result from Pytorch is :", x)# onnxruntime的推理sess  = onnxruntime.InferenceSession('../models/sample-asinh2.onnx')x     = sess.run(None, {'input0': input.numpy()})print("result from onnx is:    ", x)def export_norm_onnx():input   = torch.rand(1, 5)model   = Model()model.eval()file    = "../models/sample-asinh2.onnx"torch.onnx.export(model         = model, args          = (input,),f             = file,input_names   = ["input0"],output_names  = ["output0"],opset_version = 12)print("Finished normal onnx export")if __name__ == "__main__":export_norm_onnx()# 自定义完onnx以后必须要进行一下验证validate_onnx()
问题2:onnx中不支持相关算子
以torchvision.ops.DeformConv2d为例
算子注册
import torch
import torch.nn as nn
import torchvision
import torch.onnx
import onnxruntime
from torch.onnx import register_custom_op_symbolic
from torch.onnx.symbolic_helper import parse_args# 注意
#   这里需要把args的各个参数的类型都指定
#   这里还没有实现底层对deform_conv2d的实现
#   具体dcn的底层实现是在c++完成的,这里会在后面的TensorRT plugin中回到这里继续讲这个案例
#   这里先知道对于不支持的算子,onnx如何导出即可
@parse_args("v", "v", "v", "v", "v", "i", "i", "i", "i", "i","i", "i", "i", "none")
def dcn_symbolic(g,input,weight,offset,mask,bias,stride_h, stride_w,pad_h, pad_w,dil_h, dil_w,n_weight_grps,n_offset_grps,use_mask):return g.op("custom::deform_conv2d", input, offset)register_custom_op_symbolic("torchvision::deform_conv2d", dcn_symbolic, 12)class Model(torch.nn.Module):def __init__(self):super().__init__()self.conv1 = nn.Conv2d(3, 18, 3)self.conv2 = torchvision.ops.DeformConv2d(3, 3, 3)def forward(self, x):x = self.conv2(x, self.conv1(x))return xdef validate_onnx():input = torch.rand(1, 3, 5, 5)# PyTorch的推理model = Model()x     = model(input)print("result from Pytorch is :", x)# onnxruntime的推理sess  = onnxruntime.InferenceSession('../models/sample-deformable-conv.onnx')x     = sess.run(None, {'input0': input.numpy()})print("result from onnx is:    ", x)def infer():input = torch.rand(1, 3, 5, 5)model = Model()x = model(input)print("input is: ", input.data)print("result is: ", x.data)def export_norm_onnx():input   = torch.rand(1, 3, 5, 5)model   = Model()model.eval()file    = "../models/sample-deformable-conv.onnx"torch.onnx.export(model         = model, args          = (input,),f             = file,input_names   = ["input0"],output_names  = ["output0"],opset_version = 12)print("Finished normal onnx export")if __name__ == "__main__":# infer()export_norm_onnx()validate_onnx()
上述只是注册了相关的算子,并没有提供相关C++实现,只能实现onnx的顺利导出,但是不能使用onnxruntime运行。
算子c++实现(待补充)
onnx-graph-surgeon
使用onnx-surgeon,比较与onnx.helper的区别,学习快速修改onnx以及替换算子/创建算子的技巧
安装
python3 -m pip install onnx_graphsurgeon --index-url https://pypi.ngc.nvidia.com
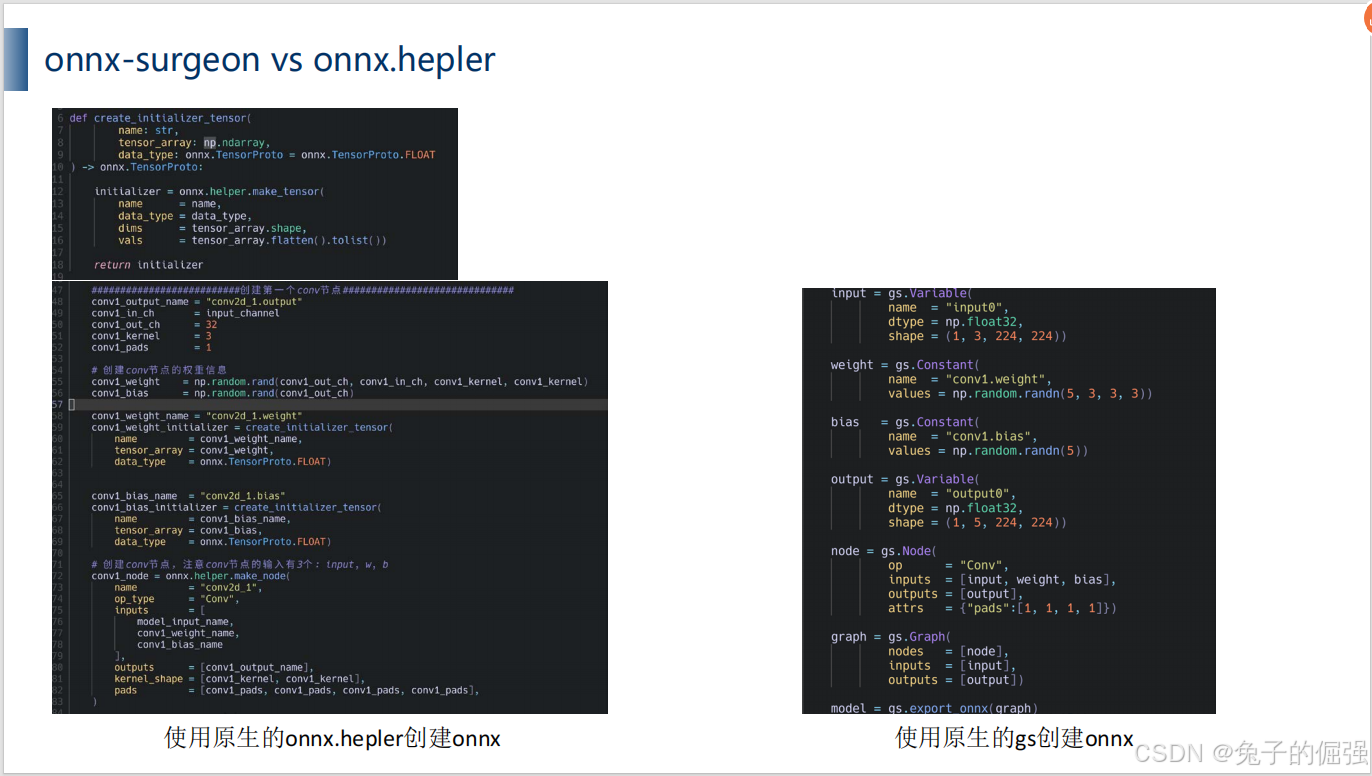
onnx-surgeon 与onnx.helper的区别
创建onnx方面的区别

与polygraphy结合使用
保存子图
import onnx_graphsurgeon as gs
import numpy as np
import onnxdef load_model(model : onnx.ModelProto):graph = gs.import_onnx(model)print(graph.inputs)print(graph.outputs)def main() -> None:model = onnx.load("../models/swin-tiny.onnx")graph = gs.import_onnx(model)tensors = graph.tensors()# LayerNorm部分 print(tensors["374"])  # LN的input1: 1 x 3136 x 128print(tensors["375"])  # LN的input2: 1 x 3136 x 1print(tensors["383"])  # LN的输出:   1 x 3136 x 128graph.inputs = [tensors["374"].to_variable(dtype=np.float32, shape=(1, 3136, 128))]graph.outputs = [tensors["383"].to_variable(dtype=np.float32, shape=(1, 3136, 128))]graph.cleanup()onnx.save(gs.export_onnx(graph), "../models/swin-subgraph-LN.onnx")# MHSA部分graph = gs.import_onnx(model)tensors = graph.tensors()print(tensors["457"])   # MHSA输入matmul:       64 x 49 x 128print(tensors["5509"])  # MHSA输入matmul的权重: 128 x 384print(tensors["5518"])  # MHSA输出matmul的权重: 128 x 128print(tensors["512"])   # MHSA输出:             64 x 49 x 128graph.inputs = [tensors["457"].to_variable(dtype=np.float32, shape=(64, 49, 128))]graph.outputs = [tensors["512"].to_variable(dtype=np.float32, shape=(64, 49, 128))]graph.cleanup()onnx.save(gs.export_onnx(graph), "../models/swin-subgraph-MSHA.onnx")# 我们想把swin中LayerNorm中的这一部分单独拿出来
if __name__ == "__main__":main()
结合polygraphy进行分析(待补充)
与TensorRT plugin结合使用
onnx算子融合/替换
import onnx_graphsurgeon as gs
import numpy as np
import onnx
import onnxruntime
import torch#####################在graph注册调用的函数########################
@gs.Graph.register()
def min(self, *args):return self.layer(op="Min", inputs=args, outputs=["min_output"])@gs.Graph.register()
def max(self, *args):return self.layer(op="Max", inputs=args, outputs=["max_output"])@gs.Graph.register()
def identity(self, a):return self.layer(op="Identity", inputs=[a], outputs=["identity_output"])@gs.Graph.register()
def clip(self, inputs, outputs):return self.layer(op="Clip", inputs=inputs, outputs=outputs)#####################通过注册的函数进行创建网络########################
#          input (5, 5)
#            |
#         identity
#            |
#           min
#            |
#           max
#            |
#         identity
#            |
#          output (5, 5)
def create_onnx_graph():# 初始化网络的opsetgraph    = gs.Graph(opset=12)# 初始化网络需要用的参数min_val  = np.array(0, dtype=np.float32)max_val  = np.array(1, dtype=np.float32)input0   = gs.Variable(name="input0", dtype=np.float32, shape=(5, 5))# 设计网络架构identity0 = graph.identity(input0)min0      = graph.min(*identity0, max_val)max0      = graph.max(*min0, min_val)output0   = graph.identity(*max0)# 设置网络的输入输出graph.inputs = [input0]graph.outputs = output0# 设置网络的输出的数据类型for out in graph.outputs:out.dtype = np.float32# 保存模型onnx.save(gs.export_onnx(graph), "../models/sample-minmax.onnx")#####################通过注册的clip算子替换网络节点####################
#          input (5, 5)
#            |
#         identity
#            |
#           clip
#            |
#         identity
#            |
#          output (5, 5)
def change_onnx_graph():graph = gs.import_onnx(onnx.load_model('../models/sample-minmax.onnx'))tensors = graph.tensors()inputs = [tensors["identity_output_0"], tensors["onnx_graphsurgeon_constant_5"],tensors["onnx_graphsurgeon_constant_2"]]outputs = [tensors["max_output_6"]]# 因为要替换子网,所以需要把子网和周围的所有节点都断开联系for item in inputs:# print(item.outputs)item.outputs.clear()for item in outputs:# print(item.inputs)item.inputs.clear()# 通过注册的clip,重新把断开的联系链接起来graph.clip(inputs, outputs)# 删除所有额外的节点graph.cleanup()onnx.save(gs.export_onnx(graph), "../models/sample-minmax-to-clip.onnx")#####################验证模型##########################################
def validate_onnx_graph(input, path):sess   = onnxruntime.InferenceSession(path)output = sess.run(None, {'input0': input.numpy()})print("input is \n", input)print("output is \n", output)def main() -> None:input  = torch.Tensor(5, 5).uniform_(-1, 1)# 创建一个minmax的网络create_onnx_graph()# 通过onnxruntime确认导出onnx是否正确生成print("\nBefore modification:")validate_onnx_graph(input, "../models/sample-minmax.onnx")# 将minmax网络修改成clip网络change_onnx_graph()# 确认网络修改的结构是否正确print("\nAfter modification:")validate_onnx_graph(input, "../models/sample-minmax-to-clip.onnx")if __name__ == "__main__":main()
编写TensorRT plugin(待补充)
快速分析开源代码并导出onnx
以Swin Transformer为例学习快速导出onnx并分析onnx的方法
常规导出pipeline
swin_transformer的github源代码下载,按照readme配置环境,model build方式查找
编写基础导出onnx代码:
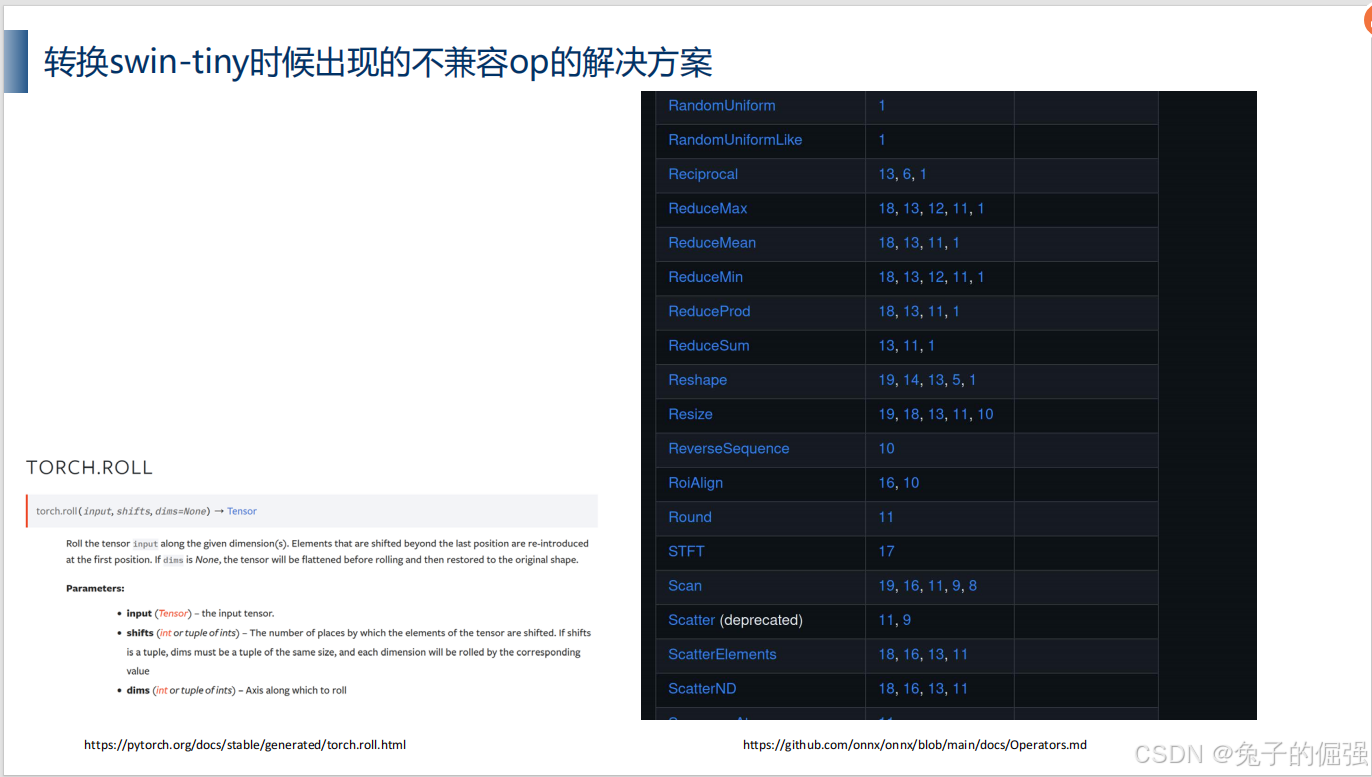
问题一:opset9中roll算子不兼容
运行脚本报错roll算子不支持,升级opset12继续尝试
问题二:opset12中roll算子不兼容
运行脚本报错roll算子不支持,考虑替换pytorch中的roll为其他算子,但是可以实现相同的功能;考虑注册onnx算子,此处尝试后者:
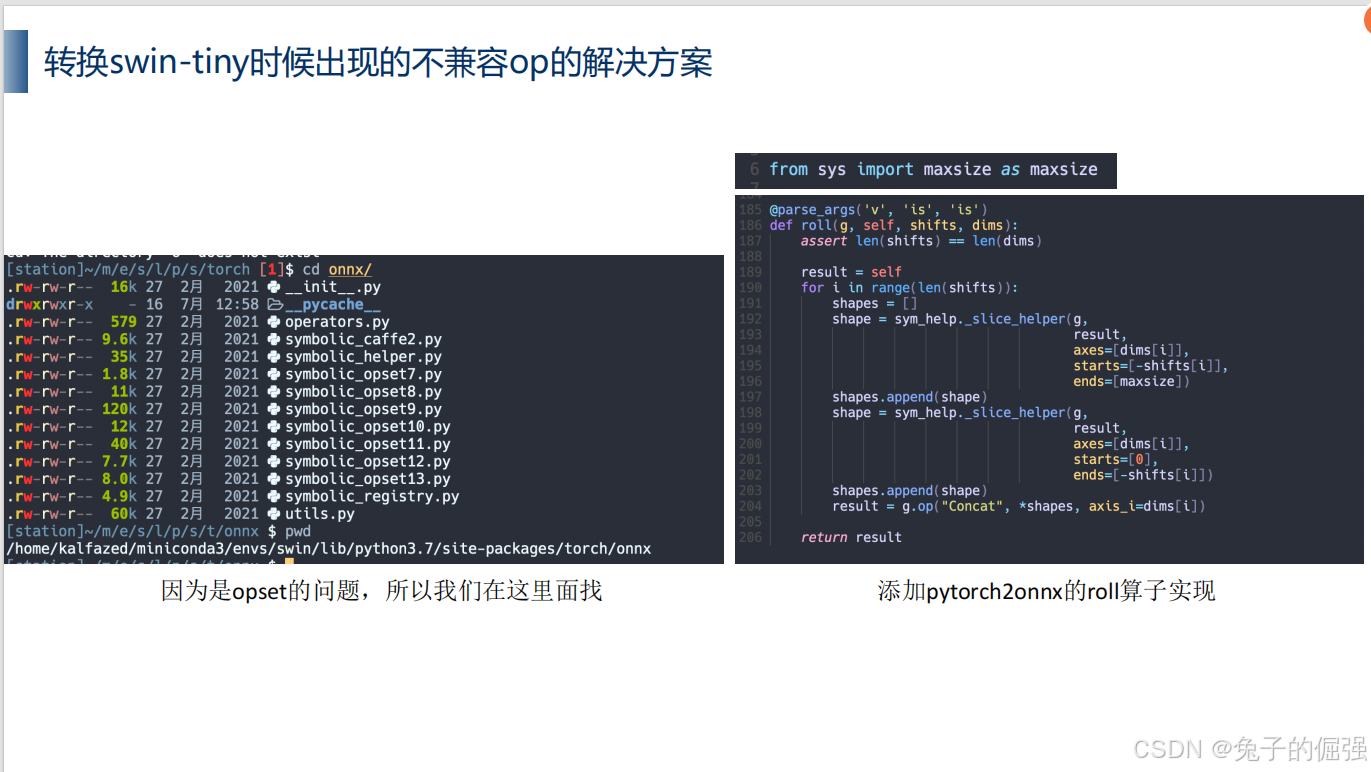
修改symbolic_opset12.py,添加roll算子实现;
此目录也可以看出当前环境的torch对opset版本的支持情况。
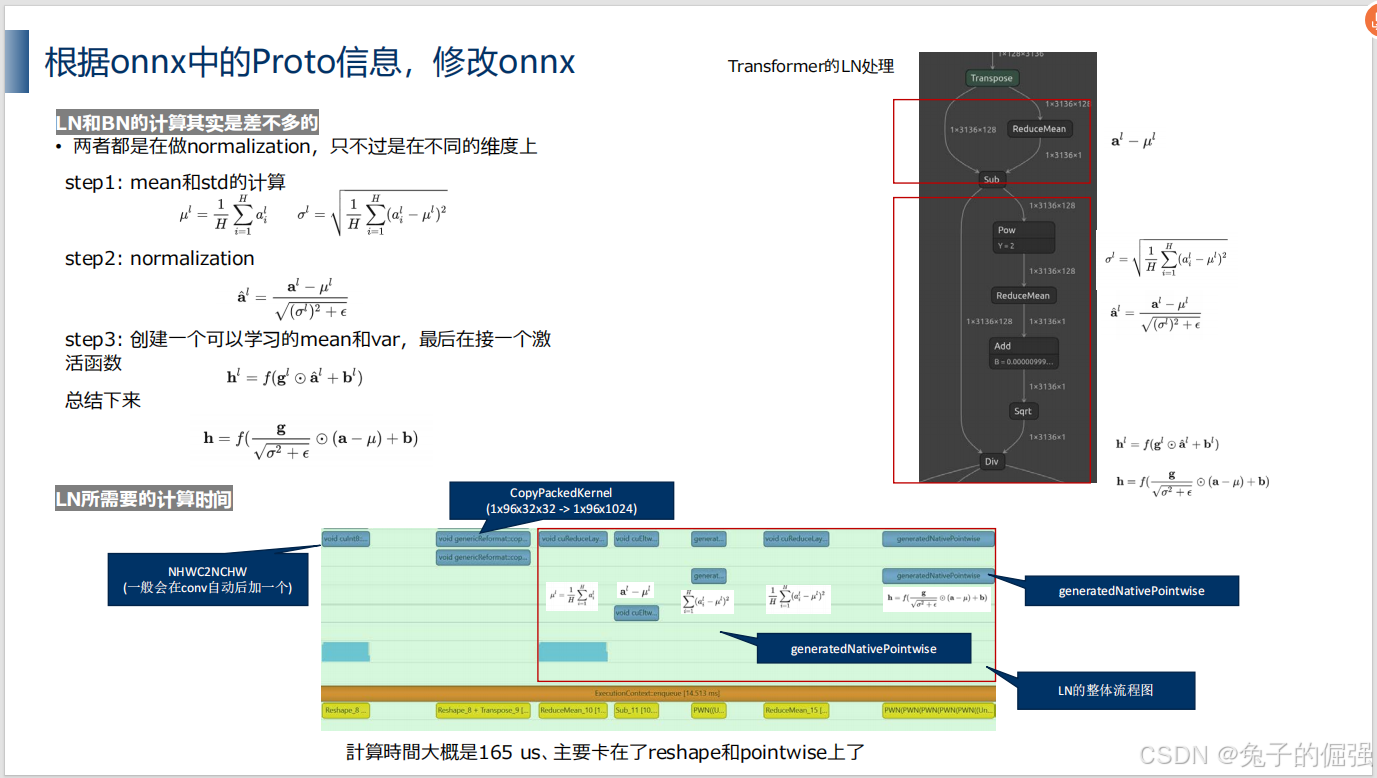
问题三:onnxsim对onnx的LN算子简化效果不佳
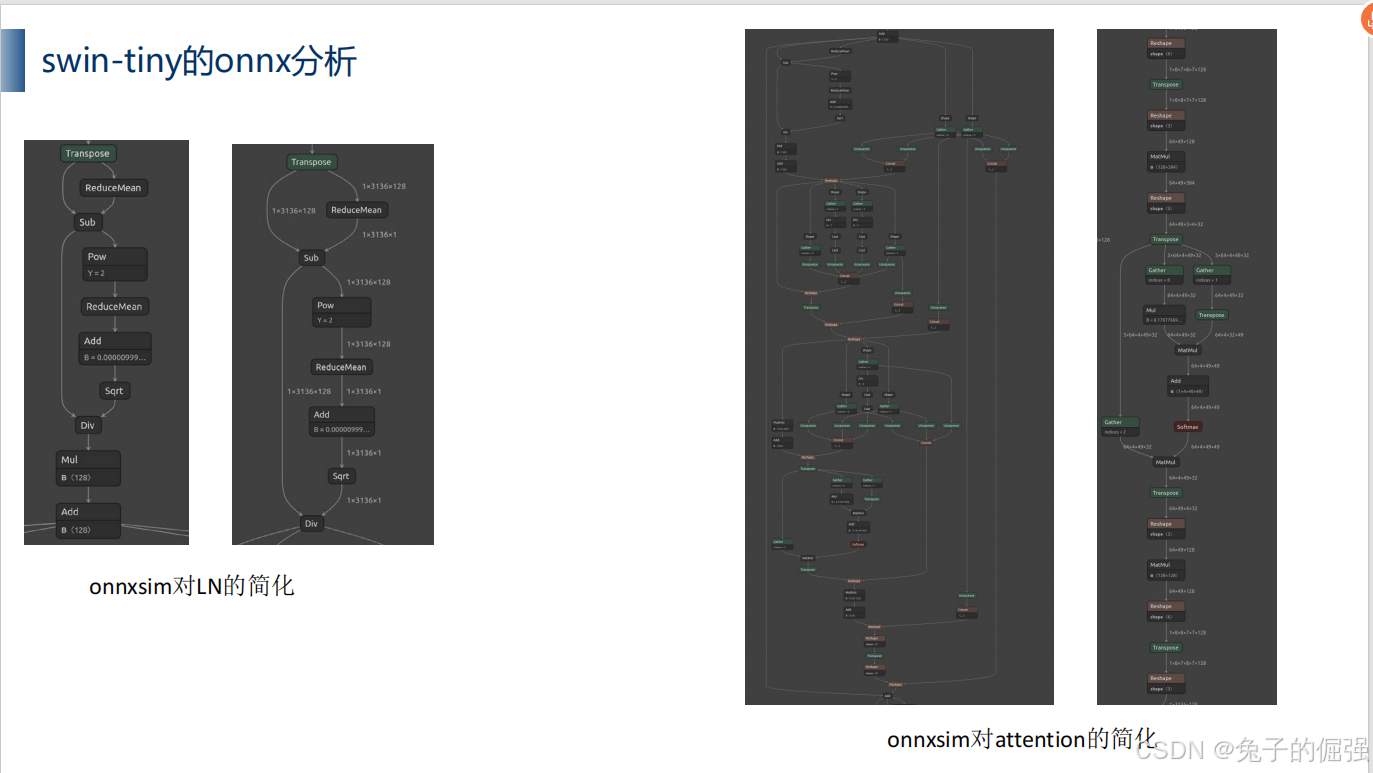
注册并实现LN算子:
查看更高版本opset与tensorrt对LN的支持情况:

运行脚本导出发现opset17不支持。
问题四:opset17与torch版本不兼容
升级torch以及cuda toolkit等环境依赖的版本,使得torch支持opset17
导出tensorrt
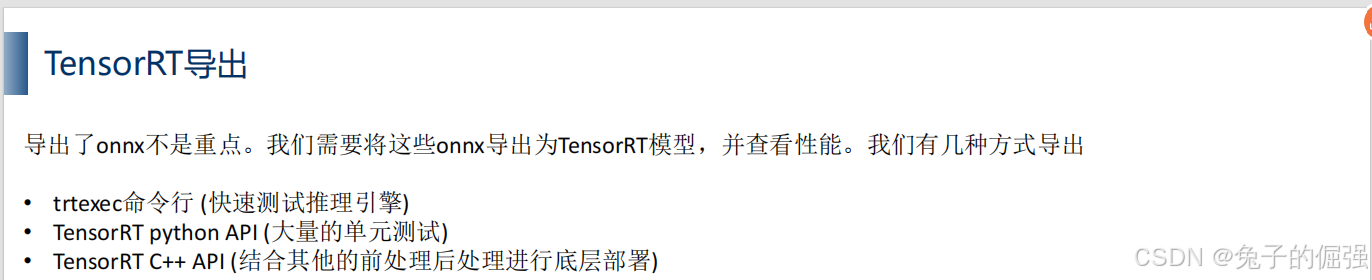
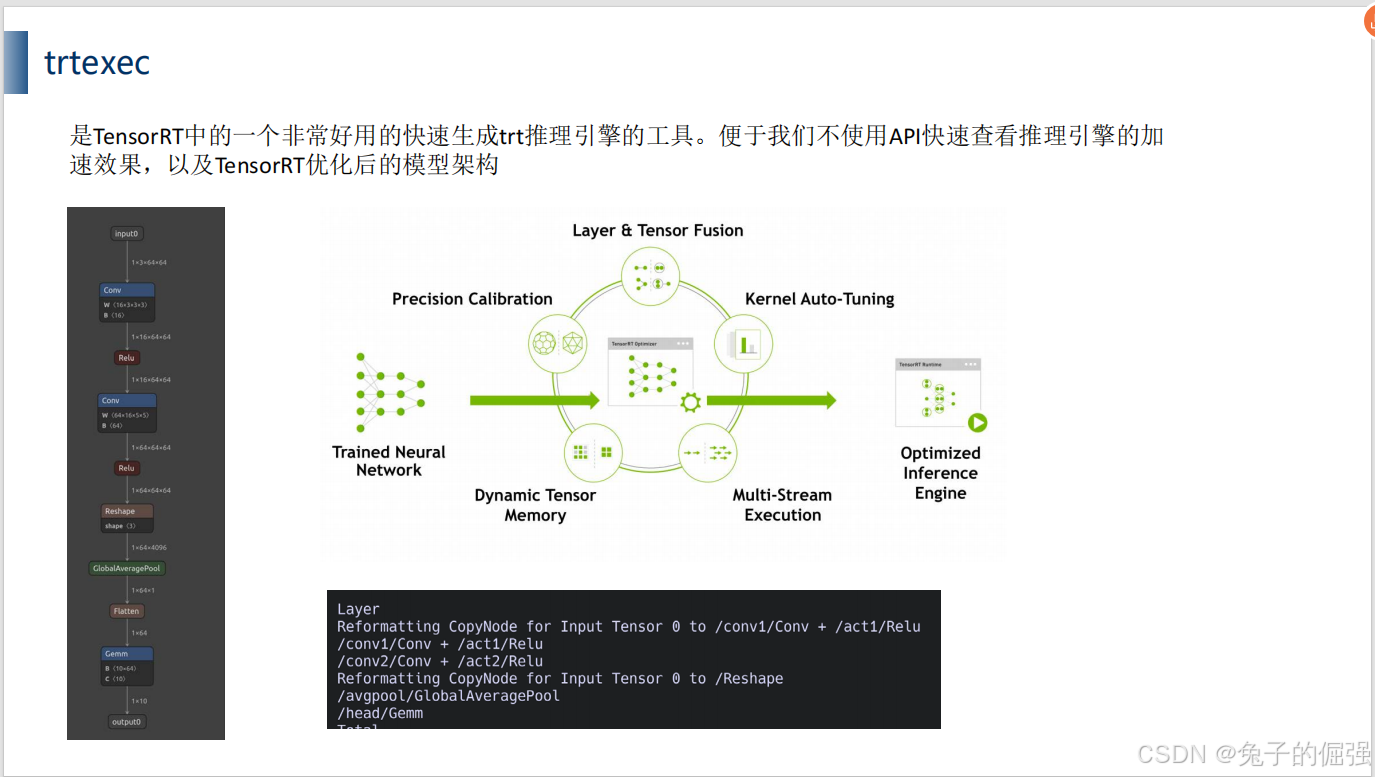
trtexec
什么是trtexec
build
trtexec官网说明
传参说明:Commonly Used Command-Line Flags
#!/bin/bash
# how to use:
#   bash tools/build.sh ${input.onnx} ${tag}IFS=. file=(${1})
IFS=/ file=(${file})
IFS=
PREFIX=${file[1]}if [[ ${2} != "" ]]
thenPREFIX=${PREFIX}-${2}
fiMODE="build"
ONNX_PATH="models"
BUILD_PATH="build"
ENGINE_PATH=$BUILD_PATH/engines
LOG_PATH=${BUILD_PATH}"/log/"${PREFIX}"/"${MODE}mkdir -p ${ENGINE_PATH}
mkdir -p $LOG_PATHtrtexec --onnx=${1} \--memPoolSize=workspace:2048 \--saveEngine=${ENGINE_PATH}/${PREFIX}.engine \--profilingVerbosity=detailed \--dumpOutput \--dumpProfile \--dumpLayerInfo \--exportOutput=${LOG_PATH}/build_output.log\--exportProfile=${LOG_PATH}/build_profile.log \--exportLayerInfo=${LOG_PATH}/build_layer_info.log \--warmUp=200 \--iterations=50 \--verbose \--fp16 \> ${LOG_PATH}/build.log
inference
#!/bin/bash
# how to use:
#   bash tools/infer.sh ${input.engine}IFS=. file=(${1})
IFS=/ file=(${file})
IFS=
PREFIX=${file[2]}if [[ ${2} != "" ]]
thenPREFIX=${PREFIX}-${2}
fiMODE="infer"
ONNX_PATH="models"
BUILD_PATH="build"
ENGINE_PATH=$BUILD_PATH/engines
LOG_PATH=${BUILD_PATH}"/log/"${PREFIX}"/"${MODE}mkdir -p ${ENGINE_PATH}
mkdir -p $LOG_PATHtrtexec --loadEngine=${ENGINE_PATH}/${PREFIX}.engine \--dumpOutput \--dumpProfile \--dumpLayerInfo \--exportOutput=${LOG_PATH}/infer_output.log\--exportProfile=${LOG_PATH}/infer_profile.log \--exportLayerInfo=${LOG_PATH}/infer_layer_info.log \--warmUp=200 \--iterations=50 \> ${LOG_PATH}/infer.log
profile
#!/bin/bash
# how to use:
#   bash tools/profile.sh ${input.engine} IFS=. file=(${1})
IFS=/ file=(${file})
IFS=
PREFIX=${file[2]}if [[ ${2} != "" ]]
thenPREFIX=${PREFIX}-${2}
fiMODE="profile"
ONNX_PATH="models"
BUILD_PATH="build"
ENGINE_PATH=$BUILD_PATH/engines
LOG_PATH=${BUILD_PATH}"/log/"${PREFIX}"/"${MODE}mkdir -p ${ENGINE_PATH}
mkdir -p $LOG_PATHnsys profile \--output=${LOG_PATH}/${PREFIX} \--force-overwrite true \trtexec --loadEngine=${ENGINE_PATH}/${PREFIX}.engine \--warmUp=0 \--duration=0 \--iterations=20 \--noDataTransfers \> ${LOG_PATH}/profile.log
将-rep文件用nsight system打开,既可以获得性能分析结果。
分析trtexec日志
–verbose 打印详细日志


