实现页面:
1.动态表绘制(可用于矩阵构建)

<template><div><h4><b>基于层次分析法的权重计算</b></h4><table table-layout="fixed"><thead><tr><th v-for="(_, colIndex) in (numRows + 1)" :key="colIndex">{{colIndex===0?"图层":layers[colIndex-1]}}</th></tr></thead><tbody ><tr v-for="(rowData, rowIndex) in generateTableData(numRows)" :key="rowIndex" :style="{ '--wid': wid}"><tdv-for="(cell, colIndex) in rowData":key="colIndex":class="{ nonEditable: isNonEditable(rowIndex, colIndex) }">{{rowData[colIndex]}}<inputv-if="colIndex!==0&&!isNonEditable(rowIndex, colIndex)"type="text"v-model="rowData.values[colIndex]"style="width: 100%;border: none;text-align: center"/><span v-else>{{ value }}</span></td></tr></tbody></table></div>
</template>
<script>
export default {name: 'TimeManagementTable',props:{layers:{type:Array,required: true,default: ()=>['地质', '水文', '其他','W']},},data() {return {numRows:null ,wid:null};},created() {this.numRows = this.layers.length;this.wid = 100/(this.numRows+1) + '%';},methods: {isNonEditable(rowIndex, colIndex) {// 假设我们想让第二列的第二个单元格(索引为1, 1)为灰色且不可编辑// 你可以根据实际需求调整这个逻辑return colIndex!==0&rowIndex+1>=colIndex||colIndex===this.numRows;},generateTableData(numRows) {const tableData = [];for (let i = 0; i < numRows-1; i++) {let arr= Array(numRows + 1).fill('')arr[0]=this.layers[i]tableData.push(arr); // 填充空字符串或你需要的默认值}return tableData;}},
};
</script><style scoped>
/* 样式可以根据需要添加 */
table {width: 100%;
}
th, td {border: 1px solid black;padding: 8px;text-align: center;width: var(--wid);
}
核心要点:
-
动态性:可根据不同数据项动态自适应构建表格
记录数组长度,根据数组长度动态设置行列号数以及其列宽
<tr v-for="(rowData, rowIndex) in generateTableData(numRows)" :key="rowIndex" :style="{ '--wid': wid}">data() {
return {
numRows:null ,
wid:null
};
},created() {
this.numRows = this.layers.length;
this.wid = 100/(this.numRows+1) + '%';
},th, td {
border: 1px solid black;
padding: 8px;
text-align: center;
width: var(--wid);
}
-
表格单元格权限控制:只有指定单元格可编辑,收集用户输入数据,其余为灰色且不可编辑
<td
v-for="(cell, colIndex) in rowData"
:key="colIndex"
:class="{ nonEditable: isNonEditable(rowIndex, colIndex) }"
>
{{rowData[colIndex]}}
<input
v-if="colIndex!==0&&!isNonEditable(rowIndex, colIndex)"
type="text"
v-model="rowData.values[colIndex]"
style="width: 100%;border: none;text-align: center"
/>
<span v-else>{{ value }}</span>isNonEditable(rowIndex, colIndex) {
// 假设我们想让第二列的第二个单元格(索引为1, 1)为灰色且不可编辑
// 你可以根据实际需求调整这个逻辑
return colIndex!==0&rowIndex+1>=colIndex||colIndex===this.numRows;
},
-
表格标题行和列设置:设置表格头和表格第一列为指定数组内的名称
<thead>
<tr>
<th v-for="(_, colIndex) in (numRows + 1)" :key="colIndex">{{colIndex===0?"图层":layers[colIndex-1]}}</th>
</tr>
</thead>
<tbody >
<tr v-for="(rowData, rowIndex) in generateTableData(numRows)" :key="rowIndex" :style="{ '--wid': wid}">
<td
v-for="(cell, colIndex) in rowData"
:key="colIndex"
:class="{ nonEditable: isNonEditable(rowIndex, colIndex) }"
>
{{rowData[colIndex]}}
<input
v-if="colIndex!==0&&!isNonEditable(rowIndex, colIndex)"
type="text"
v-model="rowData.values[colIndex]"
style="width: 100%;border: none;text-align: center"
/>
<span v-else>{{ value }}</span>
</td>
</tr>
</tbody>
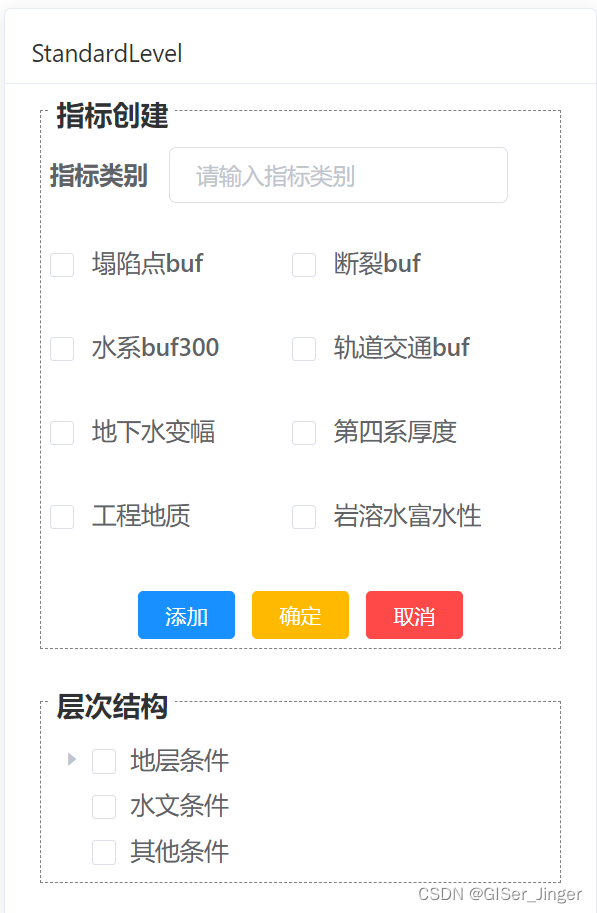
2.类C#中控件前端实现:
<template><div class="app-container standard-level"><el-row><el-col :span="24"><el-card class="box-card"><div slot="header" class="clearfix"><span>StandardLevel</span></div><div><!-- 指标选择 --><div id="indicator" style="border: gray 1px dashed; padding: 5px;"><span class="title"> 指标创建</span><el-form size="small" :inline="true"><el-form-item label="指标类别" class="form-label" ><el-inputv-model="indicatorType"placeholder="请输入指标类别"clearablesize="small"/></el-form-item><el-form-item  class="flex-container" ><div class="flex-container"><div class="flex-item" v-for="item in layers" :key="item.id"><el-checkbox :label="item.id" style="margin: 8px 0;">{{ item.name }}</el-checkbox></div></div></el-form-item></el-form><!-- 操作按钮 --><div class="buttons" style="display: flex;justify-content: center;"><el-button type="primary" size="mini" @click="addNode">添加</el-button><el-button type="warning" size="mini" @click="modifyNode">确定</el-button><el-button type="danger"  size="mini" @click="cancel">取消</el-button></div></div><div id="list" style="margin-top: 10%;border: gray 1px dashed; padding: 5px;"><span class="title">层次结构</span><!-- 层次结构 --><el-tree:data="treeData":props="defaultProps"show-checkboxnode-key="id"ref="tree"></el-tree></div></div></el-card></el-col></el-row>
</div>
</template><script>
import ElementForm from '@/plugins/package/panel/form/ElementForm.vue'export default {components: { ElementForm },data() {return {indicatorType:'',selectedCategory: '',selectedIndicators: [],layers:[{ id: '001', name: '塌陷点buf' },{ id: '002', name: '断裂buf' },{ id: '003', name: '水系buf300' },{ id: '004', name: '轨道交通buf' },{ id: '005', name: '地下水变幅' },{ id: '006', name: '第四系厚度' },{ id: '007', name: '工程地质' },{ id: '008', name: '岩溶水富水性' },],treeData: [{label: '地层条件',children: [{ label: '剥蚀buf' },{ label: '第四系厚度' },{ label: '工程地质' },],},{ label: '水文条件' },{ label: '其他条件' },],defaultProps: {children: 'children',label: 'label',},};},methods: {addNode() {// 添加节点的逻辑},modifyNode() {// 修改节点的逻辑},cancel() {// 取消操作的逻辑},},
};
</script><style scoped>
.standard-level {padding: 20px;width: 30%;
}
.form-label {margin-bottom: 10px;
}
.buttons {margin-top: 20px;
}
.flex-container {display: flex;flex-wrap: wrap;.flex-item {width: 50%;}
}
span.title{display : block;width : 25%;height: 15px;font-weight: bold;font-size: 16px;position: relative;top:-15px;text-align: center;background: white;
}</style>
核心要点:
-
checkbox列对齐设置

Element ui 丨el-checkbox-group 布局对齐_el-checkbox-group 对齐方式-CSDN博客
-
边框上显示字体设置
<div id="indicator" style="border: gray 1px dashed; padding: 5px;">
<span class="title"> 指标创建</span></div>
span.title{
display : block;
width : 25%;
height: 15px;
font-weight: bold;
font-size: 16px;
position: relative;
top:-15px;
text-align: center;
background: white;
}


