文章目录
- 1.设计UI
- 2.编写功能代码
- 2.1 初始化ui界面及类成员参数
- 2.2 添加菜单栏
- 2.3 建立信号/槽连接
- 3.主要功能代码及效果
- 4.设置图像自动调节长宽尺寸但不改变长宽比例
- 参考文献
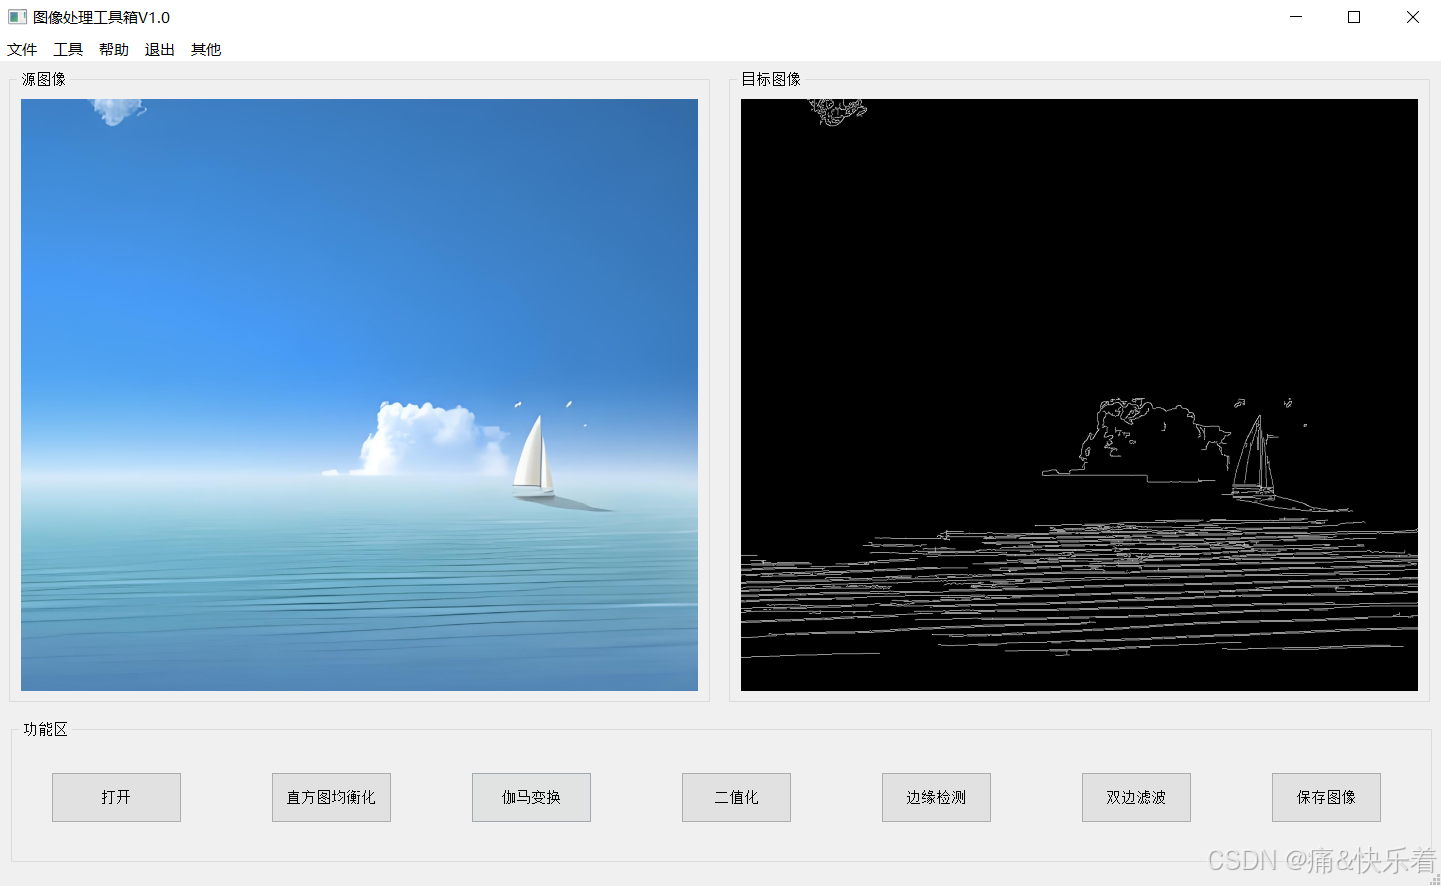
1.设计UI
对于UI的设计可以通过qt designer直接绘制,也可以通过编写python代码实现。当然,一般情况下还是建议使用designer绘制,然后转换为py代码后再进行微调。
在qt designer中绘制ui,其中使用label控件用于图像的显示,整体布局如下:

设计好ui后将其保存,并导出为py文件。
2.编写功能代码
2.1 初始化ui界面及类成员参数
class MyMainWindow(QMainWindow, Ui_MainWindow): # 继承 QMainWindow 类和 Ui_MainWindow 界面类def __init__(self, parent=None):super(MyMainWindow, self).__init__(parent) # 初始化父类self.setupUi(self) # 继承 Ui_MainWindow 界面类self.setWindowTitle('图像处理工具箱V1.0')# 添加菜单项t = self.menu_2t.addAction('EqualHist')t.addAction('Gamma transform')t.addAction('Binary')t.addAction('Edge detect')t.addAction('Bilateral')t = self.menu_3t.addAction('About')t.addAction('Other')menu = self.menu_4self.actExit = QAction("Exit", self)self.actExit.triggered.connect(self.close)menu.addAction(self.actExit)# 添加可点击执行的菜单self.mTest = QAction("其他", self)self.mTest.triggered.connect(self.trigger_actHelp)t = self.menuBar()t.addAction(self.mTest)# 菜单栏self.actionopen.triggered.connect(self.openSlot) # 连接并执行 openSlot 子程序self.action_save.triggered.connect(self.saveSlot) # 连接并执行 saveSlot 子程序self.menu_3.triggered.connect(self.trigger_actHelp) # 连接并执行 trigger_actHelp 子程序self.menu_4.triggered.connect(self.close) # 连接并执行 close 子程序self.pushButton.clicked.connect(self.click_pushButton_1) # # 按钮触发:导入图像self.pushButton_2.clicked.connect(self.click_pushButton_2) # # 按钮触发:灰度显示self.pushButton_3.clicked.connect(self.click_pushButton_3) # # 按钮触发:伽马变换self.pushButton_4.clicked.connect(self.click_pushButton_4) # # 按钮触发:二值化self.pushButton_5.clicked.connect(self.click_pushButton_5) # 点击 # 按钮触发:边缘检测self.pushButton_6.clicked.connect(self.click_pushButton_6) # 点击 # 按钮触发:双边滤波self.pushButton_7.clicked.connect(self.saveSlot) # 点击 # 按钮触发:保存图像# 初始化self.img1 = np.ndarray(())self.img2 = np.ndarray(())self.img1 = cv.imread("./images/image.png") # OpenCV 读取图像self.refreshShow(self.img1, self.label_1)self.refreshShow(self.img1, self.label_2)return
2.2 添加菜单栏
from PyQt5 import QtCore
from PyQt5.QtWidgets import QMainWindow, QWidget, QHBoxLayout, QPushButton, QApplication, QMenuBar, QLabelclass MainWin(QMainWindow):def __init__(self):super().__init__()m_bar = QMenuBar()f = m_bar.addMenu('File')f.addAction('New')t = m_bar.addMenu('Tool')t.addAction('Copy')t.addAction('Paste')sub = t.addMenu('Sub')sub1 = sub.addAction('sub1')sub.addAction('sub2')sub1.triggered.connect(self.sub1_trigger)self.setMenuBar(m_bar)self.label = QLabel()self.label.setText('label text')self.setCentralWidget(self.label)def copy_msg(self):print('Copy')def sub1_trigger(self):self.label.setText('sub1_trigger')if __name__ == '__main__':import sysapp = QApplication(sys.argv)win = MainWin()win.show()sys.exit(app.exec())
2.3 建立信号/槽连接
self.pushButton.clicked.connect(self.click_pushButton_1)    # # 按钮触发:导入图像
self.pushButton_2.clicked.connect(self.click_pushButton_2)  # # 按钮触发:灰度显示
self.pushButton_3.clicked.connect(self.click_pushButton_3)  # # 按钮触发:伽马变换
self.pushButton_4.clicked.connect(self.click_pushButton_4)  # # 按钮触发:二值化
self.pushButton_5.clicked.connect(self.click_pushButton_5)  # 点击 # 按钮触发:边缘检测
self.pushButton_6.clicked.connect(self.click_pushButton_6)  # 点击 # 按钮触发:双边滤波
self.pushButton_7.clicked.connect(self.saveSlot)  # 点击 # 按钮触发:保存图像
3.主要功能代码及效果
# _*_ coding:utf-8 _*_
import sys
import cv2 as cv
import numpy as np
from PyQt5.QtCore import qDebug
from PyQt5.QtWidgets import *
from PyQt5.QtGui import *
from ImageProV1 import Ui_MainWindow  # 导入 ImageProV1.py 中的 Ui_MainWindow 界面类class MyMainWindow(QMainWindow, Ui_MainWindow):  # 继承 QMainWindow 类和 Ui_MainWindow 界面类def __init__(self, parent=None):super(MyMainWindow, self).__init__(parent)  # 初始化父类self.setupUi(self)  # 继承 Ui_MainWindow 界面类self.setWindowTitle('图像处理工具箱V1.0')# 添加菜单项t = self.menu_2t.addAction('EqualHist')t.addAction('Gamma transform')t.addAction('Binary')t.addAction('Edge detect')t.addAction('Bilateral')t = self.menu_3t.addAction('About')t.addAction('Other')menu = self.menu_4self.actExit = QAction("Exit", self)self.actExit.triggered.connect(self.close)menu.addAction(self.actExit)# 添加可点击执行的菜单self.mTest = QAction("其他", self)self.mTest.triggered.connect(self.trigger_actHelp)t = self.menuBar()t.addAction(self.mTest)# 菜单栏self.actionopen.triggered.connect(self.openSlot)  # 连接并执行 openSlot 子程序self.action_save.triggered.connect(self.saveSlot)  # 连接并执行 saveSlot 子程序self.menu_3.triggered.connect(self.trigger_actHelp)  # 连接并执行 trigger_actHelp 子程序self.menu_4.triggered.connect(self.close)  # 连接并执行 close 子程序# 通过 connect 建立信号/槽连接,点击按钮事件发射 triggered 信号,执行相应的子程序 click_pushButtonself.pushButton.clicked.connect(self.click_pushButton_1)    # # 按钮触发:导入图像self.pushButton_2.clicked.connect(self.click_pushButton_2)  # # 按钮触发:灰度显示self.pushButton_3.clicked.connect(self.click_pushButton_3)  # # 按钮触发:伽马变换self.pushButton_4.clicked.connect(self.click_pushButton_4)  # # 按钮触发:二值化self.pushButton_5.clicked.connect(self.click_pushButton_5)  # 点击 # 按钮触发:边缘检测self.pushButton_6.clicked.connect(self.click_pushButton_6)  # 点击 # 按钮触发:双边滤波self.pushButton_7.clicked.connect(self.saveSlot)  # 点击 # 按钮触发:保存图像# 初始化self.img1 = np.ndarray(())self.img2 = np.ndarray(())self.img1 = cv.imread("./images/image.png")  # OpenCV 读取图像self.refreshShow(self.img1, self.label_1)self.refreshShow(self.img1, self.label_2)returndef click_pushButton_1(self):  # 点击 pushButton_1 触发try:self.img1 = self.openSlot()  # 读取图像self.img2 = self.img1.copy()print("click_pushButton_1", self.img1.shape)self.refreshShow(self.img1, self.label_1)  # 刷新显示except:print('open file failed.')returndef click_pushButton_2(self):  # 点击 pushButton_2 触发print("pushButton_2")self.img2 = cv.cvtColor(self.img1, cv.COLOR_BGR2GRAY)  # 图片格式转换:BGR -> Grayself.img2 = cv.equalizeHist(self.img2, None)self.refreshShow(self.img2, self.label_2)  # 刷新显示returndef click_pushButton_3(self):  # 点击 pushButton_3 伽马变换print("pushButton_3")self.img2 = self.adjust_gamma(self.img1)self.refreshShow(self.img2, self.label_2)  # 刷新显示returndef click_pushButton_4(self):  # 点击 pushButton_3 触发print("pushButton_4")temp = cv.cvtColor(self.img1, cv.COLOR_BGR2GRAY)  # 图片格式转换:BGR -> Gray_, self.img2 = cv.threshold(temp, 0, 255, cv.THRESH_OTSU + cv.THRESH_BINARY)self.refreshShow(self.img2, self.label_2)  # 刷新显示returndef click_pushButton_5(self):print("pushButton_5")temp = cv.cvtColor(self.img1, cv.COLOR_BGR2GRAY)  # 图片格式转换:BGR -> Grayself.img2 = cv.Canny(self.img1, 10, 60)self.refreshShow(self.img2, self.label_2)  # 刷新显示returndef click_pushButton_6(self):print("pushButton_6")self.img2 = cv.bilateralFilter(self.img1, 11, 20, 20, None)self.refreshShow(self.img2, self.label_2)  # 刷新显示return# 默认gamma值为1.0,默认不变化def adjust_gamma(self, image, gamma=1.5):brighter_image = np.array(np.power((image / 255), gamma) * 255, dtype=np.uint8)return brighter_imagedef refreshShow(self, img, label):print('shape: ', img.shape, label)qImg = self.cvToQImage(img)  # OpenCV 转为 PyQt 图像格式label.setScaledContents(True)  # 需要在图片显示之前进行设置# 当窗口大小改变时,调整图像大小以适应 QLabel,同时保持长宽比例# qImg = qImg.scaled(label.size(), Qt.KeepAspectRatio, Qt.SmoothTransformation)label.setPixmap((QPixmap.fromImage(qImg)))  # 加载 PyQt 图像returndef openSlot(self, flag=1):  # 读取图像文件try:# OpenCV 读取图像文件fileName, _ = QFileDialog.getOpenFileName(self, "Open Image", "../images/", "*.png *.jpg *.tif")if flag == 0 or flag == "gray":img = cv.imread(fileName, cv.IMREAD_GRAYSCALE)  # 读取灰度图像else:img = cv.imread(fileName, cv.IMREAD_COLOR)  # 读取彩色图像print(fileName, img.shape)return imgexcept:return Nonedef saveSlot(self):  # 保存图像文件# 选择存储文件 dialogtry:fileName, tmp = QFileDialog.getSaveFileName(self, "Save Image", "../images/", '*.png; *.jpg; *.tif')if self.img2.size == 1:return# OpenCV 写入图像文件ret = cv.imwrite(fileName, self.img2)if ret:print(fileName, self.img2.shape)except:print('save failed.')returndef cvToQImage(self, image):if image.dtype == np.uint8:channels = 1 if len(image.shape) == 2 else image.shape[2]if channels == 3:  # CV_8UC3qImg = QImage(image, image.shape[1], image.shape[0], image.strides[0], QImage.Format_RGB888)return qImg.rgbSwapped()elif channels == 1:qImg = QImage(image, image.shape[1], image.shape[0], image.strides[0], QImage.Format_Indexed8)return qImgelse:qDebug("ERROR: numpy.ndarray could not be converted to QImage. Channels = %d" % image.shape[2])return QImage()def qPixmapToCV(self, qPixmap):qImg = qPixmap.toImage()shape = (qImg.height(), qImg.bytesPerLine() * 8 // qImg.depth())shape += (4,)ptr = qImg.bits()ptr.setsize(qImg.byteCount())image = np.array(ptr, dtype=np.uint8).reshape(shape)image = image[..., :3]return imagedef trigger_actHelp(self):  # 动作 actHelp 触发QMessageBox.about(self, "About", """数字图像处理工具箱 v1.0""")returnif __name__ == '__main__':app = QApplication(sys.argv)  # 在 QApplication 方法中使用,创建应用程序对象myWin = MyMainWindow()  # 实例化 MyMainWindow 类,创建主窗口myWin.show()            # 在桌面显示控件 myWinsys.exit(app.exec_())   # 结束进程,退出程序
4.设置图像自动调节长宽尺寸但不改变长宽比例
# 当窗口大小改变时,调整图像大小以适应 QLabel,同时保持长宽比例
scaledImage = self.image.scaled(self.label.size(), Qt.KeepAspectRatio, Qt.SmoothTransformation)
self.label.setPixmap(scaledImage)
参考文献
[1] python-在PyCharm中使用PyQt5
[2] PyQt5使用QLabel显示OpenCV图像的自适应调节(只改变大小不改变比例)
[3] OpenCV-PyQT项目实战(7)项目案例03:鼠标框选


)


