文章目录
- 前言
- 一、工具函数模块
- 1.1 图像显示函数
- 1.2 保持宽高比的缩放函数
- 1.3 坐标点排序函数
- 二、透视变换核心模块
- 2.1 四点透视变换实现
- 三、主流程技术分解
- 3.1 图像预处理
- 3.2 轮廓检测流程
- 3.3 最大轮廓处理
- 四、后处理技术
- 4.1 透视变换
- 4.2 形态学处理
- 五、完整代码
- 总结
前言
构建智能文档视觉矫正体系:通过 AI 图像识别技术自动分析文档倾斜特征,结合自适应透视校正模型动态调整校正参数,不仅消除物理歪斜(如扫描歪斜、拍摄俯仰角偏差),还能修复因纸张褶皱、扫描设备误差导致的 “隐性扭曲”,最终呈现视觉上完全平整、几何上严格对齐的标准文档版面,为专业打印奠定基础。
一、工具函数模块
1.1 图像显示函数
def cv_show(name, value):cv2.imshow(name, value) # 创建命名窗口显示图像cv2.waitKey(0) # 等待任意键输入(单位:毫秒,0表示无限等待)cv2.destroyAllWindows() # 关闭所有OpenCV窗口(实际代码中未显式调用,需注意内存释放)
cv2.waitKey(0) 的返回值为按键ASCII码,可用于交互控制
调试建议:添加 cv2.destroyWindow(name) 关闭指定窗口,避免内存泄漏
1.2 保持宽高比的缩放函数
def resize(image, width=None, height=None, inter=cv2.INTER_AREA):dim=None(h, w) = image.shape[:2] # 获取原始高度和宽度(兼容灰度/彩色图)# 尺寸计算逻辑if width is None and height is None:return image # 无缩放直接返回if width is None:r = height / float(h) # 计算高度缩放比例dim = (int(w * r), height) # 新尺寸元组(宽度, 高度)else:r = width / float(w) # 计算宽度缩放比例dim = (width, int(h * r))# 执行缩放操作resized = cv2.resize(image, dim, interpolation=inter)return resized
插值算法选择:
cv2.INTER_AREA:基于像素区域关系重采样,适合缩小图像
cv2.INTER_CUBIC:4x4像素邻域的双三次插值,适合放大图像
cv2.INTER_LINEAR:双线性插值(默认)
1.3 坐标点排序函数
def order_points(pts):rect = np.zeros((4, 2), dtype="float32") # 初始化4x2矩阵#按顺序找到对应的坐标0123,分别是左上右上右下、左下# 计算坐标点x+y的和s = pts.sum(axis=1) # 形状:(4,) ,对矩阵的每一行进行求和操作rect[0] = pts[np.argmin(s)] # 左上角:x+y最小rect[2] = pts[np.argmax(s)] # 右下角:x+y最大# 计算坐标点x-y的差diff = np.diff(pts, axis=1) # 形状:(4,1)rect[1] = pts[np.argmin(diff)] # 右上角:x-y最小(即y相对较大)rect[3] = pts[np.argmax(diff)] # 左下角:x-y最大(即y相对较小)return rect # 返回有序坐标:[左上, 右上, 右下, 左下]
二、透视变换核心模块
2.1 四点透视变换实现
def four_point_transform(image, pts):# 坐标排序(关键步骤!)rect = order_points(pts)(tl, tr, br, bl) = rect # 解构赋值四个顶点# 计算输出图像的宽度(取两组对边最大值)widthA = np.sqrt(((br[0] - bl[0]) ** 2) + (br[1] - bl[1]) ** 2)widthB = np.sqrt(((tr[0] - tl[0]) ** 2) + (tr[1] - tl[1]) ** 2)maxWidth = max(int(widthA), int(widthB))# 计算输出图像的高度(同理)heightA = np.sqrt(((tr[0] - br[0]) ** 2) + (tr[1] - br[1]) ** 2)heightB = np.sqrt(((tl[0] - bl[0]) ** 2) + (tl[1] - bl[1]) ** 2)maxHeight = max(int(heightA), int(heightB))# 定义目标点坐标(规范坐标系)dst = np.array([[0, 0],[maxWidth - 1, 0], # 宽度方向预留1像素边界[maxWidth - 1, maxHeight - 1],[0, maxHeight - 1]], dtype="float32")# 计算透视变换矩阵(核心数学操作)M = cv2.getPerspectiveTransform(rect, dst)# 执行透视变换warped = cv2.warpPerspective(image, M, (maxWidth, maxHeight))return warped
1.尺寸计算
公式推导:基于欧氏距离公式计算对边长度
distance = sqrt((x2-x1)^2 + (y2-y1)^2)取最大值的原因:确保输出图像能完整包含原始四边形区域
2.cv2.getPerspectiveTransform
输入:源四边形(rect)和目标四边形(dst)的4个点输出:3x3透视变换矩阵数学原理:求解投影变换方程
透视变换矩阵公式
通过4对点建立8个方程,求解8个未知参数
3.cv2.warpPerspective
参数 M:3x3变换矩阵参数 (maxWidth, maxHeight):输出图像尺寸插值方式:默认双线性插值(可指定cv2.INTER_LINEAR等)
三、主流程技术分解
3.1 图像预处理
# 读取原始图像
img = cv2.imread('../data/hb.png')  # 默认BGR格式# 计算缩放比例(基于原始高度)
ratio = img.shape[0] / 500.0  # 假设将高度缩放到500px
orig = img.copy()             # 深拷贝保留原始图像
img = resize(orig, height=500)  # 执行缩放
缩放目的:加速后续轮廓处理(复杂度与图像尺寸成平方关系)
ratio的作用:后续将检测到的坐标还原到原始尺寸
3.2 轮廓检测流程
# 灰度化处理
gray = cv2.cvtColor(img, cv2.COLOR_BGR2GRAY)   #获取灰度图
# 自适应阈值化
edged = cv2.threshold(gray, 0, 255, cv2.THRESH_BINARY | cv2.THRESH_OTSU)[1]# 查找轮廓
cnts = cv2.findContours(edged.copy(), cv2.RETR_LIST, cv2.CHAIN_APPROX_SIMPLE)[-2]
img_contours=cv2.drawContours(img.copy(),cnts,-1,(0,0,255),1)
cv_show('img_contours',img_contours)
cv2.findContours参数解析:
edged.copy():避免修改原始边缘图像
cv2.RETR_LIST:检索所有轮廓,不建立层级关系
cv2.CHAIN_APPROX_SIMPLE:压缩水平、垂直和对角方向的冗余点
[-2]:兼容不同OpenCV版本(返回格式可能为 [contours, hierarchy] 或 [image, contours, hierarchy])
3.3 最大轮廓处理
# 按轮廓面积排序(降序)
screenCnt = sorted(cnts, key=cv2.contourArea, reverse=True)[0]
#获取面积最大的轮廓
# 计算轮廓周长
peri = cv2.arcLength(screenCnt, True)  # True表示轮廓闭合# 多边形近似(Douglas-Peucker算法)
screenCnt = cv2.approxPolyDP(screenCnt, 0.01 * peri, True)
print(screenCnt.shape)
img_contours=cv2.drawContours(img.copy(),[screenCnt],-1,(0,255,0),2)cv_show('img_contours1',img_contours)
1、cv2.contourArea
计算方式:格林公式积分对非闭合轮廓可能返回错误值
2、cv2.approxPolyDP
参数 0.01*peri:近似精度阈值(周长比例)原理:迭代拟合多边形,删除偏离当前线段超过阈值的点效果:将曲线近似为折线,减少顶点数量
四、后处理技术
4.1 透视变换
# 执行变换(注意坐标还原)
warped = four_point_transform(orig, screenCnt.reshape(4, 2) * ratio)# 保存结果
cv2.imwrite('../data/invoice_new.jpg', warped)
screenCnt.reshape(4,2):将轮廓点从 (N,1,2) 转换为 (4,2)
ratio:将缩放后的坐标还原到原始图像尺寸
4.2 形态学处理
# 转换为灰度图
warped_gray = cv2.cvtColor(warped, cv2.COLOR_BGR2GRAY)# 二值化处理
_, warped_binary = cv2.threshold(warped_gray, 0, 255, cv2.THRESH_BINARY | cv2.THRESH_OTSU)# 逆时针旋转90度,在对自己的文档进行识别时,可以根据需求调整转动角度
warped_rotated = cv2.rotate(warped_binary, cv2.ROTATE_90_COUNTERCLOCKWISE)# 定义形态学核
kernel = np.ones((11,11),np.uint8)
#做一个闭运算,先膨胀再腐蚀
warped_rotated_closed=cv2.morphologyEx(warped_rotated,cv2.MORPH_CLOSE,kernel)
cv2.namedWindow('warped_rotated_closed',cv2.WINDOW_NORMAL)
cv_show("warped_rotated_closed",warped_rotated)
腐蚀(Erode):用核的最小值替换锚点像素,消除小物体
膨胀(Dilate):用核的最大值替换锚点像素,填充空洞
开运算 = 先腐蚀后膨胀,用于去噪
核大小选择:3x3平衡去噪效果与细节保留
目的是为了使海报上的图案和文字显示的更清晰,字迹不会很模糊。
最终效果展示:
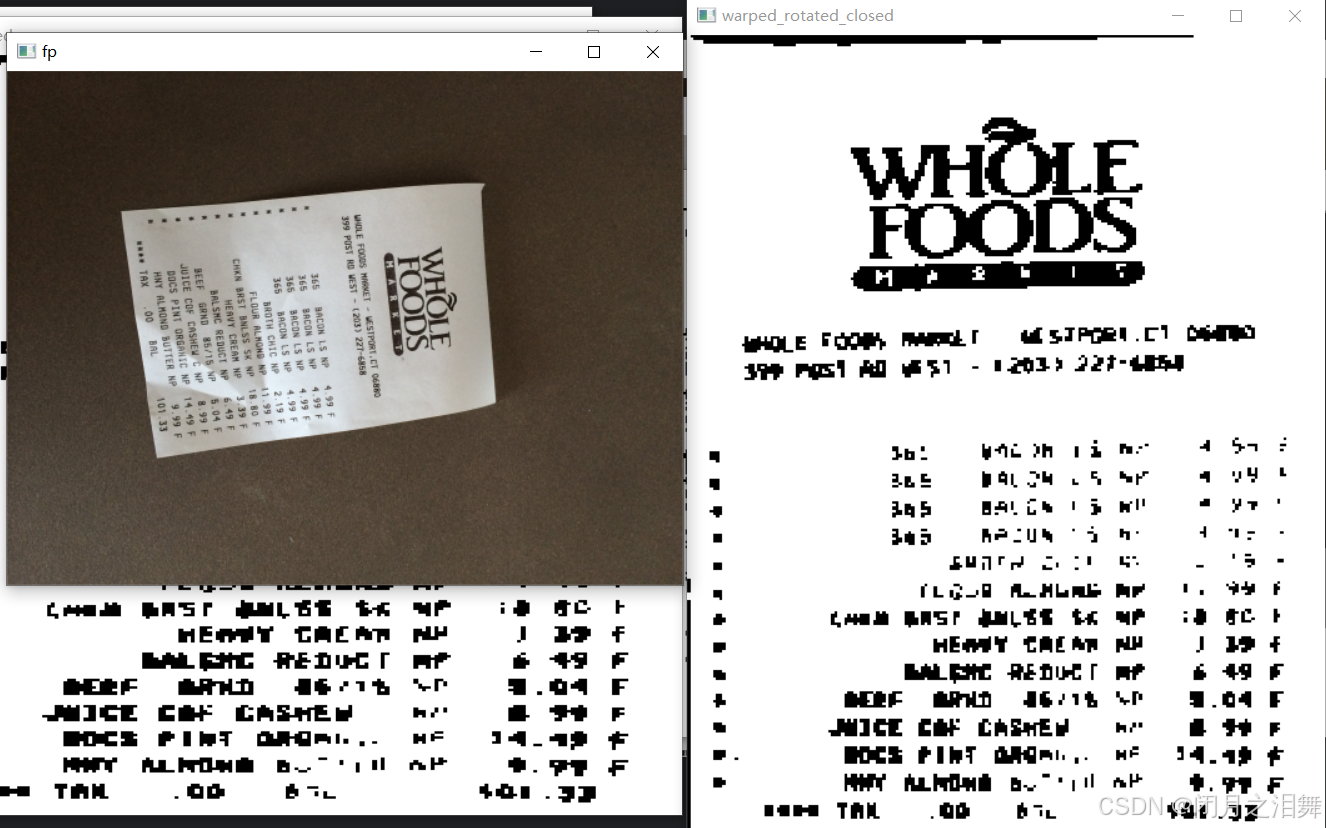
将歪歪扭扭的图片扶正,并将图片上的文字变得更清晰,上边的效果仍没有达到预计的效果,可以通过图像形态学的处理来达到更好的效果。
五、完整代码
import numpy as np
import cv2
def cv_show(name,value):cv2.imshow(name,value)cv2.waitKey(0)def resize(image,width=None,height=None,inter=cv2.INTER_AREA):dim=None(h,w)=image.shape[:2]if width is None and height is None:return imageif width is None:r=height/float(h)dim=(int(w*r),height)else:r=width/float(w)dim=(width,int(h*r))resized=cv2.resize(image,dim,interpolation=inter)return resizeddef order_points(pts):#一共四个坐标点rect=np.zeros((4,2),dtype='float32')#按顺序找到对应的坐标0123,分别是左上右上右下、左下s=pts.sum(axis=1)   #对矩阵的每一行进行求和操作rect[0]=pts[np.argmin(s)]rect[2]=pts[np.argmax(s)]diff=np.diff(pts,axis=1)rect[1]=pts[np.argmin(diff)]rect[3]=pts[np.argmax(diff)]return rectdef four_point_transform(image,pts):#获取输入的坐标点rect=order_points(pts)(tl,tr,br,bl)=rect#计算输入的w和h值widthA=np.sqrt(((br[0]-bl[0])**2) +( br[1] - bl[1])**2)widthB = np.sqrt(((tr[0] - tl[0]) ** 2) + (tr[1] - tl[1]) ** 2)maxwidth=max(int(widthA),int(widthB))heightA=np.sqrt(((tr[0]-br[0])**2) +( tr[1] - br[1])**2)heightB=np.sqrt(((tl[0]-bl[0])**2) +( tl[1] - bl[1])**2)maxheight=max(int(heightA),int(heightB))dst=np.array([[0,0],[maxwidth,0],[maxwidth,maxheight],[0,maxheight]],dtype='float32')M=cv2.getPerspectiveTransform(rect,dst)warped=cv2.warpPerspective(image,M,(maxwidth,maxheight))return warpedimg=cv2.imread('../data/hb.png')
cv_show('fp',img)# 图片多大调整大小
ratio=img.shape[0]/500.0    #计算缩小比例
orig=img.copy()
img=resize(orig,height=500)
# cv_show('1',img)#轮廓检测
print("STEP 1:轮廓检测")
gray=cv2.cvtColor(img,cv2.COLOR_BGRA2GRAY)    #获取灰度图edged=cv2.threshold(gray,0,255,cv2.THRESH_BINARY | cv2.THRESH_OTSU)[1]
cnts=cv2.findContours(edged.copy(),cv2.RETR_LIST,cv2.CHAIN_APPROX_SIMPLE)[-2]
img_contours=cv2.drawContours(img.copy(),cnts,-1,(0,0,255),1)
cv_show('img_contours',img_contours)print("STEP 2:获取最大轮廓")
screenCnt=sorted(cnts,key=cv2.contourArea,reverse=True)[0]   #获取面积最大的轮廓peri=cv2.arcLength(screenCnt,True)screenCnt=cv2.approxPolyDP(screenCnt,0.01*peri,True)
print(screenCnt.shape)
img_contours=cv2.drawContours(img.copy(),[screenCnt],-1,(0,255,0),2)cv_show('img_contours1',img_contours)# 透视变换
warped=four_point_transform(orig,screenCnt.reshape(4,2)*ratio)
cv2.imwrite('../data/invoice_new.jpg',warped)
cv2.namedWindow('xx',cv2.WINDOW_NORMAL)     #设置这个参数可以使imshow()显示出来的窗口被拉大缩小
cv2.imshow('xx',warped)
cv2.waitKey(0)warped_gray=cv2.cvtColor(warped,cv2.COLOR_BGR2GRAY)
warped_binary=cv2.threshold(warped_gray.copy(),0,255,cv2.THRESH_BINARY | cv2.THRESH_OTSU)[1]cv2.namedWindow('warped_binary',cv2.WINDOW_NORMAL)
cv_show("warped_binary",warped_binary)warped_rotated=cv2.rotate(warped_binary,cv2.ROTATE_90_COUNTERCLOCKWISE)
cv2.namedWindow('warped_rotated',cv2.WINDOW_NORMAL)
cv_show("warped_rotated",warped_rotated)#做一个闭运算,先膨胀再腐蚀
kernel = np.ones((3,3),np.uint8)
warped_rotated_closed=cv2.morphologyEx(warped_rotated,cv2.MORPH_OPEN,kernel)
cv2.namedWindow('warped_rotated_closed',cv2.WINDOW_NORMAL)
cv_show("warped_rotated_closed",warped_rotated)
总结
通过对计算机视觉技术的综合使用,可以实现很多种对文档的处理任务,还可以将将功能与摄像头结合实现实时处理任务。


)


