题目
使用LVS的 NAT 模式实现 3 台RS的轮询访问。IP地址和主机自己规划。
-i— turn,-g——DR模式,-m——NAT模式
- 节点规划
-
- 仅主机网段:192.168.216.0/24
-
- NAT网段:192.168.88.0/24
| 主机 | 角色 | 系统 | 网络 | ip |
|---|---|---|---|---|
| client | client | redhat9.5 | 仅主机 | 192.168.216.100/24 |
| lvs | lvs | redhat9.5 | 仅主机 ,NAT | 192.168.216.200/24 VIP 192.168.88.8/24 DIP |
| nginx | rs1 | redhat 9.5 | NAT | 192.168.88.13/24 |
| nginx | rs2 | redhat 9.5 | NAT | 192.168.88.15/24 |
| nginx | rs3 | redhat 9.5 | NAT | 192.168.88.17/24 |
所以主机关闭防火墙和selinux
1、配置RS(NAT模式)
RS1、RS2、RS3同样操作。
1.1 配置rs1
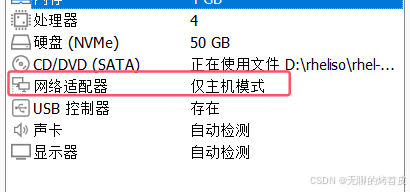
注意,RS1的网络模式为 NAT 模式,它的网关配置为 192.168.88.8(lvs的nat模式的ip)
1.1.1 关闭防火墙和selinux
注意: setenforce 0和systemctl stop firewalld时临时关闭```bash
[root@rs2 ~]# setenforce 0
[root@rs2 ~]# getenforce
Permissive
[root@rs2 ~]# systemctl stop firewalld
永久关闭
sed -i "s/^SELINUX=enforcing$/SELINUX=permissive/g" /etc/selinux/config
# 停止 firewalld 服务:systemctl stop firewalld
# 禁用 firewalld 服务,防止其在系统重启后自动启动:
o systemctl disable firewalld
1.1.2 修改ip和主机名
[root@localhost ~]# hostnamectl hostname rs1
[root@rs1 ~]# nmcli c modify ens160 ipv4.method manual ipv4.addresses 192.168.88.13/24 ipv4.gateway 192.168.88.8 connection.autoconnect yes
[root@rs1 ~]# nmcli c up ens160
1.1.3 挂载并安装nginx
[root@rs1 ~]#  mount /dev/sr0 /mnt
mount: /mnt: WARNING: source write-protected, mounted read-only.
[root@rs1 ~]# dnf install nginx -y
1.1.4 将服务器的 IP 地址写入到 Nginx 的默认网页文件中
[root@rs1 ~]# echo $(hostname -I) > /usr/share/nginx/html/index.html1.1.5 开启nginx
[root@rs1 ~]# systemctl start nginx
1.1.6 curl本机 IP 查看首页内容
[root@rs1 ~]# curl localhost
192.168.88.13
1.2 配置RS2
注意,RS2的网络模式为 NAT 模式,它的网关配置为 192.168.88.8
1.2.1 关闭防火墙和selinux
注意: setenforce 0和systemctl stop firewalld时临时关闭
[root@rs2 ~]# setenforce 0
[root@rs2 ~]# getenforce
Permissive
[root@rs2 ~]# systemctl stop firewalld
永久关闭
sed -i "s/^SELINUX=enforcing$/SELINUX=permissive/g" /etc/selinux/config
# 停止 firewalld 服务:systemctl stop firewalld
# 禁用 firewalld 服务,防止其在系统重启后自动启动:
o systemctl disable firewalld
1.2.2 修改主机名和ip
[root@localhost ~]# hostnamectl hostname rs2
[root@rs1 ~]# nmcli c modify ens160 ipv4.method manual ipv4.addresses 192.168.88.15/24 ipv4.gateway 192.168.88.8 connection.autoconnect yes
[root@rs1 ~]# nmcli c up ens160
1.2.3 挂载并安装nginx
[root@rs2 ~]# mount /dev/sr0 /mnt
mount: /mnt: WARNING: source write-protected, mounted read-only.
[root@rs2 ~]# dnf install nginx -y
1.2.4 将服务器的 IP 地址写入到 Nginx 的默认网页文件中
[root@rs2 ~]# # echo $(hostname -I) > /usr/share/nginx/html/index.html
1.2.5 开启nginx
[root@rs2 ~]# systemctl start nginx
1.2.6 curl本机 IP 查看首页内容
[root@rs2 ~]# curl 192.168.88.15
192.168.88.15
rs3配置同上
2、配置LVS
开启主机之前,设置两张网卡,第一块网卡采用仅主机模式,IP 地址为 192.168.216.200,第二块网卡
采用 NAT 模式,IP 地址为192.168.88.8
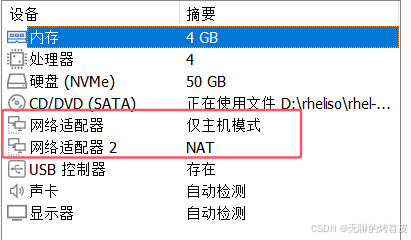
2.1 配置好网卡后,开机,然后查看网络设备
[root@lvs ~]# ip a
1: lo: <LOOPBACK,UP,LOWER_UP> mtu 65536 qdisc noqueue state UNKNOWN group default qlen 1000link/loopback 00:00:00:00:00:00 brd 00:00:00:00:00:00inet 127.0.0.1/8 scope host lovalid_lft forever preferred_lft foreverinet6 ::1/128 scope host valid_lft forever preferred_lft forever
2: ens160: <BROADCAST,MULTICAST,UP,LOWER_UP> mtu 1500 qdisc mq state UP group default qlen 1000link/ether 00:0c:29:c4:22:16 brd ff:ff:ff:ff:ff:ffaltname enp3s0inet 192.168.216.200/24 brd 192.168.216.255 scope global noprefixroute ens160valid_lft forever preferred_lft foreverinet6 fe80::20c:29ff:fec4:2216/64 scope link noprefixroute valid_lft forever preferred_lft forever
3: ens224: <BROADCAST,MULTICAST,UP,LOWER_UP> mtu 1500 qdisc mq state UP group default qlen 1000link/ether 00:0c:29:c4:22:20 brd ff:ff:ff:ff:ff:ffaltname enp19s0inet 192.168.88.8/24 brd 192.168.88.255 scope global noprefixroute ens224valid_lft forever preferred_lft foreverinet6 fe80::3a4f:2efc:6953:e288/64 scope link noprefixroute valid_lft forever preferred_lft forever
2.2 修改网络设备连接名称
我们可以执行如下的命令来查看网络设备连接名称:
[root@localhost ~]# nmcli c show
NAME    UUID                                  TYPE      DEVICE
ens160  4b6ed3ee-1c23-339d-b733-609829075468  ethernet  ens160
Wired connection 1  d9074a6b-1642-3035-96d0-cf2f83a73134  ethernet  ens224
lo      b5c12cde-e898-461f-912f-dc6a93bff316  loopback  lo
接下来我们将连接名称 Wired connection 1 改为 ens224。
# 修改连接名称
[root@localhost ~]# nmcli c modify 'Wired connection 1' connection.id
ens224
# 查看修改结果
[root@localhost ~]# nmcli c show
NAME    UUID                                  TYPE      DEVICE
ens160  4b6ed3ee-1c23-339d-b733-609829075468  ethernet  ens160
ens224  d9074a6b-1642-3035-96d0-cf2f83a73134  ethernet  ens224
lo      b5c12cde-e898-461f-912f-dc6a93bff316  loopback  lo
2.3 修改仅主机模式ip和主机名
2.3.1 修改主机名
[root@localhost ~]# hostnamectl hostname lvs
2.3.2 修改仅主机模式网卡(192.168.216.200/24 VIP)
[root@localhost ~]# nmcli c modify ens160 ipv4.method manual
ipv4.addresses 192.168.216.200/24 ipv4.gateway 192.168.216.2 ipv4.dns
223.5.5.5 connection.autoconnect yes
[root@localhost ~]# nmcli c up ens160
安装软件ipvsadm,查看相关信息
为了防止等会不能上外网,我们先把 ipvsamd 软件安装上。
[root@lvs ~]# mount /dev/sr0 /mnt
mount: /mnt: WARNING: source write-protected, mounted read-only.
[root@lvs ~]# dnf install ipvsadm -y- 软件包信息
[root@lvs ~]# rpm -ql ipvsadm
/etc/sysconfig/ipvsadm-config  #这是配置文件的路径,通常包含 ipvsadm 的初始化设置或参数配置。
/usr/lib/.build-id
/usr/lib/.build-id/0b
/usr/lib/.build-id/0b/d10d85dc0121855898c34f27a7730b50772fcc
/usr/lib/systemd/system/ipvsadm.service  #这是一个服务单元文件,定义了如何使用 systemd 启动、停止和管理 ipvsadm 服务
/usr/sbin/ipvsadm   #ipvsadm 工具的主要可执行文件,用于管理系统内核中的 IPVS 表。IPVS (IP Virtual Server) 是 Linux 内核的一部分,提供传输层负载均衡功能。
/usr/sbin/ipvsadm-restore
/usr/sbin/ipvsadm-save  #分别用于恢复和保存 IPVS 管理规则的工具。ipvsadm-save 可以将当前的 IPVS 配置保存到一个文件中,而 ipvsadm-restore 则可以从该文件中恢复配置。
/usr/share/doc/ipvsadm
/usr/share/doc/ipvsadm/MAINTAINERS
/usr/share/doc/ipvsadm/README
/usr/share/man/man8/ipvsadm-restore.8.gz
/usr/share/man/man8/ipvsadm-save.8.gz
/usr/share/man/man8/ipvsadm.8.gz
2.4 配置NAT模式网卡(192.168.88.8/24 DIP)
[root@lvs ~]# nmcli c modify ens224 ipv4.method manual ipv4.addresses 192.168.88.8/24 ipv4.gateway 192.168.88.2 connection.autoconnect yes
[root@lvs ~]# nmcli c up ens224
2.5 关闭防火墙和selinux
[root@lvs ~]# systemctl stop firewalld
[root@lvs ~]# systemctl disable firewalld
Removed "/etc/systemd/system/multi-user.target.wants/firewalld.service".
Removed "/etc/systemd/system/dbus-org.fedoraproject.FirewallD1.service".[root@lvs ~]# setenforce 0
[root@lvs ~]# sed -i "s/^SELINUX=enforcing$/SELINUX=permissive/g" /etc/selinux/config
3、配置客户端(仅主机模式)
- 修改网络模式
[root@client ~]# systemctl stop firewalld
[root@client ~]# setenforce 0
[root@client ~]# getenforce
Permissive[root@localhost ~]# hostnamectl hostname client
[root@localhost ~]# nmcli c modify ens160 ipv4.method manual
ipv4.addresses 192.168.216.100/24 ipv4.gateway 192.168.216.2 ipv4.dns
223.5.5.5 connection.autoconnect yes
[root@localhost ~]# nmcli c up ens160
[root@client ~]# nmcli d show ens160
GENERAL.DEVICE:                         ens160
GENERAL.TYPE:                           ethernet
GENERAL.HWADDR:                         00:0C:29:0B:4E:6E
GENERAL.MTU:                            1500
GENERAL.STATE:                          100 (connected)
GENERAL.CONNECTION:                     ens160
GENERAL.CON-PATH:                       /org/freedesktop/NetworkManager/ActiveConnection/2
WIRED-PROPERTIES.CARRIER:               on
IP4.ADDRESS[1]:                         192.168.216.100/24
IP4.GATEWAY:                            192.168.216.2
IP4.ROUTE[1]:                           dst = 192.168.216.0/24, nh = 0.0.0.0, mt = 100
IP4.ROUTE[2]:                           dst = 0.0.0.0/0, nh = 192.168.216.2, mt = 100
IP4.DNS[1]:                             223.5.5.5
IP6.ADDRESS[1]:                         fe80::20c:29ff:fe0b:4e6e/64
IP6.GATEWAY:                            --
IP6.ROUTE[1]:                           dst = fe80::/64, nh = ::, mt = 1024
4、功能测试
4.1 lvs启动ipvsadm服务
[root@lvs ~]# ipvsadm-save > /etc/sysconfig/ipvsadm
[root@lvs ~]# systemctl start ipvsadm
我在客户端上访问 VIP 来测试是否能够成功访问到后端的 RS 服务器。
[root@client ~]# curl 192.168.216.200
curl: (7) Failed to connect to 192.168.216.200 port 80: No route to host
但是,我们在 lvs 服务器中可以访问:
[root@lvs ~]# curl 192.168.88.13
192.168.88.13
[root@lvs ~]# curl 192.168.88.15
192.168.88.15
[root@lvs ~]# curl 192.168.88.17
192.168.88.17
为什么呢?原因是没有做 LVS 规则匹配
A虚拟服务器,a真实服务器
-t虚拟服务ip和端口,-r真实服务ip和端口
-s指定算法 rr算法为轮询
-m指定为nat模式(默认为dr模式) -w权重
4.2 lvs添加规则
[root@lvs ~]# ipvsadm -A -t 192.168.216.200:80 -s rr
[root@lvs ~]# ipvsadm -a -t 192.168.216.200:80 -r 192.168.88.13:80 -m -w 2
[root@lvs ~]# ipvsadm -Ln
IP Virtual Server version 1.2.1 (size=4096)
Prot LocalAddress:Port Scheduler Flags-> RemoteAddress:Port           Forward Weight ActiveConn InActConn
TCP  192.168.216.200:80 rr-> 192.168.88.13:80             Masq    2      0          0
[root@lvs ~]# ipvsadm -a -t 192.168.216.200:80 -r 192.168.88.15:80 -m -w 1
[root@lvs ~]# ipvsadm -a -t 192.168.216.200:80 -r 192.168.88.17:80 -m -w 1
[root@lvs ~]# ipvsadm -Ln
IP Virtual Server version 1.2.1 (size=4096)
Prot LocalAddress:Port Scheduler Flags-> RemoteAddress:Port           Forward Weight ActiveConn InActConn
TCP  192.168.216.200:80 rr-> 192.168.88.13:80             Masq    2      0          0         -> 192.168.88.15:80             Masq    1      0          0         -> 192.168.88.17:80             Masq    1      0          0
配置完后,重启服务器。
[root@lvs ~]# systemctl restart ipvsadm重启后,继续在客户端进行测试,发现还是拒绝
[root@client ~]# curl 192.168.216.200
curl: (7) Failed to connect to 192.168.216.200 port 80: No route to host原因是需要配置内核转发参数 net.ipv4.ip_forward=1 。
4.3 配置转发参数
[root@lvs ~]# echo "net.ipv4.ip_forward=1" >> /etc/sysctl.conf
配置好后执行如下的命令来生效。
[root@lvs ~]# sysctl -p
net.ipv4.ip_forward = 1
4.4 客户端测试
[root@client ~]# curl 192.168.216.200
192.168.88.17
[root@client ~]# curl 192.168.216.200
192.168.88.15
[root@client ~]# curl 192.168.216.200
192.168.88.13
[root@client ~]# curl 192.168.216.200
192.168.88.17
5、总结
lvs要设置两块网卡,一块用于虚拟IP,便于用户访问;另一块作为后端真实主机的网关。
lvs要添加规则并重启ipvsadm,配置内核转发参数并使其生效。


