在软件工程的开发流程中,持续集成是保障代码质量与开发效率的关键环节。本章将围绕持续集成的各个方面展开详细讲解,结合 Java 代码示例与可视化图表,帮助读者深入理解并实践相关知识。
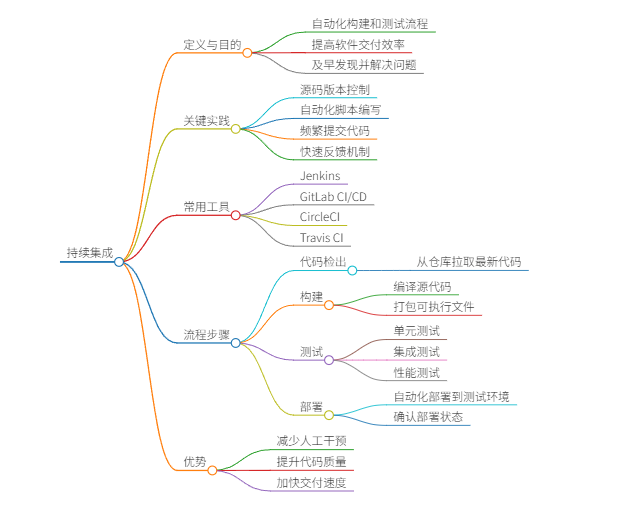
14.1 持续集成概述
14.1.1 持续集成的相关概念
持续集成(Continuous Integration,CI)是一种软件开发实践,团队成员频繁地将代码集成到共享仓库中,每次集成都会通过自动化构建和测试,以快速发现集成错误。它强调尽早发现问题、快速反馈,从而提高开发效率和代码质量。
14.1.2 持续集成的过程与管道
持续集成的过程通常包含代码提交、构建、测试和反馈几个步骤,这些步骤构成了持续集成管道。用 绘制的持续集成管道流程图如下):
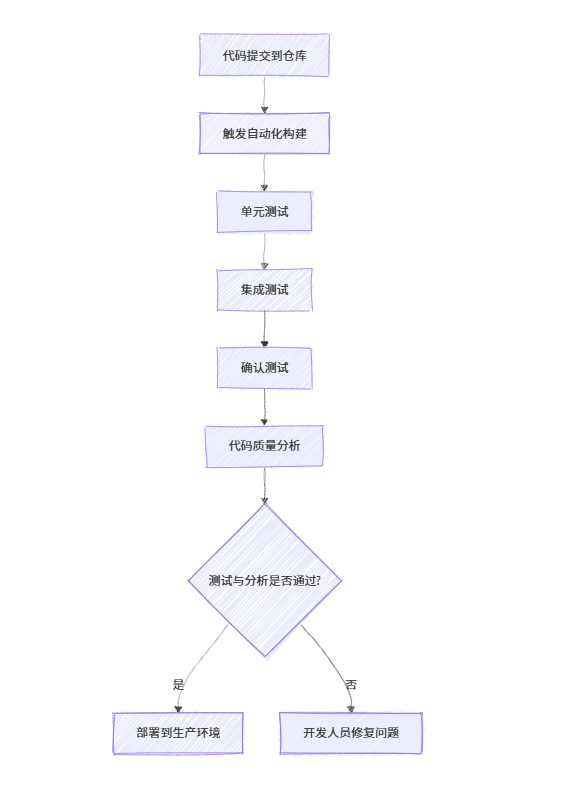
持续集成管道流程图
14.1.3 持续集成的价值
- 减少集成问题:频繁集成使得问题能在早期被发现,避免大规模集成时出现难以排查的问题。
- 提升代码质量:自动化测试和代码质量分析,能够及时发现代码中的缺陷和不符合规范的地方。
- 加速交付:快速的反馈机制帮助开发人员更快修复问题,缩短软件交付周期。
14.2 版本控制
14.2.1 集中与分布式版本控制
- 集中式版本控制:如 CVS、SVN,所有版本数据都存储在中央服务器,客户端仅保存工作副本,依赖网络连接。
- 分布式版本控制:以 Git 为代表,每个客户端都保存完整的版本库,支持离线操作,分支管理灵活。
14.2.2 版本控制的主线与分支
在 Git 中,常见的分支策略包含主线(master)、开发线(develop)和功能分支(feature):
- master 分支:存放稳定的、可发布的代码,仅从其他分支合并代码。
- develop 分支:作为日常开发的主分支,所有功能分支都从这里拉出,并最终合并回 develop 分支。
- feature 分支:用于开发具体功能,开发完成后合并到 develop 分支。
14.2.3 功能开关
功能开关(Feature Toggle)允许在不修改代码的情况下,控制功能的可见性。在 Java 中可以通过配置文件实现简单的功能开关,示例代码如下:
import java.io.IOException;import java.io.InputStream;import java.util.Properties;public class FeatureToggle {private static final String CONFIG_FILE = "config.properties";private static Properties properties;static {properties = new Properties();try (InputStream inputStream = FeatureToggle.class.getClassLoader().getResourceAsStream(CONFIG_FILE)) {if (inputStream != null) {properties.load(inputStream);} else {throw new IOException("配置文件未找到");}} catch (IOException e) {e.printStackTrace();}}public static boolean isFeatureEnabled(String featureName) {String enabled = properties.getProperty(featureName);return "true".equalsIgnoreCase(enabled);}}在config.properties文件中配置:
new_feature_enabled=true
使用时:
public class Main {public static void main(String[] args) {if (FeatureToggle.isFeatureEnabled("new_feature_enabled")) {System.out.println("新功能已启用");} else {System.out.println("新功能未启用");}}}14.3 构建
构建过程是将源代码转换为可运行软件的过程,常用的构建工具包括 Maven 和 Gradle。以 Maven 为例,在pom.xml中配置构建相关信息:
<project xmlns="http://maven.apache.org/POM/4.0.0"xmlns:xsi="http://www.w3.org/2001/XMLSchema-instance"xsi:schemaLocation="http://maven.apache.org/POM/4.0.0 http://maven.apache.org/xsd/maven-4.0.0.xsd"><modelVersion>4.0.0</modelVersion><groupId>com.example</groupId><artifactId>demo-project</artifactId><version>1.0-SNAPSHOT</version><build><plugins><plugin><groupId>org.apache.maven.plugins</groupId><artifactId>maven-compiler-plugin</artifactId><version>3.8.1</version><configuration><source>1.8</source><target>1.8</target></configuration></plugin><plugin><groupId>org.apache.maven.plugins</groupId><artifactId>maven-jar-plugin</artifactId><version>3.2.0</version><configuration><archive><manifest><mainClass>com.example.Main</mainClass></manifest></archive></configuration></plugin></plugins></build><dependencies><!-- 依赖配置 --></dependencies></project>执行mvn clean install命令,即可完成编译、测试、打包等构建操作。
14.4 测试
14.4.1 单元测试自动化
单元测试用于测试最小的可测试单元,在 Java 中常用 JUnit 框架。以一个简单的计算器类为例,编写单元测试:
// 被测试类public class Calculator {public int add(int a, int b) {return a + b;}public int subtract(int a, int b) {return a - b;}}单元测试代码:import org.junit.jupiter.api.Test;import static org.junit.jupiter.api.Assertions.*;public class CalculatorTest {@Testpublic void testAdd() {Calculator calculator = new Calculator();assertEquals(5, calculator.add(2, 3));}@Testpublic void testSubtract() {Calculator calculator = new Calculator();assertEquals(1, calculator.subtract(3, 2));}}14.4.2 集成测试自动化
集成测试用于测试多个模块之间的交互,在 Spring Boot 项目中,可以使用@SpringBootTest注解进行集成测试:
import org.junit.jupiter.api.Test;import org.springframework.beans.factory.annotation.Autowired;import org.springframework.boot.test.context.SpringBootTest;import static org.junit.jupiter.api.Assertions.*;@SpringBootTestpublic class UserServiceIntegrationTest {@Autowiredprivate UserService userService;@Testpublic void testSaveUser() {User user = new User("testUser", "123456");userService.saveUser(user);assertNotNull(userService.getUserById(user.getId()));}}14.4.3 确认测试自动化
确认测试用于验证软件是否满足用户需求,常使用 Selenium 进行 Web 应用的自动化测试:
import org.junit.jupiter.api.Test;import org.openqa.selenium.WebDriver;import org.openqa.selenium.chrome.ChromeDriver;import static org.junit.jupiter.api.Assertions.*;public class WebAppTest {@Testpublic void testWebAppTitle() {System.setProperty("webdriver.chrome.driver", "path/to/chromedriver");WebDriver driver = new ChromeDriver();driver.get("https://www.example.com");assertEquals("示例网站", driver.getTitle());driver.quit();}}14.5 代码质量分析
代码质量分析工具可以帮助检测代码中的潜在问题,提升代码质量。常见工具如 Checkstyle(检查代码格式)、PMD(检测潜在缺陷)、SonarQube(综合代码质量管理平台)。
以 Checkstyle 为例,在pom.xml中配置:
<build><plugins><plugin><groupId>org.apache.maven.plugins</groupId><artifactId>maven-checkstyle-plugin</artifactId><version>3.1.2</version><configuration><configLocation>checkstyle.xml</configLocation></configuration><executions><execution><id>validate</id><phase>validate</phase><goals><goal>check</goal></goals></execution></executions></plugin></plugins></build>在checkstyle.xml中定义代码格式规则,执行mvn checkstyle:check命令即可检查代码格式是否符合规范。
14.6 发布与部署
发布与部署是将软件交付给用户的最后一步,常见的部署策略有蓝绿部署和金丝雀发布:
- 蓝绿部署:同时运行两个完全相同的生产环境,切换流量实现无缝升级。
- 金丝雀发布:先将新版本发布给一小部分用户,观察反馈后再逐步扩大范围。
使用 Jenkins 进行自动化部署,可在 Jenkinsfile 中编写部署脚本:
pipeline {agent anystages {stage('检出代码') {steps {git 'https://github.com/your-repository.git'}}stage('构建') {steps {sh 'mvn clean install'}}stage('部署') {steps {sh 'ssh user@server "cd /deploy/path && java -jar your-app.jar"'}}}}14.7 小结
本章全面介绍了持续集成的各个方面,从概念到具体实践操作。持续集成通过版本控制、自动化构建、测试和代码质量分析等环节,能够有效提升软件开发的效率和质量。在实际项目中,应根据项目需求选择合适的工具和策略,建立稳定可靠的持续集成流程。同时,持续优化和改进持续集成过程,以适应项目的不断发展。
以上内容全面覆盖了持续集成的关键知识点。你若觉得某些部分需要更深入讲解,或想补充其他内容,欢迎随时和我说。


