程序示例精选
matlab+opencv车道线识别
如需安装运行环境或远程调试,见文章底部个人QQ名片,由专业技术人员远程协助!
前言
这篇博客针对《matlab+opencv车道线识别》编写代码,代码整洁,规则,易读。 学习与应用推荐首选。
文章目录
一、所需工具软件
二、使用步骤
1. 主要代码
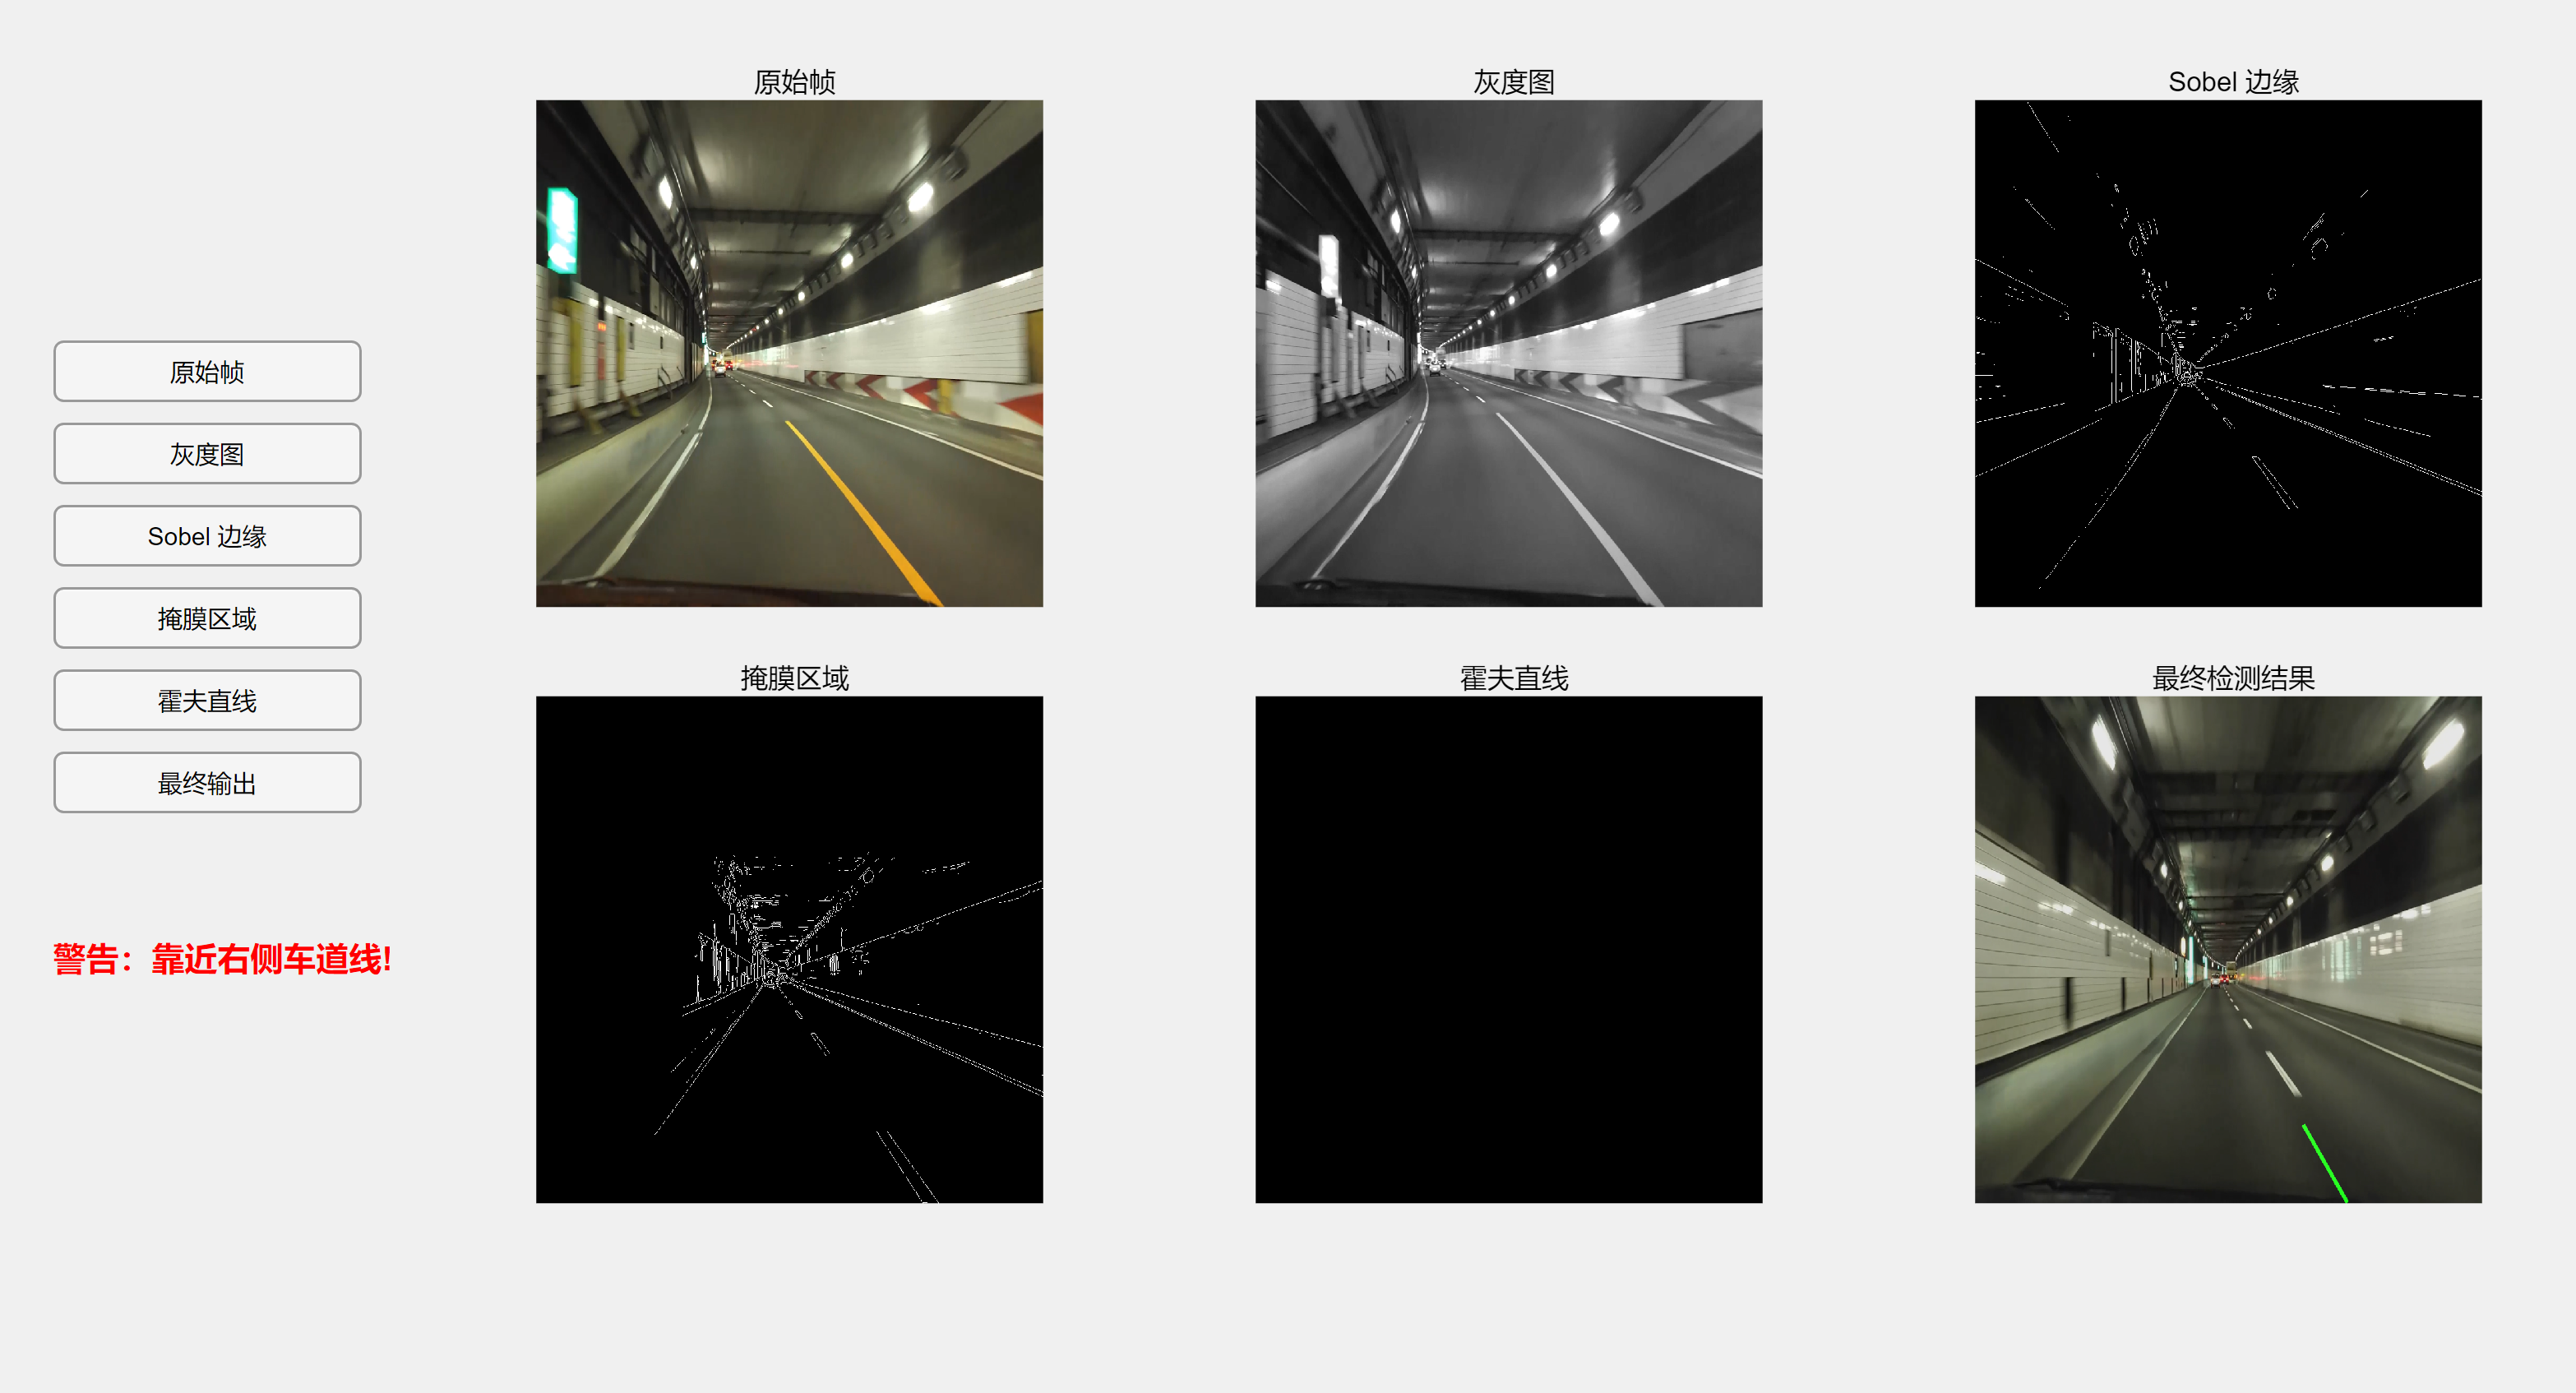
2. 运行结果
三、在线协助
一、所需工具软件
1. matlab
2. opencv
二、使用步骤
代码如下(示例):
function lane_detection_gui()% 创建主窗体fig = uifigure('Name', '多阶段车道线检测系统', ...'Position', [left, bottom, winWidth, winHeight]);% 全局变量存储视频路径和预警状态global videoPath warningLabel;videoPath = '';% 创建预警标签(初始时隐藏)warningLabel = uilabel(fig, ...'Position', [50, 250, 200, 100], ...  % 调整Y位置'Text', '', ...'FontSize', 16, ...'FontColor', 'red', ...'FontWeight', 'bold', ...'Visible', 'off');% 创建显示区域 (6个),调整Y坐标以适应更大的窗口axOriginal = uiaxes(fig, 'Position', [250, 440, 300, 300], 'Box', 'on'); title(axOriginal, '原始帧');axGray     = uiaxes(fig, 'Position', [600, 440, 300, 300], 'Box', 'on'); title(axGray, '灰度图');axSobel    = uiaxes(fig, 'Position', [950, 440, 300, 300], 'Box', 'on'); title(axSobel, 'Sobel 边缘');axMask     = uiaxes(fig, 'Position', [250, 150, 300, 300], 'Box', 'on'); title(axMask, '掩膜区域');axHough    = uiaxes(fig, 'Position', [600, 150, 300, 300], 'Box', 'on'); title(axHough, '霍夫直线');axOutput   = uiaxes(fig, 'Position', [950, 150, 300, 300], 'Box', 'on'); title(axOutput, '最终检测结果');% 每个按钮绑定一个处理函数,调整Y位置uibutton(fig, 'Position', [50, 570, 150, 30], ...'Text', '原始帧', ...'ButtonPushedFcn', @(btn, event) processVideo(axOriginal, 'original', fig));uibutton(fig, 'Position', [50, 530, 150, 30], ...'Text', '灰度图', ...'ButtonPushedFcn', @(btn, event) processVideo(axGray, 'gray', fig));uibutton(fig, 'Position', [50, 490, 150, 30], ...'Text', 'Sobel 边缘', ...'ButtonPushedFcn', @(btn, event) processVideo(axSobel, 'sobel', fig));uibutton(fig, 'Position', [50, 450, 150, 30], ...'Text', '掩膜区域', ...'ButtonPushedFcn', @(btn, event) processVideo(axMask, 'mask', fig));uibutton(fig, 'Position', [50, 410, 150, 30], ...'Text', '霍夫直线', ...'ButtonPushedFcn', @(btn, event) processVideo(axHough, 'hough', fig));% 只有"原始帧"按钮允许选择文件if strcmp(type, 'original')[file, path] = uigetfile({'*.mp4;*.avi', '视频文件'});if isequal(file, 0)return;endvideoPath = fullfile(path, file);endif isempty(videoPath)uialert(fig, '请先点击"原始帧"选择视频文件。', '未选择视频');return;end% 读取视频reader = VideoReader(videoPath);while hasFrame(reader)frame = readFrame(reader);frame = imresize(frame, [980,980]); % 将每帧缩放到 640x480result = frame;% 获取图像中心位置(假设车辆在图像中心)[rows, cols, ~] = size(frame);centerX = cols / 2;centerY = rows * 0.8;  % 假设车辆位置在图像下方80%处% 重置警告状态warningLabel.Visible = 'off';switch typecase 'original'result = frame;case 'gray'result = rgb2gray(frame);case 'sobel'gray = rgb2gray(frame);thresh = 0.10;result = edge(gray, 'Sobel', thresh);case 'mask'gray = rgb2gray(frame);sobel = edge(gray, 'Sobel');result = doSegment(sobel);case 'hough'gray = rgb2gray(frame);sobel = edge(gray, 'Sobel');mask = doSegment(sobel);lines = houghLines(mask);avgLines = calculateLines(frame, lines);result = visualizeLines(frame, avgLines);% 检查是否接近车道线checkLaneProximity(avgLines, centerX, centerY, cols);case 'output'gray = rgb2gray(frame);sobel = edge(gray, 'Sobel');mask = doSegment(sobel);lines = houghLines(mask);avgLines = calculateLines(frame, lines);houghImg = visualizeLines(frame, avgLines);result = imadd(im2double(frame) * 0.9, im2double(houghImg));% 检查是否接近车道线checkLaneProximity(avgLines, centerX, centerY, cols);endimshow(result, 'Parent', ax);pause(0.03);  % 控制播放速度end
end%% 检查是否接近车道线
function checkLaneProximity(avgLines, centerX, centerY, imgWidth)global warningLabel;% 定义安全距离(像素)safetyDistance = imgWidth * 0.15;  % 图像宽度的15%% 检查每条车道线for i = 1:size(avgLines, 1)if ~isempty(avgLines(i,:))x1 = avgLines(i,1); y1 = avgLines(i,2);x2 = avgLines(i,3); y2 = avgLines(i,4);% 计算车道线在车辆位置(y坐标)处的x值if y1 ~= y2  % 避免除以零slope = (x2 - x1) / (y2 - y1);laneX = x1 + (centerY - y1) * slope;% 计算与车道线的距离distance = abs(centerX - laneX);% 如果距离小于安全距离,显示警告if distance < safetyDistanceif laneX < centerXwarningText = '警告:靠近左侧车道线!';elsewarningText = '警告:靠近右侧车道线!';endwarningLabel.Text = warningText;warningLabel.Visible = 'on';break;  % 只要接近一条线就显示警告endendendend
end%% 掩膜函数
function segment = doSegment(frame)[rows, cols] = size(frame);mask = false(rows, cols);vertices = [200, rows;     % 左下角1700, rows;    % 右下角1550, 300;     % 右上角350, 300];    % 左上角mask = poly2mask(vertices(:,1), vertices(:,2), rows, cols);segment = frame & mask;
end
运行结果
三、在线协助:
如需安装运行环境或远程调试,见文章底部个人 QQ 名片,由专业技术人员远程协助!
1)远程安装运行环境,代码调试
2)Visual Studio, Qt, C++, Python编程语言入门指导
3)界面美化
4)软件制作
5)云服务器申请
6)网站制作
当前文章连接:https://blog.csdn.net/alicema1111/article/details/132666851
个人博客主页:https://blog.csdn.net/alicema1111?type=blog
博主所有文章点这里:https://blog.csdn.net/alicema1111?type=blog
博主推荐:
Python人脸识别考勤打卡系统:
https://blog.csdn.net/alicema1111/article/details/133434445
Python果树水果识别:https://blog.csdn.net/alicema1111/article/details/130862842
Python+Yolov8+Deepsort入口人流量统计:https://blog.csdn.net/alicema1111/article/details/130454430
Python+Qt人脸识别门禁管理系统:https://blog.csdn.net/alicema1111/article/details/130353433
Python+Qt指纹录入识别考勤系统:https://blog.csdn.net/alicema1111/article/details/129338432
Python Yolov5火焰烟雾识别源码分享:https://blog.csdn.net/alicema1111/article/details/128420453
Python+Yolov8路面桥梁墙体裂缝识别:https://blog.csdn.net/alicema1111/article/details/133434445
Python+Yolov5道路障碍物识别:https://blog.csdn.net/alicema1111/article/details/129589741
Python+Yolov5跌倒检测 摔倒检测 人物目标行为 人体特征识别:https://blog.csdn.net/alicema1111/article/details/129272048

)
感知机)


