本文将介绍
pyhanlp。包括
HanLP 1.x和HanLP 2.x版本的使用场景的介绍,以及它们的安装、迁移和使用方法,以帮助大家充分利用其强大的自然语言处理功能。主要内容包括:
1、如何在3.9及以上的python环境下安装pyhanlp?
2、pyhanlp的迁移;
3、HanLP2.x的安装使用。
HanLP 是一个开源的自然语言处理(NLP)工具包,提供了丰富的功能,包括分词、词性标注、依存句法分析、关键词提取、文本分类等。这些功能满足了多种语言处理需求,被广泛应用于研究和工业领域。
两个版本的衍生:
-
HanLP 1.x
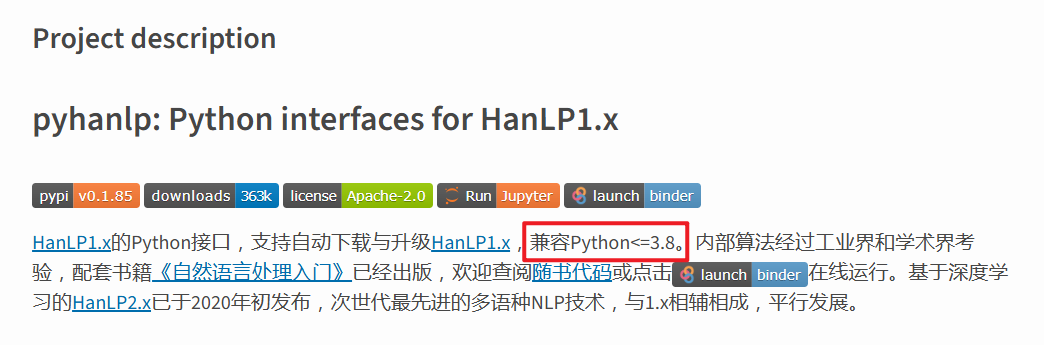
HanLP 1.x 是基于 Java 的版本,主要依赖统计模型和规则算法。它提供了高效的分词和词性标注工具,同时支持命名实体识别(NER)、依存句法分析和关键词提取等基础 NLP 功能。为了方便 Python 用户使用 HanLP 1.x,提供了一个名为pyhanlp的 Python 包,通过 JPype 将 HanLP 1.x 的 Java 接口封装成 Python API。pyhanlp支持自动下载和升级模型,但其核心仍依赖 Java,适用于 Python ≤ 3.8 的环境。 -
HanLP 2.x
HanLP 2.x 是一个全新的版本,完全基于 Python 开发,并采用了现代深度学习技术,如 Transformer 和预训练语言模型(如 BERT 和 GPT)。HanLP 2.x 支持多语言处理,不再局限于中文,并在复杂任务(如文本生成、问答系统和语义分析)上表现优异。其 API 设计更加现代化,易于上手,适合高精度和大规模的 NLP 应用场景。
HanLP 1.x 和 HanLP 2.x 的对比:
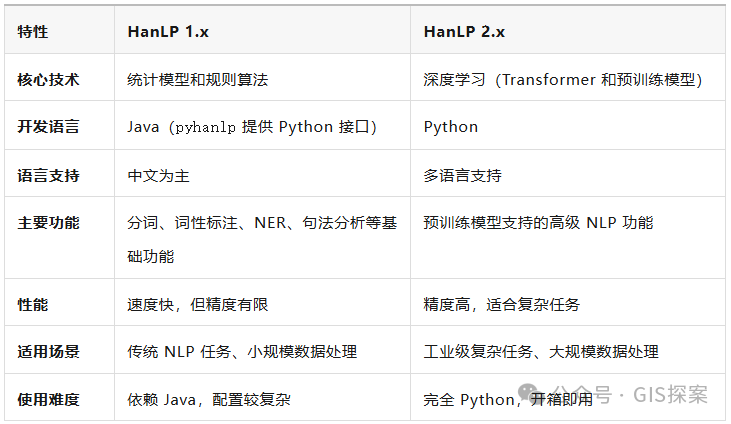
总结:
-
如果您的任务对速度和资源需求较敏感,或者只是完成基础的 NLP 任务,HanLP 1.x 仍然是一个高效的选择。
-
如果您不打算将使用
HanLP 1.x接口实现的功能迁移到HanLP 2.x,但希望在新版本的 Python 中安装和迁移pyhanlp,请仔细阅读本文并动手测试相关步骤。 -
如果需要处理复杂任务或多语言环境,并且注重精度和性能,HanLP 2.x 是更好的选择。
一、python3.11环境下安装pyhanlp
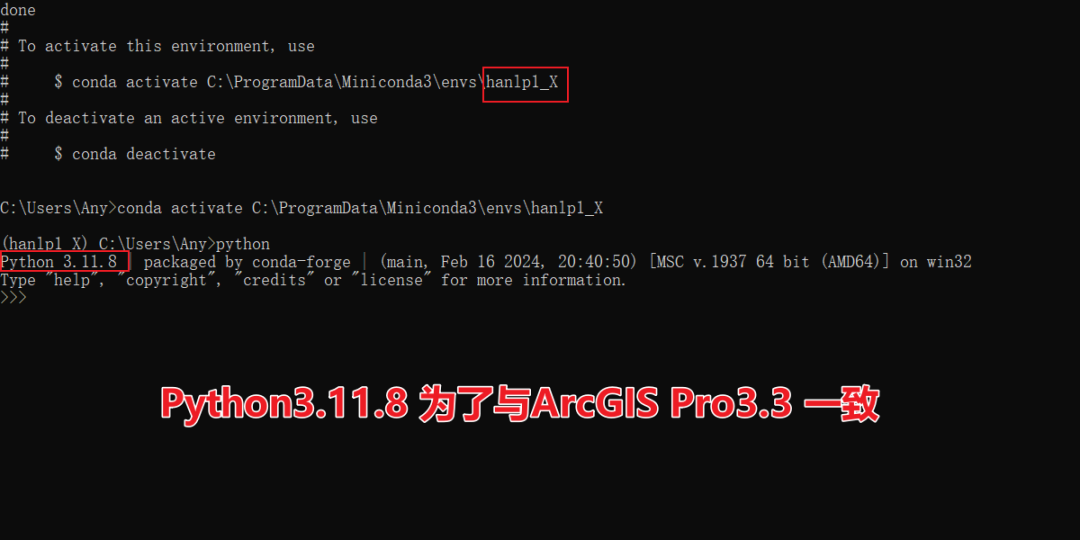
1.1 python3.11虚拟环境准备
创建一个python为3.11.8的虚拟环境hanlp1_X。
1.2 修改setup.py文件内容
使用官网的conda命令:
conda install -c conda-forge openjdk python=3.8 jpype1=0.7.0 -y pip install pyhanlp
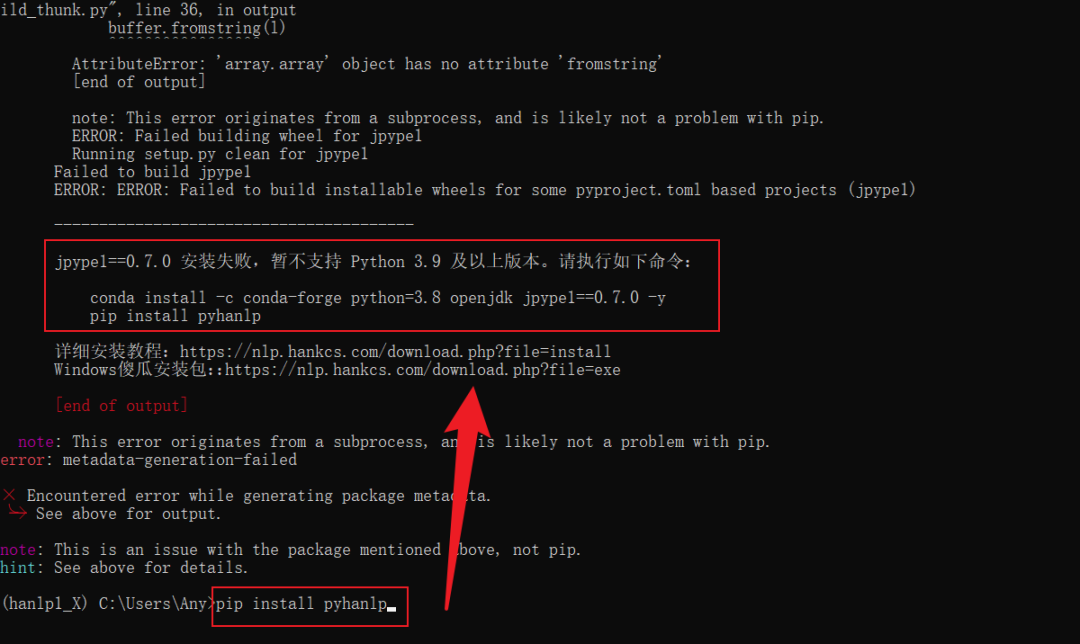
显然是不可行的,python的版本,jpype1的版本都不对。直接使用命令:
| pip install pyhanlp |
安装报错信息如下:
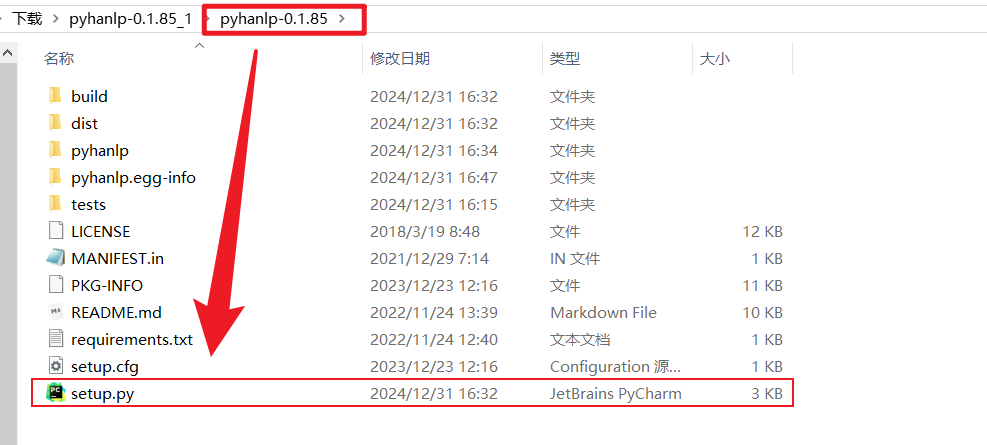
打开下载的pyhanlp 0.1.85的包中的安装文件setup.py。
setup.py的内容如下,影响安装的信息如高亮(红色)部分。
# -*- coding:utf-8 -*-# Author:hankcs# Date: 2018-03-11 20:54from os.path import abspath, join, dirnameimport sysfrom setuptools import find_packages, setupdef browser_open(url='https://nlp.hankcs.com/download.php?file=install'):try:import webbrowserwebbrowser.open_new_tab(url)except:passJPYPE = 'jpype1==0.7.0'try:import subprocesscommand = 'pip install ' + JPYPEsubprocess.run([sys.executable, "-m"] + command.split(" "),check=True,)except:browser_open()errors = ['{} 安装失败'.format(JPYPE)]if sys.version_info >= (3, 9):errors.append('暂不支持 Python 3.9 及以上版本')sys.exit('''----------------------------------------{}。请执行如下命令:conda install -c conda-forge python=3.8 openjdk {} -ypip install pyhanlp详细安装教程:https://nlp.hankcs.com/download.php?file=installWindows傻瓜安装包:https://nlp.hankcs.com/download.php?file=exe '''.format(','.join(errors), JPYPE))if sys.version_info[0] < 3: # In Python3 TypeError: a bytes-like object is required, not 'str'long_description = 'Python wrapper for HanLP: Han Language Processing'else:this_dir = abspath(dirname(__file__))with open(join(this_dir, 'README.md'), encoding='utf-8') as file:long_description = file.read()setup(name='pyhanlp',version='0.1.85',description='Python wrapper for HanLP: Han Language Processing',long_description=long_description,long_description_content_type="text/markdown",url='https://github.com/hankcs/pyhanlp',author='hankcs',author_email='hankcshe@gmail.com',license='Apache License 2.0',classifiers=['Intended Audience :: Developers','Natural Language :: Chinese (Simplified)','Natural Language :: Chinese (Traditional)','Operating System :: OS Independent','Programming Language :: Python','Programming Language :: Python :: 2','Programming Language :: Python :: 2.7','Programming Language :: Python :: 3','Topic :: Text Processing','Topic :: Text Processing :: Indexing','Topic :: Text Processing :: Linguistic'],keywords='corpus,machine-learning,NLU,NLP',packages=find_packages(exclude=['docs', 'tests*']),include_package_data=True,install_requires=[JPYPE, 'hanlp-downloader'],entry_points={'console_scripts': ['hanlp=pyhanlp.main:main',],},# python_requires='<3.9',)
我们不妨对高亮部分进行更改,将jpype1的版本改为1.4.1,将判断python版本的部分注释,如下所示:
# -*- coding:utf-8 -*-# Author:hankcs# Date: 2018-03-11 20:54from os.path import abspath, join, dirnameimport sysfrom setuptools import find_packages, setupdef browser_open(url='https://nlp.hankcs.com/download.php?file=install'):try:import webbrowserwebbrowser.open_new_tab(url)except:passJPYPE = 'jpype1==1.4.1'try:import subprocesscommand = 'pip install ' + JPYPEsubprocess.run([sys.executable, "-m"] + command.split(" "),check=True,)except:browser_open()errors = ['{} 安装失败'.format(JPYPE)]# if sys.version_info >= (3, 9):# errors.append('暂不支持 Python 3.9 及以上版本')# sys.exit(# '''# ----------------------------------------## {}。请执行如下命令:## conda install -c conda-forge python=3.8 openjdk {} -y# pip install pyhanlp## 详细安装教程:https://nlp.hankcs.com/download.php?file=install# Windows傻瓜安装包:https://nlp.hankcs.com/download.php?file=exe# '''.format(','.join(errors), JPYPE))if sys.version_info[0] < 3: # In Python3 TypeError: a bytes-like object is required, not 'str'long_description = 'Python wrapper for HanLP: Han Language Processing'else:this_dir = abspath(dirname(__file__))with open(join(this_dir, 'README.md'), encoding='utf-8') as file:long_description = file.read()setup(name='pyhanlp',version='0.1.85',description='Python wrapper for HanLP: Han Language Processing',long_description=long_description,long_description_content_type="text/markdown",url='https://github.com/hankcs/pyhanlp',author='hankcs',author_email='hankcshe@gmail.com',license='Apache License 2.0',classifiers=['Intended Audience :: Developers','Natural Language :: Chinese (Simplified)','Natural Language :: Chinese (Traditional)','Operating System :: OS Independent','Programming Language :: Python','Programming Language :: Python :: 2','Programming Language :: Python :: 2.7','Programming Language :: Python :: 3','Topic :: Text Processing','Topic :: Text Processing :: Indexing','Topic :: Text Processing :: Linguistic'],keywords='corpus,machine-learning,NLU,NLP',packages=find_packages(exclude=['docs', 'tests*']),include_package_data=True,install_requires=[JPYPE, 'hanlp-downloader'],entry_points={'console_scripts': ['hanlp=pyhanlp.main:main',],},# python_requires='<3.9',)
1.3 使用setup.py安装pyhanlp
使用命令:
| python setup.py install |
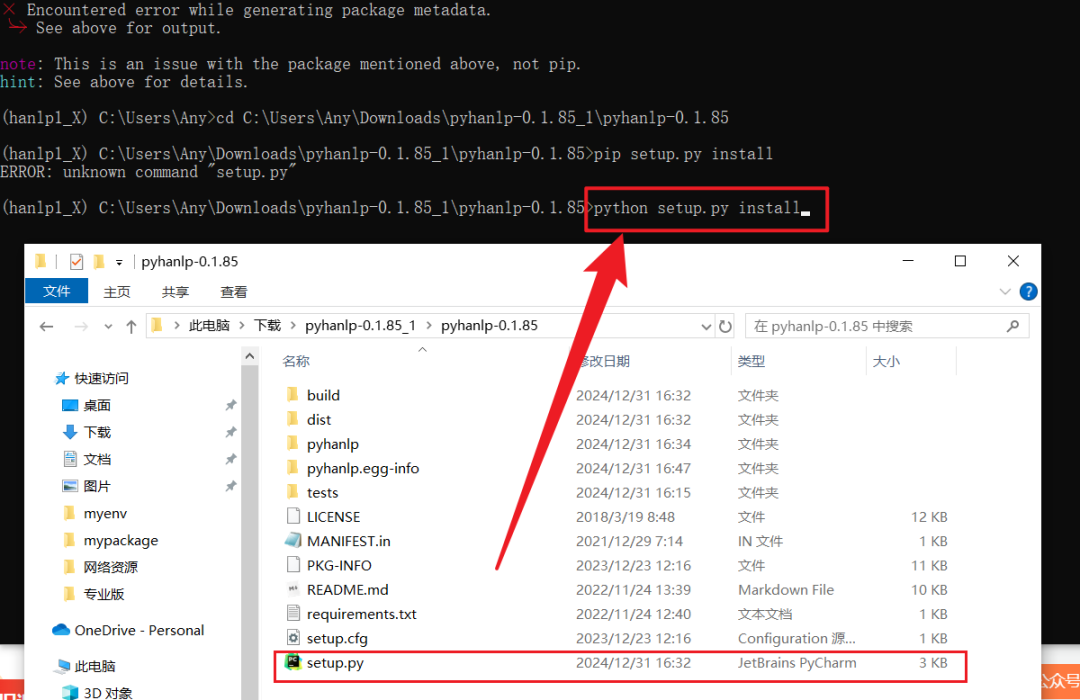
安装pyhanlp如下:
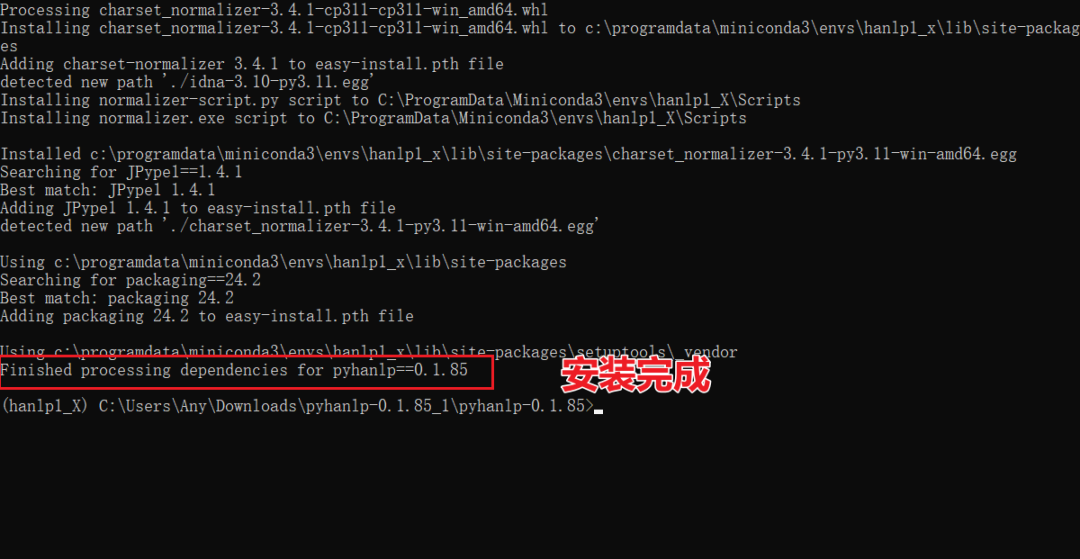
安装完成后,在目录:
C:\ProgramData\miniconda3\envs\hanlp1_X\Lib\site-packages
下,会生成一个名为“pyhanlp-0.1.85-py3.11.egg”的文件夹,在该文件夹下, 将pyhanlp文件夹剪切或复制到site-packages目录下。

1. 4 导入pyhanlp
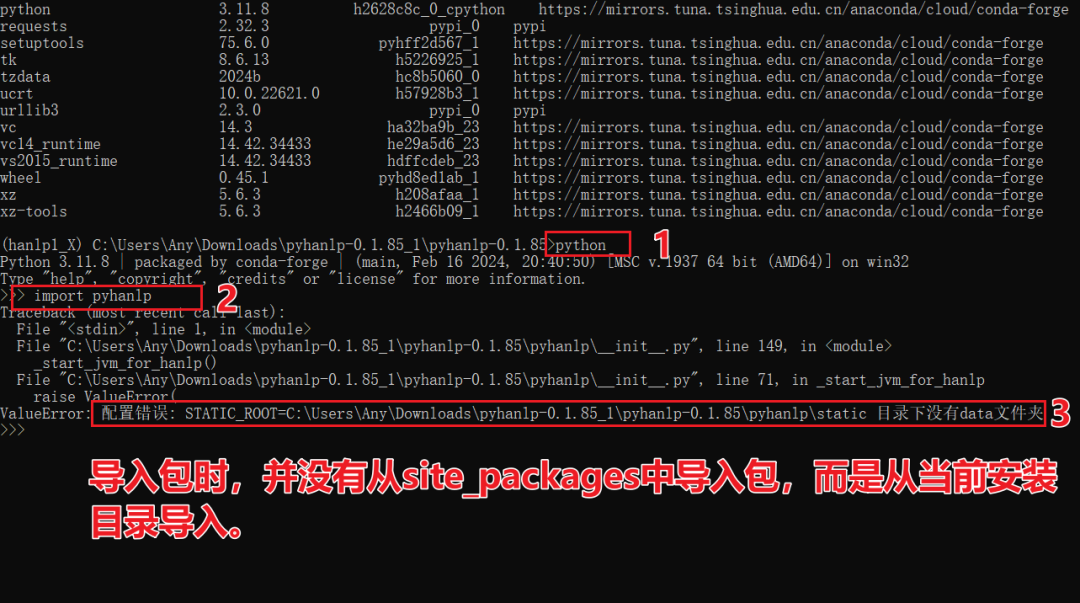
重新打开一个命令行窗口,激活hanlp1_X(或者切换一下当前目录),否则导入的是安装目录下的文件夹。
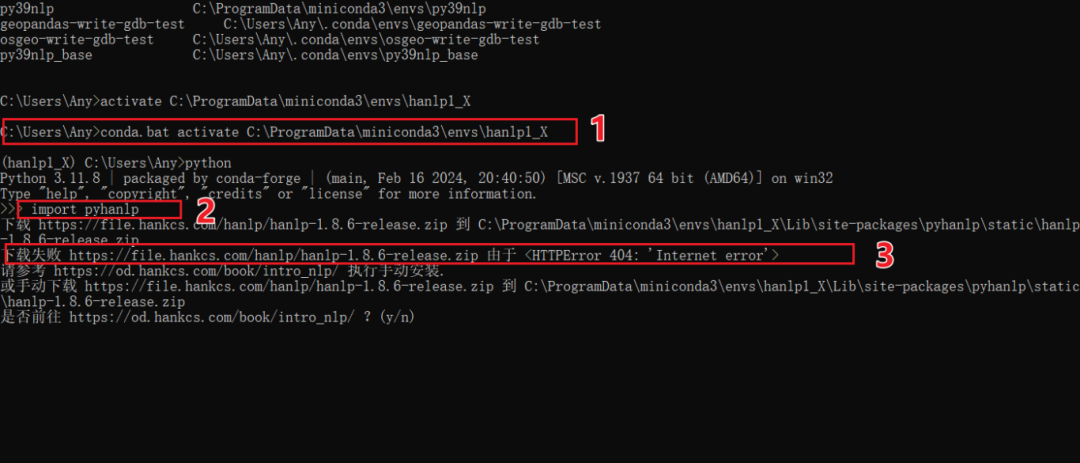
1.5 导包失败,配置hanlp-1.8.5-release
从地址:http://download.hanlp.com/下载hanlp-1.8.5-release.zip文件。
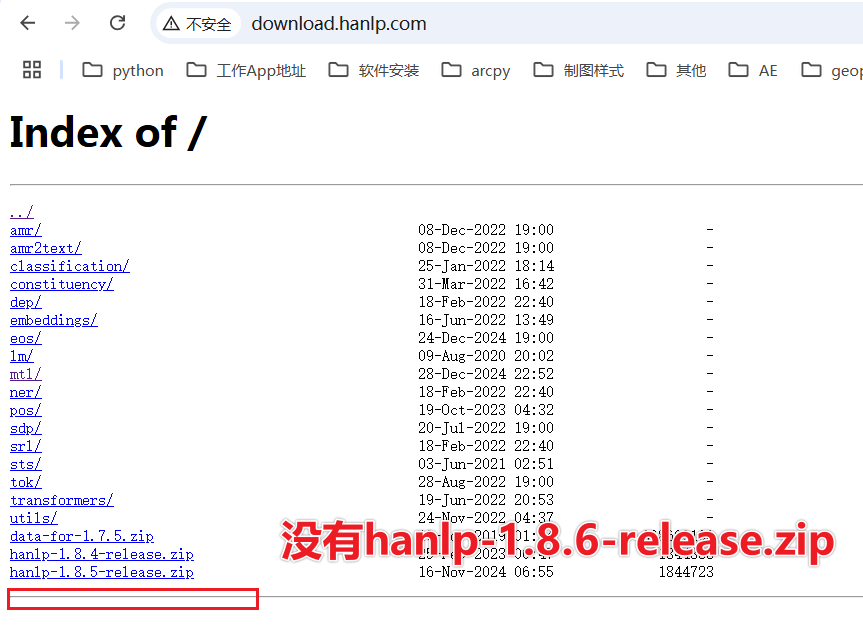
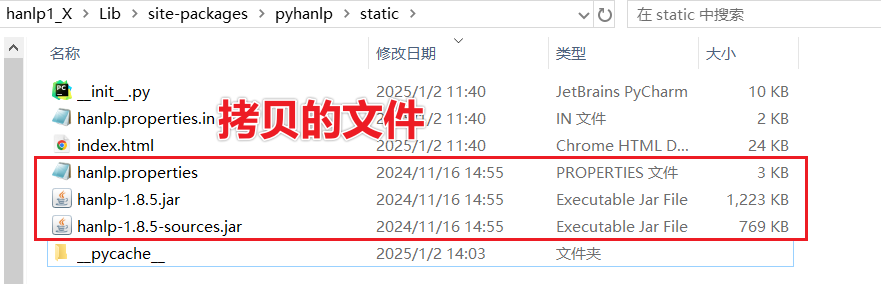
那么,直接下载hanlp-1.8.5-release.zip,将压缩包内的文件解压后,拷贝至目录:
C:\ProgramData\miniconda3\envs\hanlp1_X\Lib\site-packages\pyhanlp\static
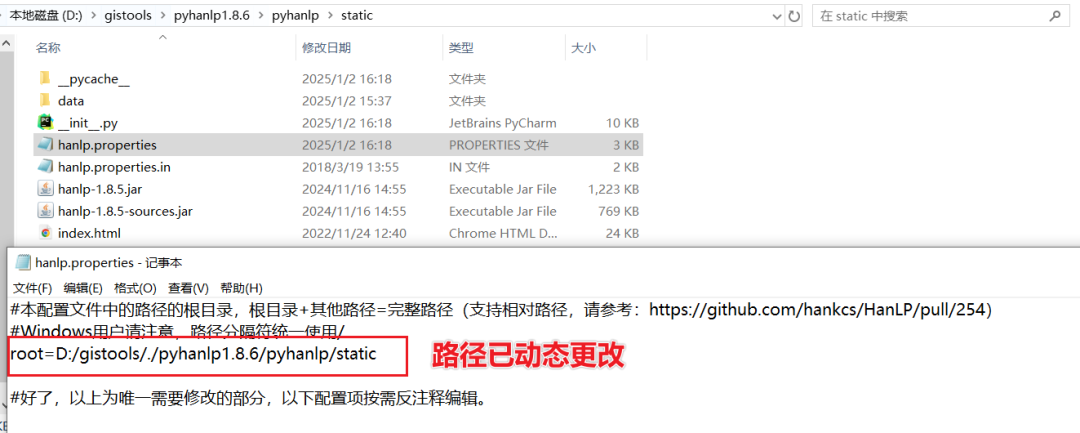
打开文件“hanlp.properties”,并编辑“root=D:/JavaProjects/HanLP/”行,将路径更改为当前pyhanlp文件夹下的static文件夹所在的绝对路径地址。
问题来了,这个地址是写死的,当将包含pyhanlp的python环境拷贝或编译后,将发生找不到指定文件的错误,解决办法附后。
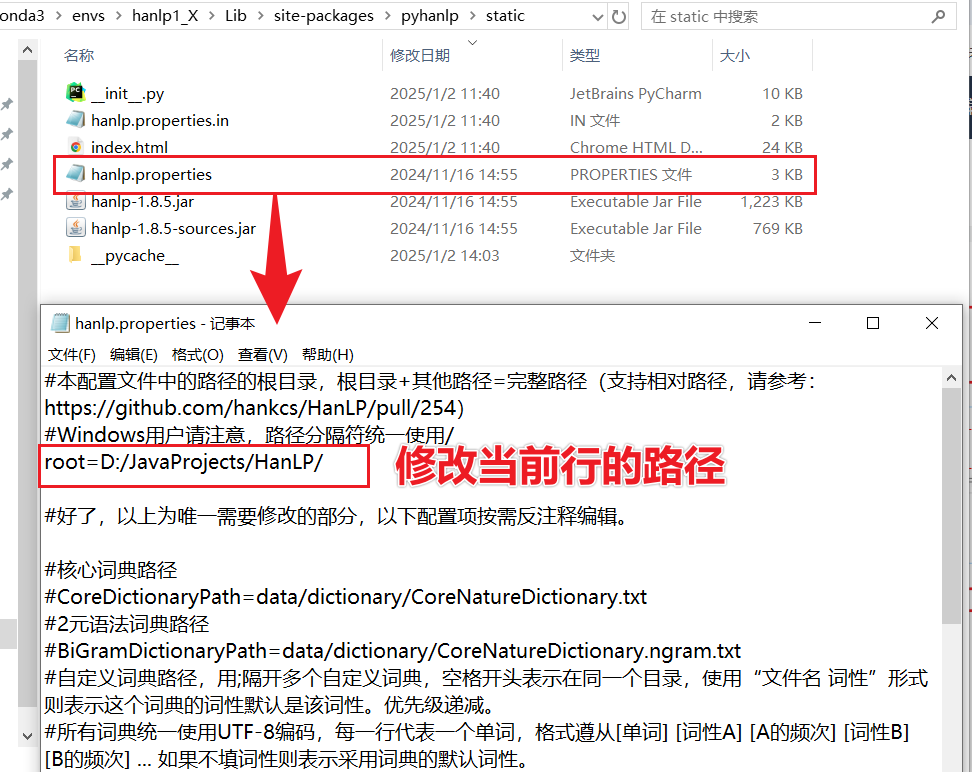
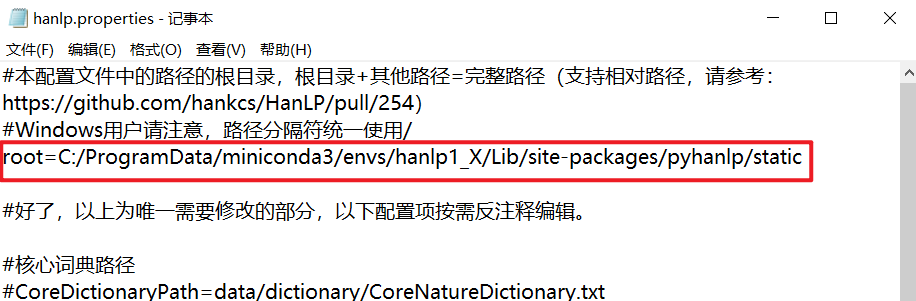
更改结果如下:
再次导入包pyhanlp测试,错误信息如下:

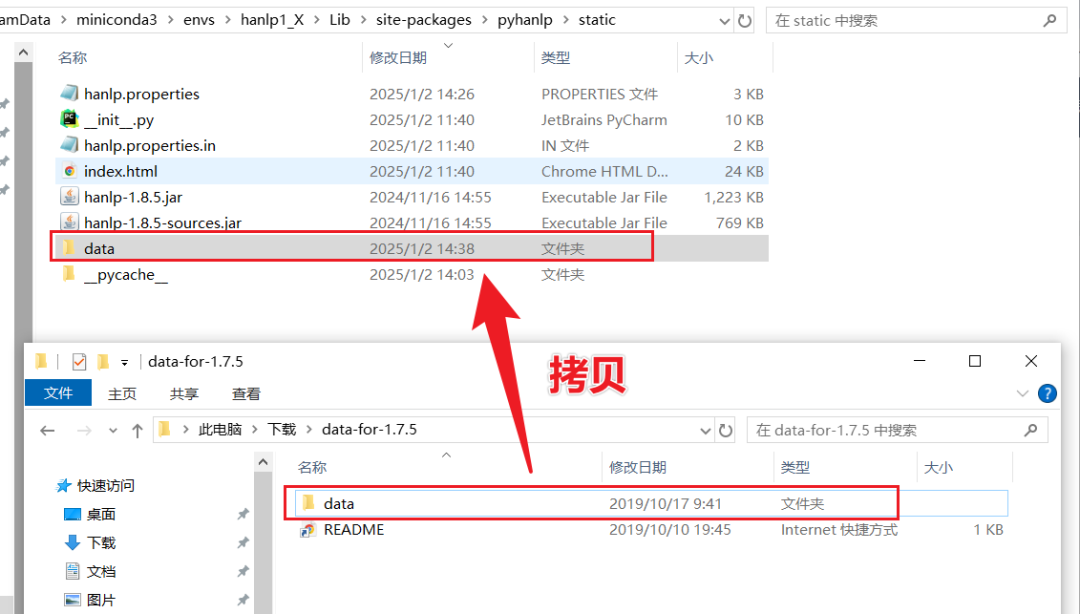
1.6 导包失败,配置data-for-1.7.5
到http://download.hanlp.com/网站上下载“data-for-1.7.5.zip”文件,并将其解压至目录:
C:\ProgramData\miniconda3\envs\hanlp1_X\Lib\site-packages\pyhanlp\static
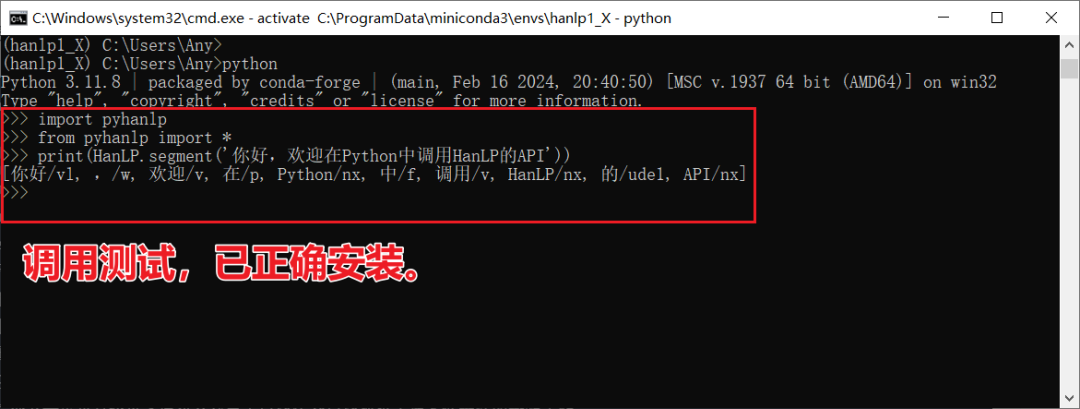
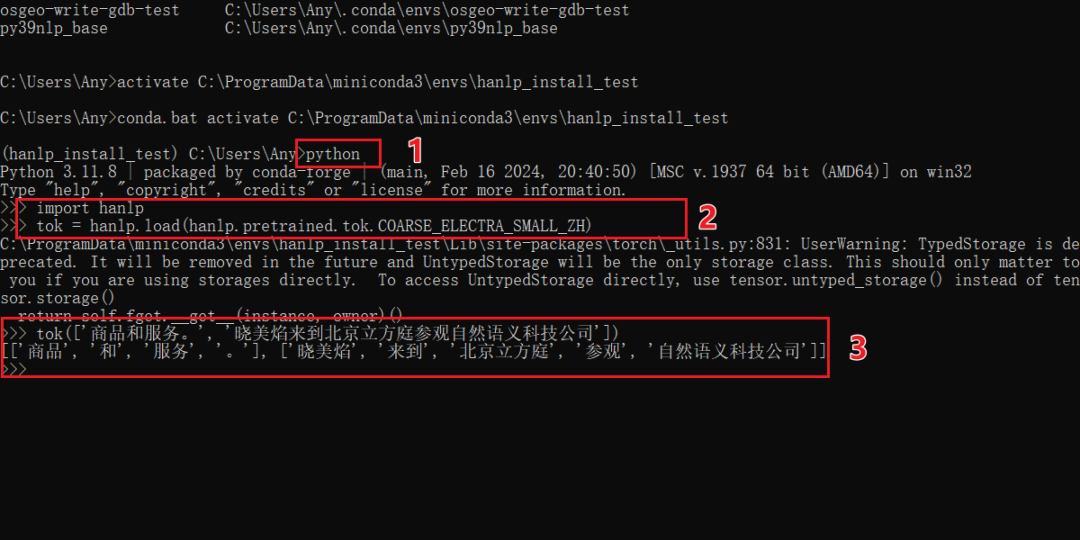
再次导入包pyhanlp测试,输出信息如下:
二、pyhanlp的迁移
当将pyhanlp包迁移至其他环境或将其打包到单一可执行文件中时,由于文件“hanlp.properties”中的“root=……”地址是写死的,该如何解决呢?
思路:
在导入pyhanlp包前,动态编辑“hanlp.properties”文件中的“root=……“地址,可通过修改pyhanlp包的"__init__.py"实现。
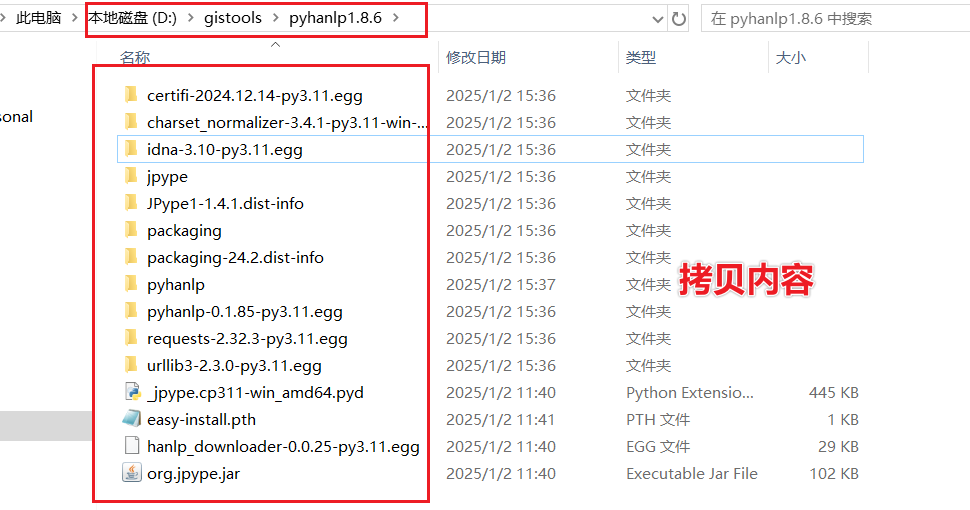
2.1 拷贝pyhanlp包及其依赖至文件夹pyhanlp1.8.6
为了测试这个过程,在D:\gistools\目录下创建文件夹pyhanlp1.8.6,将pyhanlp包及其依赖拷贝至pyhanlp1.8.6(若不知道依赖项有哪些,可在site-packages文件夹下按时间排序)。
注意:pyhanlp包存放的目录不能包含中文路径。

拷贝内容如下:
2.2 编辑__init__.py文件
编辑pyhanlp文件夹下的__init__.py文件,增加一下内容:
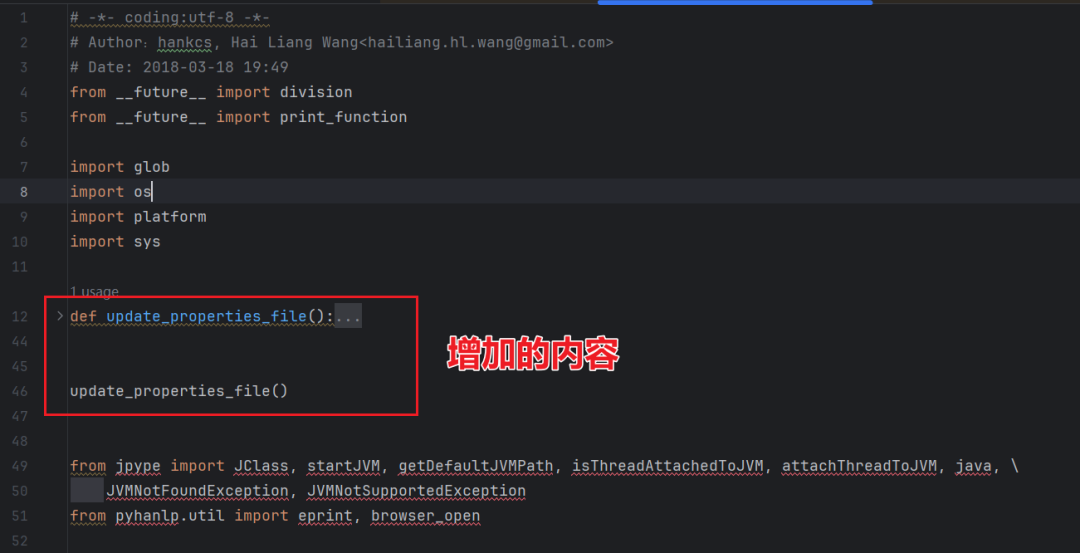
函数update_properties_file的内容如下:
def update_properties_file():# 获取当前模块所在的目录module_dir = os.path.dirname(__file__)# 构建 static 目录的路径,并使用正斜杠作为路径分隔符static_dir = os.path.join(module_dir, 'static')static_dir_write = static_dir.replace(os.path.sep, '/')# 构建 hanlp.properties 文件的路径properties_file_path = os.path.join(static_dir, 'hanlp.properties')# 读取 hanlp.properties 文件with open(properties_file_path, 'r', encoding='utf-8') as file:lines = file.readlines()# 更新 root 属性值updated_lines = []root_updated = Falsefor line in lines:if line.startswith('root='):# 更新 root 属性值为 static 目录的路径line = f'root={static_dir_write}\n'root_updated = Trueupdated_lines.append(line)# 如果没有找到 root 属性,则添加一行if not root_updated:updated_lines.append(f'root={static_dir_write}\n')# 将更新后的内容写回 hanlp.properties 文件with open(properties_file_path, 'w', encoding='utf-8') as file:file.writelines(updated_lines)
在pyhanlp1.8.6同级目录的文件夹(如:gistools)下,创建文件“导入测试.py”,代码内容为将pyhanlp1.8.6目录添加到os.path中。
导入pyhanlp测试,报错信息如下:
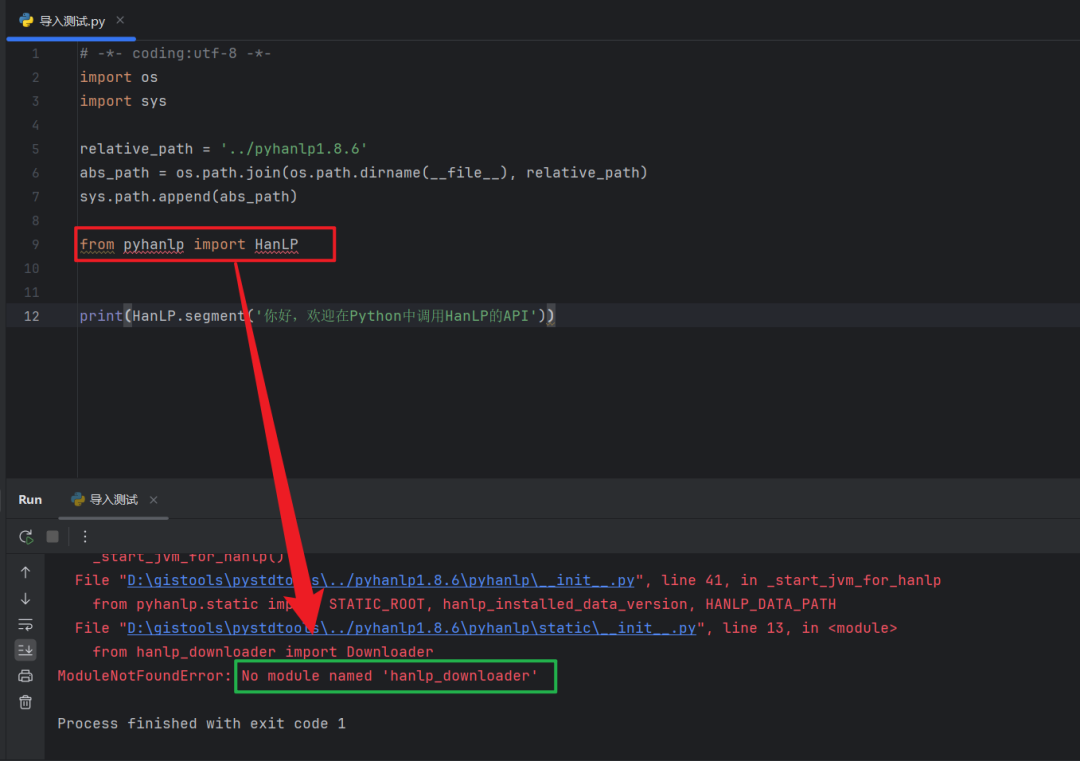
2.3 添加hanlp_downloader模块
错误信息为没有“hanlp_downloader”模块,到地址:
https://pypi.org/project/hanlp-downloader/#files
下载hanlp_downloader-0.0.25.tar.gz,并提取hanlp_downloader文件夹,将其拷贝至:D:\gistools\pyhanlp1.8.6,测试如下:
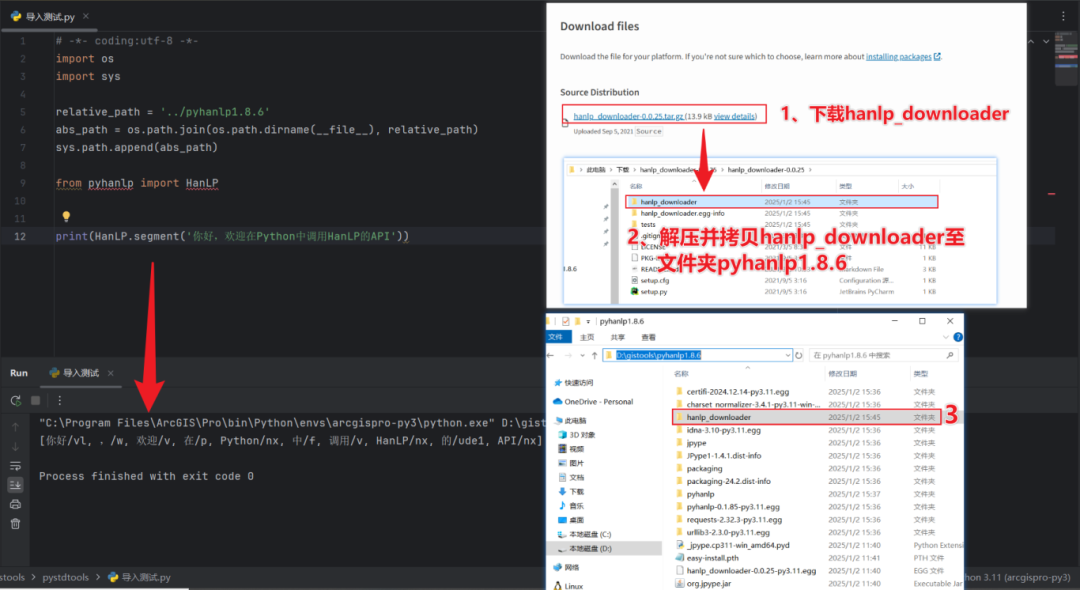
可以发现,pyhanlp迁移后能正常使用,且hanlp.properties文件中root变量对应的地址已动态更改。
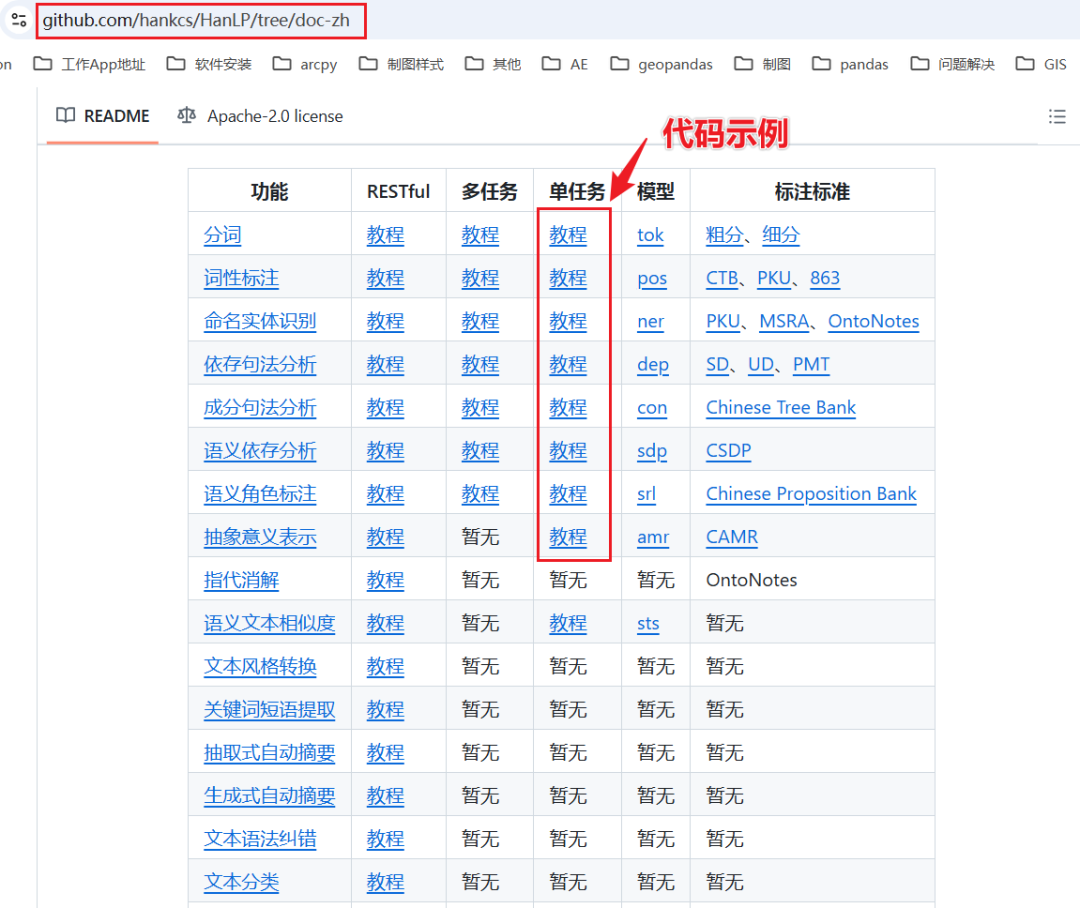
三、HanLP2.x的安装使用
尽管https://github.com/hankcs/HanLP/tree/doc-zh中明确支持的python版本不包括3.11,但在3.11的python虚拟环境下,无论是Windows、Linux还是macOS,HanLP的安装只需一句话搞定:
pip install hanlp -U
HanLP2.1的接口示例,可参考:https://github.com/hankcs/HanLP/tree/doc-zh