一、web服务器简介
1、www:
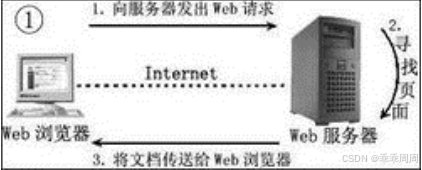
1 、 www 所用的协议: 浏览器怎样向 web 服务器请求数据以及服务器怎样把文档传送给浏览器呢?这就是由http 协议来定义的,( Hyper Text Transport Protocol , HTTP ,超文本传输协议)。2 、 www 服务器需要提供可让客户端浏览的平台。目前最主流的 Web 服务器是 Apache 、 Microsoft 的Internet信息服务器( Internet Information Services , IIS )和 unix nginx 。3 、服务器所提供的最主要数据是超文本标记语言( Hyper Text Markup Language、 HTML )、多媒体文件(图片、影像、声音、文字等,都属于多媒体或称为超媒体),HTML 只是一些纯文本数据,通过所谓的标记来规范所要显示的数据格式。4 、客户端收到服务器的数据之后需要软件解析服务器所提供的数据,最后将效果呈现在用户的屏幕上。那么著名的浏览器就有内建在Windows 操作系统内的 IE 浏览器了,还有 Firefox 浏览器和 Google 的chrome浏览器。
2、网址及HTTP:
- URL : Uniform Resource Locator ,统一资源定位符,对可以从互联网上得到的资源的位置和访问方法的一种简洁的表示,是互联网上标准资源的地址。
- 网址格式: < 协议 >://< 主机或主机名 >[:port]/< 目录资源 , 路径 >
- 浏览器常支持的协议有: http 、 https 、 ftp 等。
- 主机地址或者主机名:主机地址就是服务器在因特网所在的 IP 地址。如果是主机名的话,那么就需要域名解析。
- 端口号( port ): http 为 80 , https 为 443 ( IANA :互联网数字分配机构)
- 0-1023 :众所周知,永久地分配给固定的应用程序使用,特权端口(只有管理员有权限启用并让进程监听)
- 1024-41951 :亦为注册端口,但要求不是特别严格,分配给程序注册为某应用使用:3306/TCP
- 41952-60000:客户端程序随机使用的端口,动态端口,或私有端口
-
-
- 超文本传输协议HTTP 协议:被用于在 Web 浏览器和网站服务器之间传递信息。 HTTP 协议以明文方式发送内容,不提供任何方式的数据加密,如果攻击者截取了Web 浏览器和网站服务器之间的传输报文,就可以直接读懂其中的信息,因此HTTP 协议不适合传输一些敏感信息,比如信用卡号、密码等。为了解决HTTP协议的这一缺陷,需要使用另一种协议:安全套接字层超文本传输协议 HTTPS 。
- HTTPS(全称: Hyper Text Transfer Protocol over Secure Socket Layer 或 Hypertext Transfer Protocol Secure,超文本传输安全协议),是以安全为目标的 HTTP 通道。 HTTPS并不是一个新协议, 而是 HTTP+SSL ( TLS )。原本 HTTP 先和 TCP (假定传输层是 TCP 协议)直接通信,而加了 SSL 后,就变 成 HTTP 先和 SSL 通信,再由 SSL 和 TCP 通信,相当于 SSL 被嵌在了 HTTP 和 TCP 之间。
- http请求方法:在http通信中,每个http请求报文都包含一个方法,用以告诉web服务器端需要执行哪些具体的动作,这些动作包括:获取指定web页面、提交内容到服务器、删除服务器上资源文件等。
| 序号 | 方法 | 描述 |
| 1 | GET | 请求指定的页面信息,并返回实体主体。 |
| 2 | HEAD | 类似于get请求,只不过返回的响应中没有具体的内容,用于获取报头。 |
| 3 | POST | 向指定资源提交数据进行处理请求(例如提交表单或者上传文件)。数据被包含在请求体中。POST请求可能会导致新的盗源的建立和/或已有资源的修改。 |
| 4 | PUT | 从客户端问服务器传送的数据取代指定的文档的内容。 |
| 5 | DELETE | 请求服务器删除指定的页面。 |
| 6 | CONNECT | HTTP/1.1协议中预留给能够将连接改为管道方式的代理服务器。 |
| 7 | OPTIONS | 允许客户端查看服务器的性能。 |
| 8 | TRACE | 回显服务器收到的请求,主要用于测试或诊断。 |
- 状态代码:由三位数字组成,第一个数字定义了响应的类别,且有五种可能取值。
1)1xx:指示信息 —— 表示请求已接收,继续处理
2)2xx:成功 —— 表示请求已被成功接收、理解、接受
3)3xx:重定向 —— 要完成请求必须进行更进一步的操作
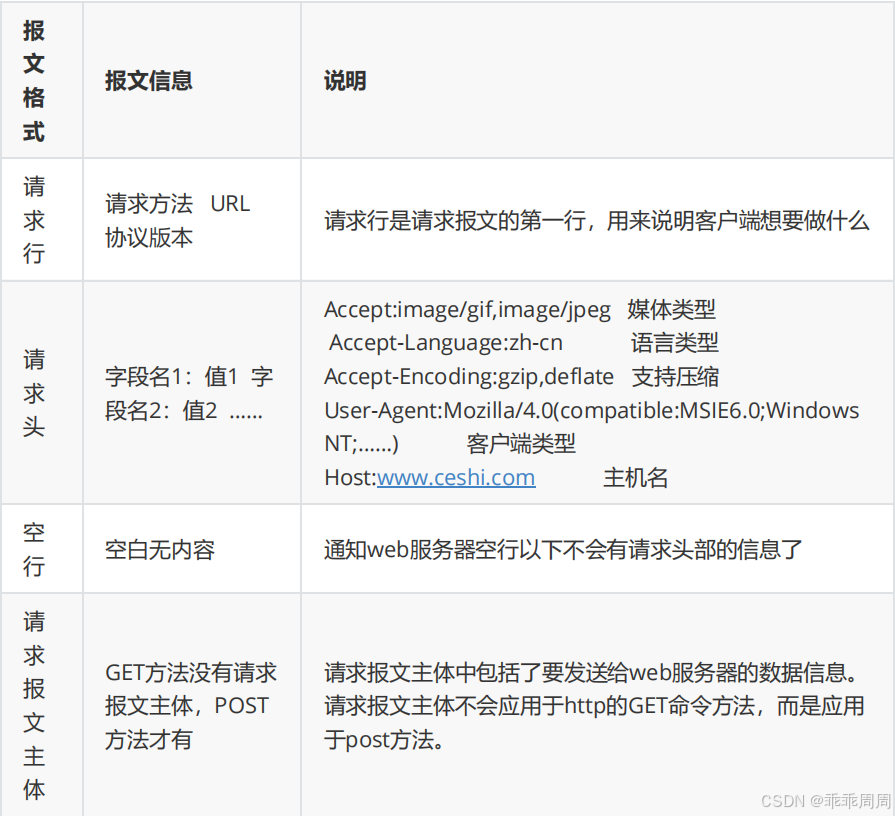
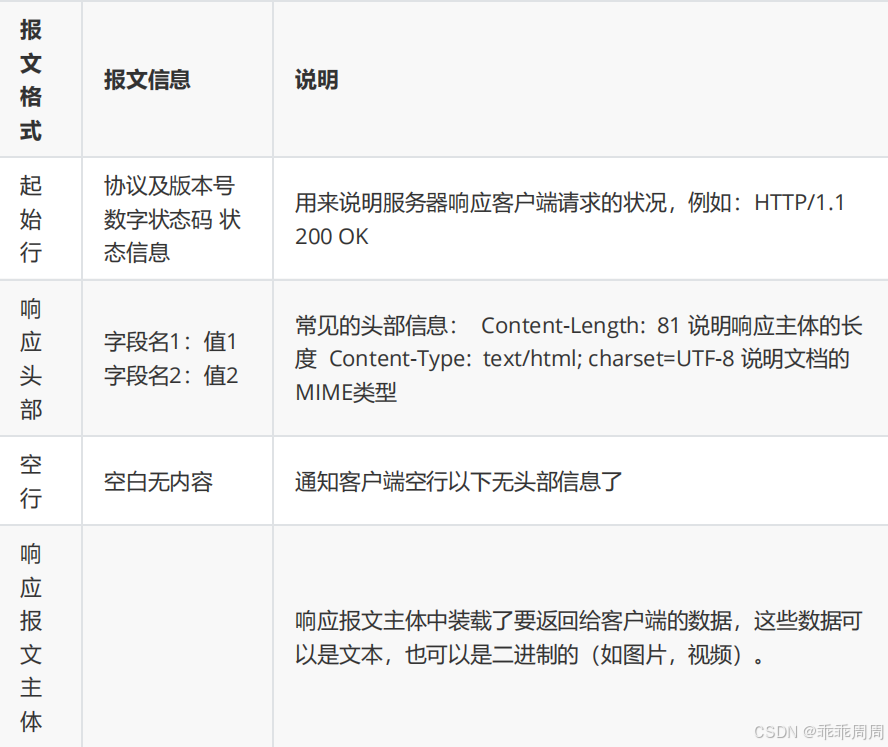
- HTTP 报文: http 报文中有很多行内容,这些行的字段内容都是由一些 ASCII 码串组成,但各个字段的长度是不同的。http 报文可分为两种,一种是从 web 客户端发往 web 服务器的 http 报文,称为请求报文。另外一种是从web 服务器发往 web 客户端的报文,称为响应报文 。
1)http请求报文由请求行、请求头部、空行和请求报文主体几个部分组成
2)http响应报文由起始行、响应头部、空行和响应报文主体这几个部分组成
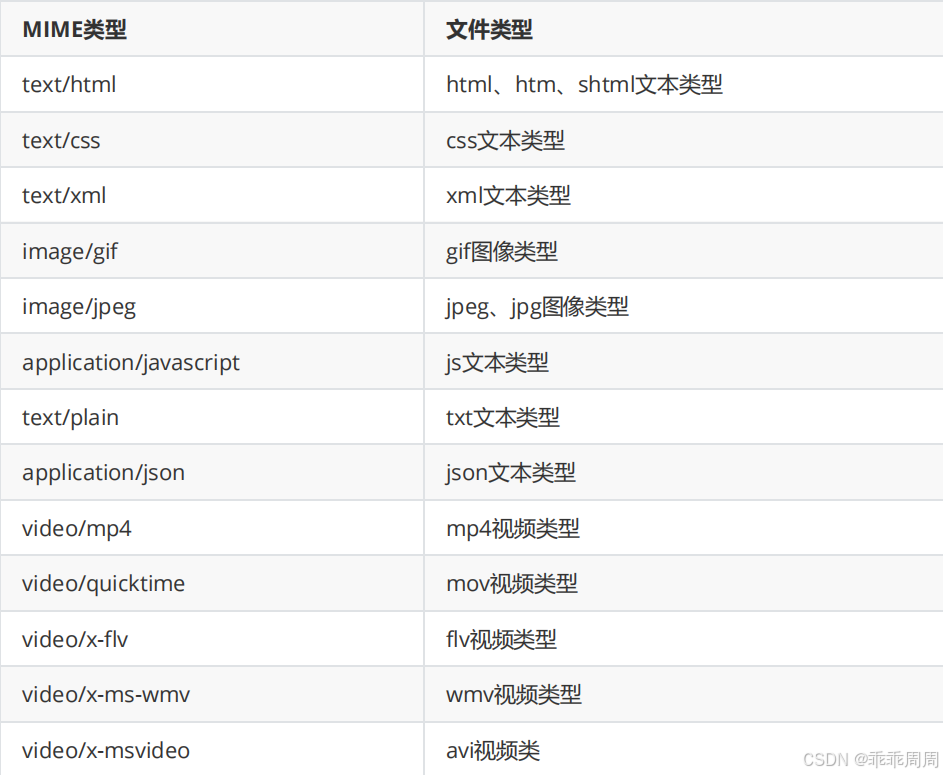
- MIME ( Multipurpose Internet Mail Extension ,多用途因特网邮件扩展)最初是为了解决在不同的电子邮件系统之间搬移报文时存在的问题。后来http 也支持了这个功能,用它来描述数据并标记不同的数据内容类型。
3、http协议请求的工作流程:
( 1 )终端客户在 web 浏览器地址栏输入访问地址 http://www.ceshi.com:80/index.html( 2 ) web 浏览器请求 DNS 服务器把域名 www.ceshi.com 解析成 web 服务器的 IP 地址( 3 ) web 浏览器将端口号(默认是 80 )从访问地址( URL )中解析出来( 4 ) web 浏览器通过解析后的 ip 地址及端口号与 web 服务器之间建立一条 TCP 连接( 5 )建立 TCP 连接后, web 浏览器向 web 服务器发送一条 HTTP 请求报文( 6 ) web 服务器响应并读取浏览器的请求信息,然后返回一条 HTTP 响应报文。( 7 ) web 服务器关闭 HTTP 连接,关闭 TCP 连接, web 浏览器显示访问的网站内容到屏幕上。
4、浏览器访问https网站的通信过程 :
1.客户端浏览器向服务器端发送信息(客户端支持的SSL/TLS协议的版本号、密钥算法套件、客户端产生的随机数,稍后用于生成对话密钥)
2.服务器端向客户端发送信息(确认使用的加密通信协议版本、确认使用的加密方法、服务器证书)
3.客户端利用服务器传过来的信息验证服务器的合法性。如果合法性验证没有通过,通讯将断开;如果合法性验证通过,则可以知道认证服务器的公开密钥的是真实有效的数字证书认证机构,并且服务器的公开密钥是值得信赖的。(此处认证机关的公开密钥必须安全地转交给客户端。使用通信方式时,如何安全转交是一件很困难的事,因此,多数浏览器开发商发布版本时,会事先在内部植入常用认证机关的公开密钥。)
4.客户端随机产生一个用于后面通讯的对称密钥,然后用服务器的公钥对其加密,然后将加密后的对称密钥传给服务器。
5、SSL安全套阶层:
SSL 是 “Secure Sockets Layer” 的缩写,中文叫做 “ 安全套接层 ” 。它是在上世纪 90 年代中期,由网景公司设计的。到了1999 年, SSL 应用广泛,已经成为互联网上的事实标准。 IETF 就把 SSL 标准化。标准化之后SSL 被改为 TLS ( Transport Layer Security 传输层安全协议)。
SSL 协议分为两层:
SSL记录协议 ( SSL Record Protocol ):它建立在可靠的传输协议(如 TCP )之上,为高层协议提供数据封装、压缩、加密等基本功能。
SSL握手协议( SSL Handshake Protocol ):它建立在 SSL 记录协议之上,用于在实际的数据传输开始前,通讯双方进行身份认证、协商加密算法、交换加密密钥等。
SSL 协议提供的服务:
1)认证用户和服务器,确保数据发送到正确的客户机和服务器
2)加密数据以防止数据中途被窃取
3)维护数据的完整性,确保数据在传输过程中不被改变
二、web服务器的类型
1、仅提供用户浏览的单向静态网页
2、提供用户互动接口的动态网站
LAMP ( linux+Apache+MySQL+PHP )lnmp ( linux+nginx+Mysql+php )Apache 主要提供 www 的服务器平台MySQL :传统的文件读取是很麻烦的,如果你只要读取该文件当中的一小部分,系统还是会将整个文件读出来,若又有人同时读取同一个文件时,那就会造成效率与系统上的问题,所以才会有数据库系统的推出。数据库其实是一种特殊格式的文件,这种文件要通过特殊接口(数据库软件)来进行读写。由于这个特殊接口已经针对数据的查询、写入做过优化设计,因此很适合多人同时写入与查询工作。PHP : PHP 可以被用来建立动态网页, PHP 程序代码可以直接在 HTML 网页当中嵌入,就像编辑HTML网页一样简单。 PHP 是一种 “ 程序语言 ” ,这种程序语言可以直接在网页当中编写,不需要经过编译即可执行。
三、web服务器基本配置
服务器端:此处使用nginx提供web服务,RPM包获取:http://nginx.org/packages/
#下载nginx包
[root@localhost ~]# dnf install nginx -y
[root@localhost ~]# nginx -v
[root@localhost ~]# nginx -V
[root@localhost ~]# rpm -ql nginx#相关文件
[root@localhost ~]# tree /etc/nginx/
/etc/nginx/
├── conf.d #子配置文件目录
├── default.d
├── fastcgi.conf
├── fastcgi.conf.default
├── fastcgi_params #用以翻译nginx的变量供php识别
├── fastcgi_params.default
├── koi-utf
├── koi-win
├── mime.types #用以配置支持的媒体文件类型
├── mime.types.default
├── nginx.conf #主配置文件
├── nginx.conf.default
├── scgi_params
├── scgi_params.default
├── uwsgi_params #用以配置nginx的变量供python识别
├── uwsgi_params.default
└── win-utf
[root@localhost ~]# tree /usr/share/nginx/html/ #默认的nginx网站根目录
[root@localhost ~]# tree /var/log/nginx/ #nginx的日志文件所在目录
#nginx服务主配置文件nginx.conf的结构
[root@localhost nginx]# grep ^[^#] /etc/nginx/nginx.conf# 全局配置(无{}标志)
user nginx; #进程所属用户
worker_processes auto; #worker数量
error_log /var/log/nginx/error.log; #错误日志存放路径
pid /run/nginx.pid; #pid文件路径
include /usr/share/nginx/modules/*.conf; #include导入的功能模块配置文件# 性能配置(有{}标志)
events {
worker_connections 1024; #TCP连接数
}# http模块配置(有{}标志)
http { #http区块开始
log_format main '$remote_addr - $remote_user [$time_local] "$request"''$status $body_bytes_sent "$http_referer" ''"$http_user_agent" "$http_x_forwarded_for"'; #错误日志格式access_log /var/log/nginx/access.log main; #访问日志路径sendfile on; #开启高效文件传输模式tcp_nopush on; #性能优化参数tcp_nodelay on; #性能优化参数keepalive_timeout 65; #持久连接时间或超时时间types_hash_max_size 4096; #性能优化参数include /etc/nginx/mime.types; #可解析的静态资源类型default_type application/octet-stream;include /etc/nginx/conf.d/*.conf; #子配置文件存放路径#server区块开始
server { listen 80; #监听端口listen [::]:80;server_name _; #服务器的名字root /usr/share/nginx/html; #主页存放路径include /etc/nginx/default.d/*.conf; #子配置文件存放路径error_page 404 /404.html; #404错误返回的页面location = /40x.html { #使用location定义用户请求的uri}error_page 500 502 503 504 /50x.html; #500、502、503、504返回的页面location = /50x.html {}} #server区块结束
} #http区块结束
=========http模块配置(有{}标志)==================
[root@localhost ~]#systemctl disable firewalld --now
[root@localhost ~]# setenforce 0
[root@localhost ~]# getenforce
Permissive
[root@localhost ~]# systemctl restart nginx
#测试可以使用curl命令访问web服务器或者使用浏览器访问
[root@localhost ~]# curl -I localhost
HTTP/1.1 200 OK
Server: nginx/1.21.5
Date: Fri, 17 Nov 2023 08:40:28 GMT
Content-Type: text/html
Content-Length: 3510
Last-Modified: Mon, 23 Oct 2023 15:48:29 GMT
Connection: keep-alive
ETag: "653695cd-db6"
Accept-Ranges: bytes四、虚拟主机配置实战
1、搭建静态网站——基于http协议的静态网站
实验1:搭建一个 web 服务器,访问该服务器时显示 “hello world” 欢迎界面 。
[root@localhost ~]# echo "hello world" > /usr/share/nginx/html/index.html
[root@localhost ~]# curl localhost
hello world
[root@localhost ~]# curl 192.168.168.153
hello world
实验 2 :建立两个基于 ip 地址访问的网站,要求如下:
该网站 ip 地址的主机位为 100 ,设置首页目录为 /www/ip/100 ,网页内容为: this is 100 。
该网站 ip 地址主机位为 200 ,设置首页目录为 /www/ip/200 ,网页内容为: this is 200 。
#添加ip地址
[root@localhost ~]# nmcli connection modify ens33 +ipv4.addresses
192.168.168.100/24 +ipv4.gateway 192.168.168.2 ipv4.dns 114.114.114.114 ipv4.method manual autoconnect yes
[root@localhost ~]# nmcli connection modify ens33 +ipv4.addresses
192.168.168.200/24
[root@localhost ~]# nmcli connection up ens33
#创建两个网页文件根目录,并定义网页内容
[root@localhost ~]# mkdir -pv /www/ip/{100,200}
[root@localhost ~]# echo this is 100 > /www/ip/100/index.html
[root@localhost ~]# echo this is 200 > /www/ip/200/index.html
#设置selinux,必须设置,否则无法看到网页页面内容
[root@server html]# setenforce 0
[root@server html]# getenforce
Permissive
#定义基于不同ip地址来访问网站的配置文件
#新建文件,写入如下配置
[root@localhost ~]# vim /etc/nginx/conf.d/test_ip.conf
server {listen 192.168.168.100:80;root /www/ip/100;location / {}
}
server {listen 192.168.168.200:80;root /www/ip/200;location / {}
}
[root@localhost ~]# systemctl restart nginx
[root@localhost ~]# curl 192.168.168.100
this is 100
[root@localhost ~]# curl 192.168.168.200
this is 200
实验 3 :建立两个基于不同端口访问的网站,要求如下:
建立一个使用 web 服务器默认端口的网站,设置网站首页目录为 /www/port/80 ,网页内容为: the port is 80。
建立一个使用 10000 端口的网站,设置网站首页目录为 /www/port/10000 ,网页内容为: the port is 10000。
[root@localhost ~]# mkdir -pv /www/port/{80,10000}
[root@localhost ~]# echo the port is 80 > /www/port/80/index.html
[root@localhost ~]# echo the port is 10000 > /www/port/10000/index.html
[root@localhost ~]# nmcli connection modify ens33 +ipv4.addresses
192.168.168.153/24
[root@localhost ~]# nmcli connection up ens33
[root@localhost ~]# cat /etc/nginx/conf.d/test_port.conf
server {
listen 192.168.168.153:80;
root /www/port/80;
location / {
}
}
server {
listen 192.168.168.153:10000;
root /www/port/10000;
location / {
}
}
[root@localhost ~]# systemctl restart nginx
[root@localhost ~]# curl 192.168.168.153:10000
the port is 10000
[root@localhost ~]# curl 192.168.168.153
the port is 80
实验 4 :建立两个基于域名访问的网站,要求如下:
新建一个网站,域名为 www.ceshi.com ,设置网站首页目录为 /www/name ,网页内容为 this is test。
新建一个网站,域名为 rhce.first.day ,同时可通过 ce.first.day 访问,设置网站首页目录为/www/ce, 网页内容为: today is first day of class 。
[root@localhost conf.d]# nmcli connection modify ens33 +ipv4.addresses 192.168.168.154/24
[root@localhost conf.d]# nmcli connection up ens33
[root@localhost ~]# mkdir /www/{name,ce}
[root@localhost ~]# echo this is test > /www/name/index.html
[root@localhost ~]# echo today is first day of class > /www/ce/index.html
[root@localhost ~]# vim /etc/nginx/conf.d/test_servername.conf
server {listen 192.168.168.154:80;server_name www.ceshi.com;root /www/name;location / {}
}
server {listen 192.168.168.154:80;server_name rhce.first.day ce.first.day;root /www/ce;location / {}
}
[root@localhost ~]# vim /etc/hosts 192.168.168.154 www.ceshi.com rhce.first.day ce.first.day
[root@localhost ~]# systemctl restart nginx
[root@localhost ~]# curl www.ceshi.com
this is test
[root@localhost ~]# curl rhce.first.day
today is first day of class
[root@localhost ~]# curl ce.first.day
today is first day of class
实验 5 :基于虚拟目录和用户控制的 web 网站
[root@localhost conf.d]# nmcli connection modify ens33 +ipv4.addresses 192.168.168.155/24
[root@localhost conf.d]# nmcli connection up ens33
[root@localhost ~]# vim /etc/nginx/conf.d/test_virtualdir.conf
server {listen 192.168.168.155:80;root /usr/share/nginx/html;location /real {alias /www/real;}
}
[root@localhost ~]# mkdir /www/real/
[root@localhost ~]# echo real-virtual > /www/real/index.html
[root@localhost ~]# systemctl restart nginx
[root@localhost ~]# curl 192.168.168.155/real/
real-virtual#用户访问控制
[root@localhost ~]# vim /etc/nginx/conf.d/test_virtualdir.conf
server {listen 192.168.168.155:80;root /usr/share/nginx/html;location /real {alias /www/real;auth_basic on;auth_basic_user_file /etc/nginx/conf.d/auth-password;}
}
[root@localhost ~]# dnf install httpd-tools -y
[root@localhost ~]# htpasswd -cb /etc/nginx/conf.d/auth-password user1 123456
[root@localhost ~]# systemctl restart nginx
[root@localhost ~]# curl 192.168.168.155/real/<html><head><title>401 Authorization Required</title></head><body><center><h1>401 Authorization Required</h1></center><hr><center>nginx/1.21.5</center></body></html>[root@localhost ~]# curl 192.168.168.155/real/ -u user1
Enter host password for user 'user1':
real-virtual
[root@localhost ~]# curl user1:123456@192.168.168.155/real<html><head><title>301 Moved Permanently</title></head><body><center><h1>301 Moved Permanently</h1></center><hr><center>nginx/1.21.5</center></body></html>
[root@localhost ~]# curl user1:123456@192.168.168.155/real/
real-virtual
2、 搭建静态网站——基于https协议的静态网站
https 网站配置:
#https功能由ngx_http_ssl_module模块提供
[rootlocalhost ~]# nmcli connection modify ens33 +ipv4.addresses 192.168.168.156/24
[root@localhost ~]# nmcli connection up ens33
[root@localhost ~]# mkdir -pv /www/https/
[root@localhost ~]# echo https > /www/https/index.html
[root@localhost conf.d]# cd /etc/pki/tls/certs/#key是私钥文件
[root@localhost certs]# openssl genrsa -out https.key#crt是由证书颁发机构(CA)签名后的证书,或者是开发者自签名的证书,包含证书持有人的信息,持
有人的公钥,以及签署者的签名等信息
[root@localhost certs]# openssl req -utf8 -new -key https.key -x509 -days 100 -out https.crt[[root@localhost ~]# cat /etc/nginx/conf.d/test_https.conf
server {# listen 80;listen 192.168.168.156:443 ssl;root /www/https;ssl_certificate /etc/pki/tls/certs/https.crt;ssl_certificate_key /etc/pki/tls/certs/https.key;location / {}
}
[root@localhost ~]# systemctl restart nginx
[root@localhost ~]# curl --insecure https://192.168.168.156
https
[root@localhost ~]# curl -k https://192.168.168.156
https
3、搭建动态网站:
[root@localhost nginx]# nmcli connection modify ens33 +ipv4.addresses
192.168.168.157/24
[root@localhost nginx]# nmcli connection up ens33
[root@localhost ~]# dnf install php php-fpm -y
[root@localhost ~]# systemctl restart nginx php-fpm
[root@ntp-server ~]# echo "<?php phpinfo(); ?>" >
/usr/share/nginx/html/index.php
#使用浏览器访问

)
感知机)


