文章目录
- JDBC是什么
- 1、环境搭建 && 入门案例
- 2、核心API理解
- ①、注册驱动(Driver类)
- ②、Connection
- ③、statement(sql注入)
- ④、PreparedStatement
- ⑤、ResultSet
- 3、jdbc扩展(ORM、批量操作)
- ①、实体类和ORM
- ②、批量操作
- 4. 连接池
- ①、常用连接池
- ②、Durid连接池
- ③、HikariCP连接池
- 5、JDBC工具类
- ①、JDBC工具类初步封装
- ②、加强工具类(引入ThreadLocal)
- 6、BaseDAO详解
- ①、BaseDAO的概念&&搭建
- ②、BaseDAO搭建增删改查
- 7、JDBC事务
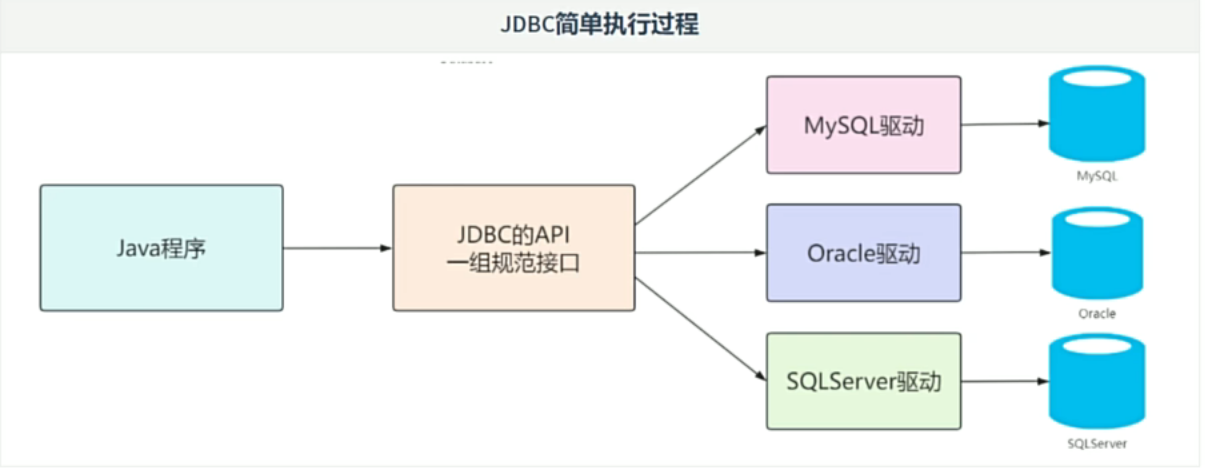
JDBC是什么
JDBC(Java Database Connectivity),意为java数据库连接。
- jdbc是java提供的一组独立于任何数据库管理系统的api
- java提供接口规范,由各个厂商提供接口的实现,厂商提供的实现类封装成jar文件,也就是俗称的数据库驱动jar包。
- JDBC的好处是,程序员只关心标准和规范,无需关注实现过程。
1、环境搭建 && 入门案例
开发环境:
Mysql 8.0.23 + idea2022 + jdk17 + maven3.8.1
创建数据库语句:
CREATE DATABASE test_jdbc;USE test_jdbc;CREATE TABLE t_emp
(emp_id    INT AUTO_INCREMENT COMMENT '员工编号' PRIMARY KEY,emp_name  VARCHAR(100) NOT NULL COMMENT '员工姓名',emp_salary DOUBLE(10, 5) NOT NULL COMMENT '员工薪资',emp_age   INT NOT NULL COMMENT '员工年龄'
);INSERT INTO t_emp (emp_name, emp_salary, emp_age)
VALUES ('张三', 777.77, 32),('李四', 666.66, 41),('王五', 111, 23),('赵六', 123, 26),('钱七', 123, 28);
创建java项目:
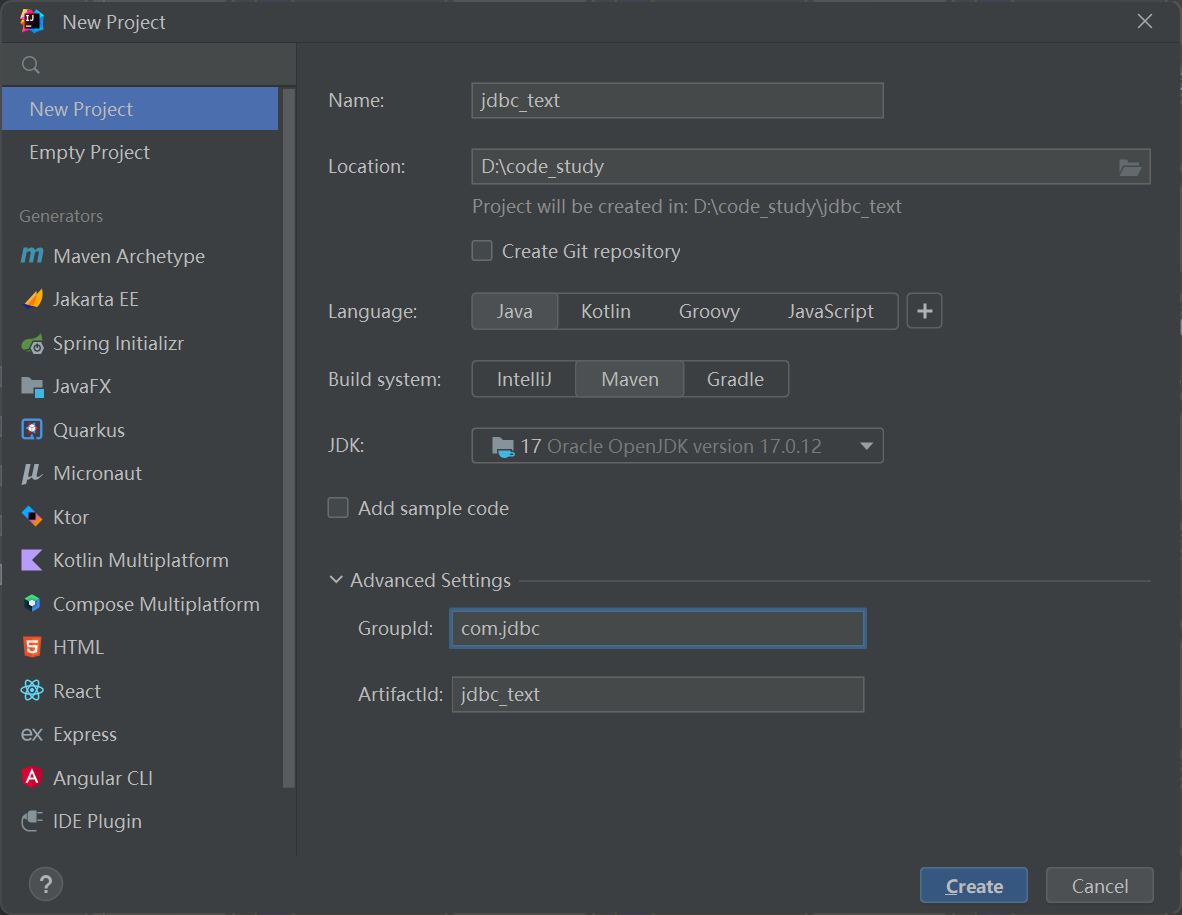
添加pom.xml:
<dependencies><dependency><groupId>mysql</groupId><artifactId>mysql-connector-java</artifactId><version>8.0.23</version></dependency></dependencies>
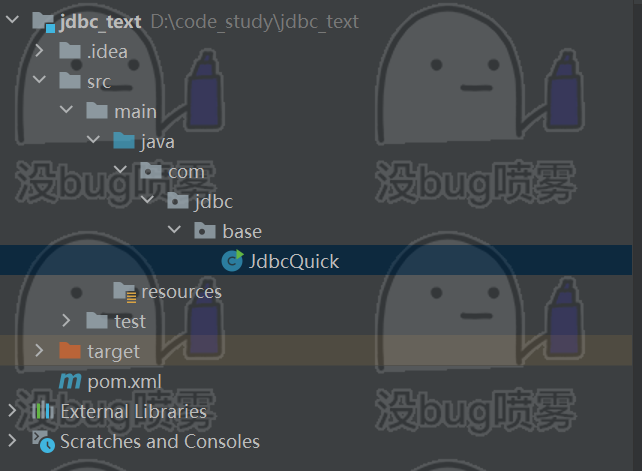
项目结构:
编写入门案例:
public static void main(String[] args) throws Exception {//1. 注册驱动Class.forName("com.mysql.cj.jdbc.Driver");//2. 获取连接对象String url = "jdbc:mysql://localhost:3306/test_jdbc"; //连接urlString userName = "root"; // 用户名String password = "root"; // 密码Connection connection = DriverManager.getConnection(url, userName, password);//3. 获取执行sql语句的对象Statement statement = connection.createStatement();//4. 编写sql语句并执行,以及接收返回的结果集String sql = "SELECT * FROM t_emp";ResultSet resultSet = statement.executeQuery(sql);//5. 处理结果,遍历resultSet结果集while (resultSet.next()) {int empId = resultSet.getInt("emp_id");String empName = resultSet.getString("emp_name");double empSalary = resultSet.getDouble("emp_salary");int empAge = resultSet.getInt("emp_age");System.out.println(empId + "\t" + empName + "\t" + empSalary + "\t" + empAge);}// 6.关闭资源(先开后关原则)resultSet.close();statement.close();connection.close();}
运行结果:
1	张三	777.77	32
2	李四	666.66	41
3	王五	111.0	23
4	赵六	123.0	26
5	钱七	123.0	28
2、核心API理解
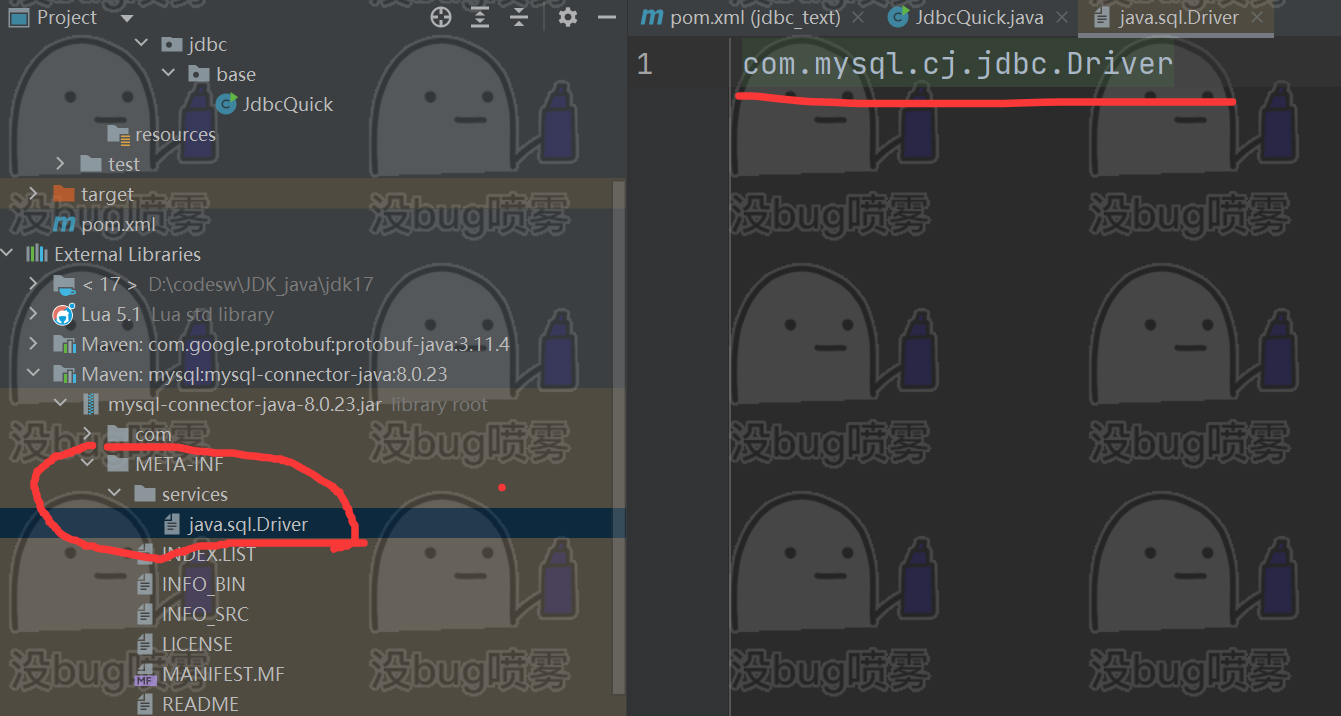
①、注册驱动(Driver类)
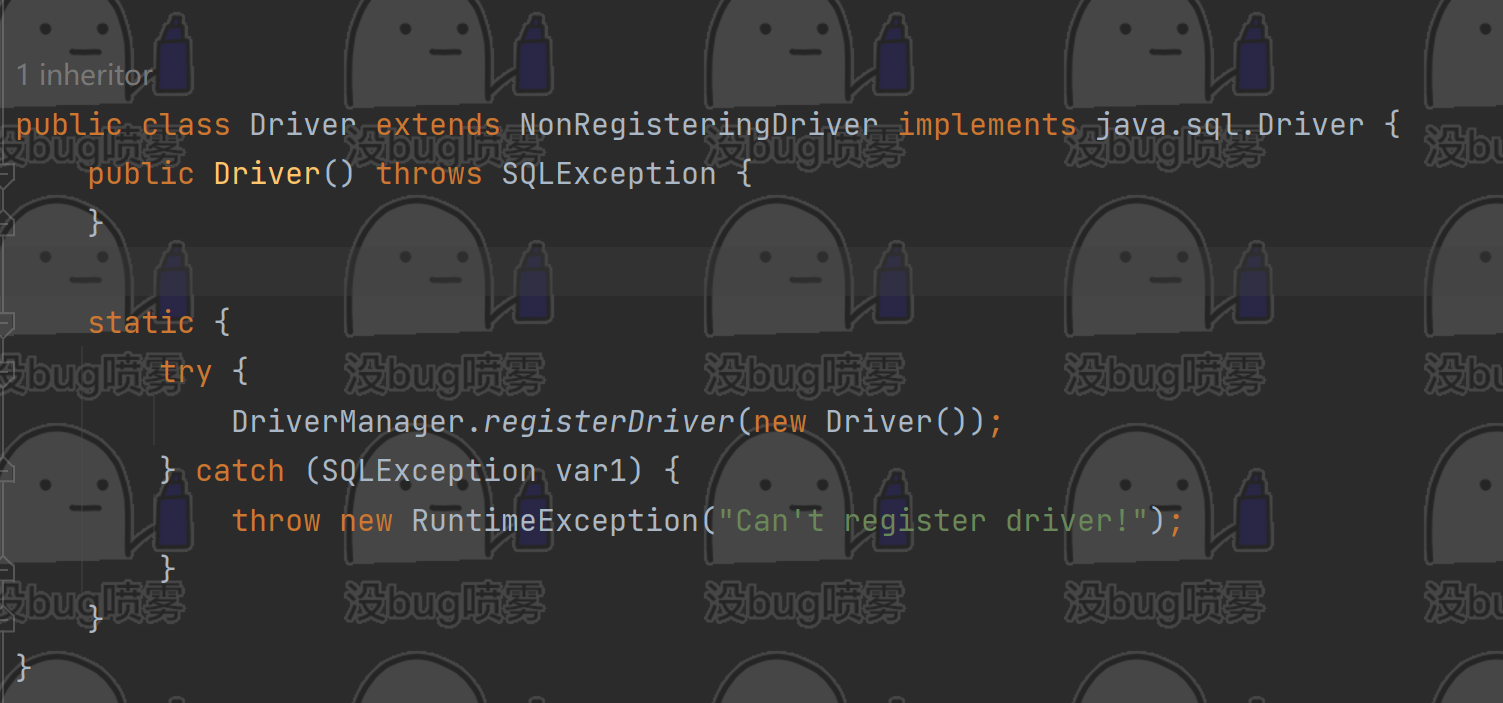
类中最关键代码是是:
DriverManager.registerDriver(new Driver());
同样我们在正式代码中也可以改用这行代码来注册驱动。
在java6以后,我们不需要注册驱动,jdk也会自动检查我们是否存在相关jar包,有没有导入,如果有,自动帮我们加载了。该文件与被实现类的名字相同,而里面存的是我们要加载的驱动类,这样jdk就实现了自动加载驱动的功能。
②、Connection
-
Connection接口是JDBC API的重要接口,用于与数据库建立的通信通道。换而言之,Connection对象不为null,则代表一次数据库连接。
-
在建立连接时,需要指定数据库URL、用户名、密码参数。
- URL: jdbc:mysql://localhost:3306/atguigu
- jdbc:mysql://[IP地址:端口号/数据库名称?参数数值对1&参数数值对2]
- URL: jdbc:mysql://localhost:3306/atguigu
-
Connection 接口还需要管理事务,Connection 接U提供 commit 和 rollback 方法,用于提交事务和回滚事务。
-
可以创建 Statement 对象,用于执行 SQL 查询与半数据操作交互。
-
在使用JDBC技术时,必须要先获取Connection对象,在使用完毕后,要释放资源,避免资源占用用很费资源。
③、statement(sql注入)
-
Statement 接口用于执行 SQL 查询并与数据库进行交互。它是 JDBC API 中的一个重要接口。通过 Statement 对象,可以向数据库发送 SQL 查询并获取执行结果。
-
结果可以是一个或多个结果。
- 增删改: 变更影响行数单个结果。
- 查询: 单行单列,多行多列,单行多列等结果。
-
但是 Statement 接口在执行SQL查询时,会产生 SQL 注入攻击问题:
- 当使用 Statement 执行动态拼接的 SQL 查询时,往往需要将查询条件与 SQL 查询拼接在一起,直接将 参数和SQL查询一并生成,拼接成SQL语句的条件将为true得到结果。
sql注入演示:
public static void main(String[] args) throws Exception {// 1.获取连接对象Connection connection = DriverManager.getConnection("jdbc:mysql://localhost:3306/test_jdbc", "root", "root");// 2.获取执行sql语句的对象Statement statement = connection.createStatement();Scanner sc = new Scanner(System.in);String name = sc.nextLine();// 3. 执行sql语句String sql = "select * from t_emp where emp_name = '" + name + "'";ResultSet resultSet = statement.executeQuery(sql);while (resultSet.next()) {int empId = resultSet.getInt("emp_id");String empName = resultSet.getString("emp_name");double empSalary = resultSet.getDouble("emp_salary");int empAge = resultSet.getInt("emp_age");System.out.println(empId + "\t" + empName + "\t" + empSalary + "\t" + empAge);}// 6.关闭资源(先开后关原则)resultSet.close();statement.close();connection.close();}
想要的效果:
请输入员工姓名:
张三
1	张三	777.77	32
sql注入:
请输入员工姓名:
abc' or '1' = '1
1	张三	777.77	32
2	李四	666.66	41
3	王五	111.0	23
4	赵六	123.0	26
5	钱七	123.0	28
sql注入其实就是动态拼接sql语句会导致语句实际效果和实际想要的不一样,这里是简单演示。
④、PreparedStatement
-
PreparedStatement 是 Statement 接口的子接口,用于执行 预编译 的 SQL 查询,作用和优点:
-
预编译SQL语句:在创建PreparedStatement时,就会对预编译SQL语句, 也就是说SQL语句已经固定。
-
防止SQL注入:PreparedStatement 支持参数化查询,将数据作为参数传递到SQL语句中,采用?占位符 的方式,将传入的参数用一对单引号包裏起来”,天龙你怎么计算存的价值。有数据的非法注入关難字或 SQL注入问题。
-
性能提升:PreparedStatement是预编译SQL语句,同一SQL语句多次执行的情况下,可以复用,不必每次 重新编译和解析。
-
-
后续的功能都是基于PreparedStatement执行实现,更安全。更效率更高。
PreparedStatement不支持无参创建,因此创建的时候必须传入一个sql。
public static void main(String[] args) throws Exception {// 1.获取连接对象Connection connection = DriverManager.getConnection("jdbc:mysql://localhost:3306/test_jdbc", "root", "root");// 2.获取执行sql语句的对象String sql = "select * from t_emp where emp_name = ?";PreparedStatement statement = connection.prepareStatement(sql);System.out.println("请输入员工姓名:");Scanner sc = new Scanner(System.in);String name = sc.nextLine();// 3. 为?占位符赋值, 并执行sql语句statement.setString(1, name); //这里第一个参数是指的占位符的位置ResultSet resultSet = statement.executeQuery();while (resultSet.next()) {int empId = resultSet.getInt("emp_id");String empName = resultSet.getString("emp_name");double empSalary = resultSet.getDouble("emp_salary");int empAge = resultSet.getInt("emp_age");System.out.println(empId + "\t" + empName + "\t" + empSalary + "\t" + empAge);}// 6.关闭资源(先开后关原则)resultSet.close();statement.close();connection.close();}
它之所以能防止sql注入,就是因为无论你传入什么值,它都会在外面给你加一个’ ',这样无论你里面怎么写,都不会影响到整个sql的条件。
⑤、ResultSet
-
ResultSet 是 JDBC API 中的一个接口,用于表示从数据库中 执行查询语句后返回的结果集。它提供了一种用 于遍历和访问查询结果的方式。
-
遍历结果:ResultSet可以通过使用 next() 方法将指针移动到结果集集的下一行,逐行遍历数据库查询的结果,返 回值为boolean类型,true代表有下一行结果,false则代表没有。
-
提取单列结果:可以通过 getXXX的方式来获取单列的数据,该方法为重载方法,支持索引和列名进行获取。
next()用于判断有没有下一行。

3、jdbc扩展(ORM、批量操作)
①、实体类和ORM
实体类:
-
在使用JDBC操作数据库时,我们会发现数据都是零散的, 明明在数据库中是一行完整的数据,到了Java 中变成了一个一个的变量,不利于维护和管理。 所以我们要把数据库存在一个载体里, 这 个载体就是实体类!
-
ORM(Object Relational Mapping)思想,对象到关系数据库的映射,作用是在编程中,把面向对象的概 念跟数据库中表的概念对应起来,以面向对象的方式操作数据库中数据,即一张表对应一个类,一个对象对应一条数据,一个类对应一个属性!
-
当下JDBC中运用和过程为手动ORM。现在已经有ORM框架,比如MyBatis等。
//类名和表要映射库名对应,但是表名一般都有前缀,类名只要全写!
public class Employee {private Integer empId;//emp_id = empId 数据库中列名用下划线分隔,属性名用驼峰! private String empName;//emp_name = empNameprivate Double empSalary;//emp_salary = empSalaryprivate Integer empAge;//emp_age = empAge//省略get、set、构造、有参、toString方法。
}
ORM思想:
Object Relation Mapping思想,即对象到关系数据库的映射。
封装单个对象:
@Testpublic void testORM() throws Exception {// 1.获取连接对象Connection connection = DriverManager.getConnection("jdbc:mysql://localhost:3306/test_jdbc", "root", "root");// 2.获取执行sql语句的对象String sql = "select * from t_emp where emp_id = ?";PreparedStatement statement = connection.prepareStatement(sql);statement.setInt(1, 1);ResultSet resultSet = statement.executeQuery();Employee employee = null;while (resultSet.next()) {employee = new Employee();int empId = resultSet.getInt("emp_id");String empName = resultSet.getString("emp_name");double empSalary = resultSet.getDouble("emp_salary");int empAge = resultSet.getInt("emp_age");employee.setEmpAge(empAge);employee.setEmpId(empId);employee.setEmpName(empName);employee.setEmpSalary(empSalary);}System.out.println(employee);resultSet.close();statement.close();connection.close();}
封装集合:
List<Employee> list = new ArrayList<>();
new一个集合,然后每次执行完之后放到集合中,打印即可。
②、批量操作
- 插入多条数据的时候,一条一条发送的效率太低,因此引入批量操作提高效率
String sql = "insert into t_emp (emp_name, emp_salary, emp_age) values (?, ?, ?)";PreparedStatement statement = connection.prepareStatement(sql);for(int i = 1; i < 1000; i ++ ) {statement.setString(1, "marry" + i);statement.setDouble(2, 100.0 + i);statement.setInt(3, 20 + i);statement.executeUpdate();}
这样的效率相对较低
连接url中添加参数:
"jdbc:mysql://localhost:3306/test_jdbc?rewriteBatchedStatements=true"
批量优化:
for(int i = 1; i < 1000; i ++ ) {statement.setString(1, "marry" + i);statement.setDouble(2, 100.0 + i);statement.setInt(3, 20 + i);statement.addBatch();}statement.executeBatch();
这样会减少与mysql交互的次数。
4. 连接池
-
连接池就是数据库连接对象的数据仓库,通过配置,由连接池负责创建连接、管理连接、释放连接等操作。
-
预先创建数据库连接放入连接池,用户在请求时,通连接池直接获取连接,使用完毕后,将连接放回池中,避免了频繁的创建和销毁,同时解决了解决了创建的效率。
-
当池中无连接可用,且未达到上限时,连接池会新建连接。
-
池中连接达到上限,用户请求会等待,可以设置超时时问。
①、常用连接池
JDBC 的数据库连接池使用 javax.sql.DataSource接口进行规范,所有有的第三方连接池实现此接口!也就是说,使用连接池获取连接的和回收连接方式都一样,不同的只是性能和扩展功能!
也就是说,使用连接池获取连接的和回收连接方式都一样,不同的只是性能和扩展功能。
我们只看两个主要的连接池:
-
Druid 是阿里提供快的数据库连接池,是集DBCP、C3P0、Proxool 优点于一身的数据库连接池,性能、扩展 性、易用性都更好,功能丰富。
-
Hikari(ひかり [shi ga li])取自日语,是光的意思,是SpringBoot2.x.x之后内置的一款连接池,基于 BoneCP(已经放弃维护,推荐该连接池)做了不少的改进和优化,日志量被极度精简,可靠性很高。
②、Durid连接池
引入依赖:
<dependency><groupId>com.alibaba</groupId><artifactId>druid</artifactId><version>1.2.18</version>
</dependency>
使用方法(软编码):
创建:resource/db.properties
driverClassName=com.mysql.cj.jdbc.Driver
url=jdbc:mysql:///test_jdbc
username=root
password=root
initialSize=10
maxActive=20
测试代码:
@Testpublic void testDruid() throws Exception {Properties properties = new Properties();InputStream is = DruidTest.class.getClassLoader().getResourceAsStream("db.properties");properties.load(is);DataSource dataSource = DruidDataSourceFactory.createDataSource(properties);Connection connection = dataSource.getConnection();System.out.println(connection);connection.close();}
③、HikariCP连接池
引入pom.xml:
<dependency><groupId>com.zaxxer</groupId><artifactId>HikariCP</artifactId><version>5.0.1</version>
</dependency>
其余步骤都相同,核心代码只改变这几行:
//3. 创建HikariConfig连接池配置对象,将Properties集合传递进去。
HikariConfig hikariConfig = new HikariConfig(properties);//4. 基于HikariConfig连接池配置对象,创建HikariDataSource
HikariDataSource hikariDataSource = new HikariDataSource(hikariConfig);//5. 获取连接
Connection connection = hikariDataSource.getConnection();
System.out.println(connection);
5、JDBC工具类
①、JDBC工具类初步封装
db.properties :
driverClassName=com.mysql.cj.jdbc.Driver
url=jdbc:mysql:///test_jdbc
username=root
password=root
initialSize=10
maxActive=20
工具类代码:
public class JDBCUtil {// 创建连接池引用,提供全局使用private static DataSource dataSource;// 项目创建时就创建连接池对象并赋值static {try {Properties properties = new Properties();InputStream is = DruidTest.class.getClassLoader().getResourceAsStream("db.properties");properties.load(is);dataSource = DruidDataSourceFactory.createDataSource(properties);} catch (Exception e) {throw new RuntimeException(e);}}//获取连接的方法public static Connection getConnection() {try {return dataSource.getConnection();} catch (SQLException e) {throw new RuntimeException(e);}}// 回收连接的方法public static void release(Connection connection) {try {connection.close();} catch (SQLException e) {throw new RuntimeException(e);}}
}
测试代码:
Connection connection = JDBCUtil.getConnection();
System.out.println(connection);JDBCUtil.release(connection);
可以看到,我们将重复的创建步骤都封装到一个工具类之后,写正式测试主函数的时候发现代码就少了很多。
②、加强工具类(引入ThreadLocal)
ThreadLocal用于保存每个线程共享变量,原因是在Java中,每一个线程对象中都有一个
ThreadLocalMap<ThreadLocal, Object>,其key就是一个ThreadLocal,而Object即为该线程的共享变量。
而这个map是通过ThreadLocal的set和get方法操作的。对于同一个static ThreadLocal,不同线程只能从中get,
set,remove自己的变量,而不会影响其他线程的变量。
在进行对象跨层传递的时候,使用ThreadLocal可以避免多次传递,打破层次间的约束。
线程间数据隔离。
- 执行事务操作,用于存储线程事务信息。
- 数据库连接,Session会话管理。
- ThreadLocal对象.get: 获取ThreadLocal中当前线程共享变量的值。
- ThreadLocal对象.set: 设置ThreadLocal中当前线程共享变量的值。
- ThreadLocal对象.remove: 移除ThreadLocal中当前线程共享变量的值。
public class JDBCUtil_v2 {// 创建连接池引用,提供全局使用private static DataSource dataSource;private static ThreadLocal<Connection> threadLocal = new ThreadLocal<>();// 项目创建时就创建连接池对象并赋值static {try {Properties properties = new Properties();InputStream is = DruidTest.class.getClassLoader().getResourceAsStream("db.properties");properties.load(is);dataSource = DruidDataSourceFactory.createDataSource(properties);} catch (Exception e) {throw new RuntimeException(e);}}//获取连接的方法public static Connection getConnection() {try {// 在Thread Local中取连接,如果第一次创建,就先设置进入ThreadLocal。Connection connection = threadLocal.get();if (connection == null) {connection = dataSource.getConnection();threadLocal.set(connection);}return connection;} catch (SQLException e) {throw new RuntimeException(e);}}// 回收连接的方法public static void release() {try {Connection connection = threadLocal.get();if(connection == null) {threadLocal.remove();connection.close();}} catch (SQLException e) {throw new RuntimeException(e);}}
}
测试代码:
@Testpublic void testJDBCV2() {// 有ThreadLocal版本Connection connection = JDBCUtil_v2.getConnection();Connection connection1 = JDBCUtil_v2.getConnection();Connection connection2 = JDBCUtil_v2.getConnection();System.out.println(connection);System.out.println(connection1);System.out.println(connection2);// 无ThreadLocal版本Connection connection3 = JDBCUtil_v1.getConnection();Connection connection4 = JDBCUtil_v1.getConnection();Connection connection5 = JDBCUtil_v1.getConnection();System.out.println(connection3);System.out.println(connection4);System.out.println(connection5);}
运行结果:
com.mysql.cj.jdbc.ConnectionImpl@4b34fff9
com.mysql.cj.jdbc.ConnectionImpl@4b34fff9
com.mysql.cj.jdbc.ConnectionImpl@4b34fff9
com.mysql.cj.jdbc.ConnectionImpl@2a225dd7
com.mysql.cj.jdbc.ConnectionImpl@61eaec38
com.mysql.cj.jdbc.ConnectionImpl@125290e5
可以看到,引入ThreadLocal之后,极大节省了资源,一个连接可以多次复用。
6、BaseDAO详解
①、BaseDAO的概念&&搭建
- DAO :Data Access Object 数据访问对象
可以理解为对一张表的增删改查操作都维护在一个对应的DAO中。 - BaseDAO:抽出公共性代码,创建一个公共的父类,给这些DAO的实现类可以抽出公共性代码,复用简单更改的基础操作,我们称为BaseDAO。
搭建DAO:
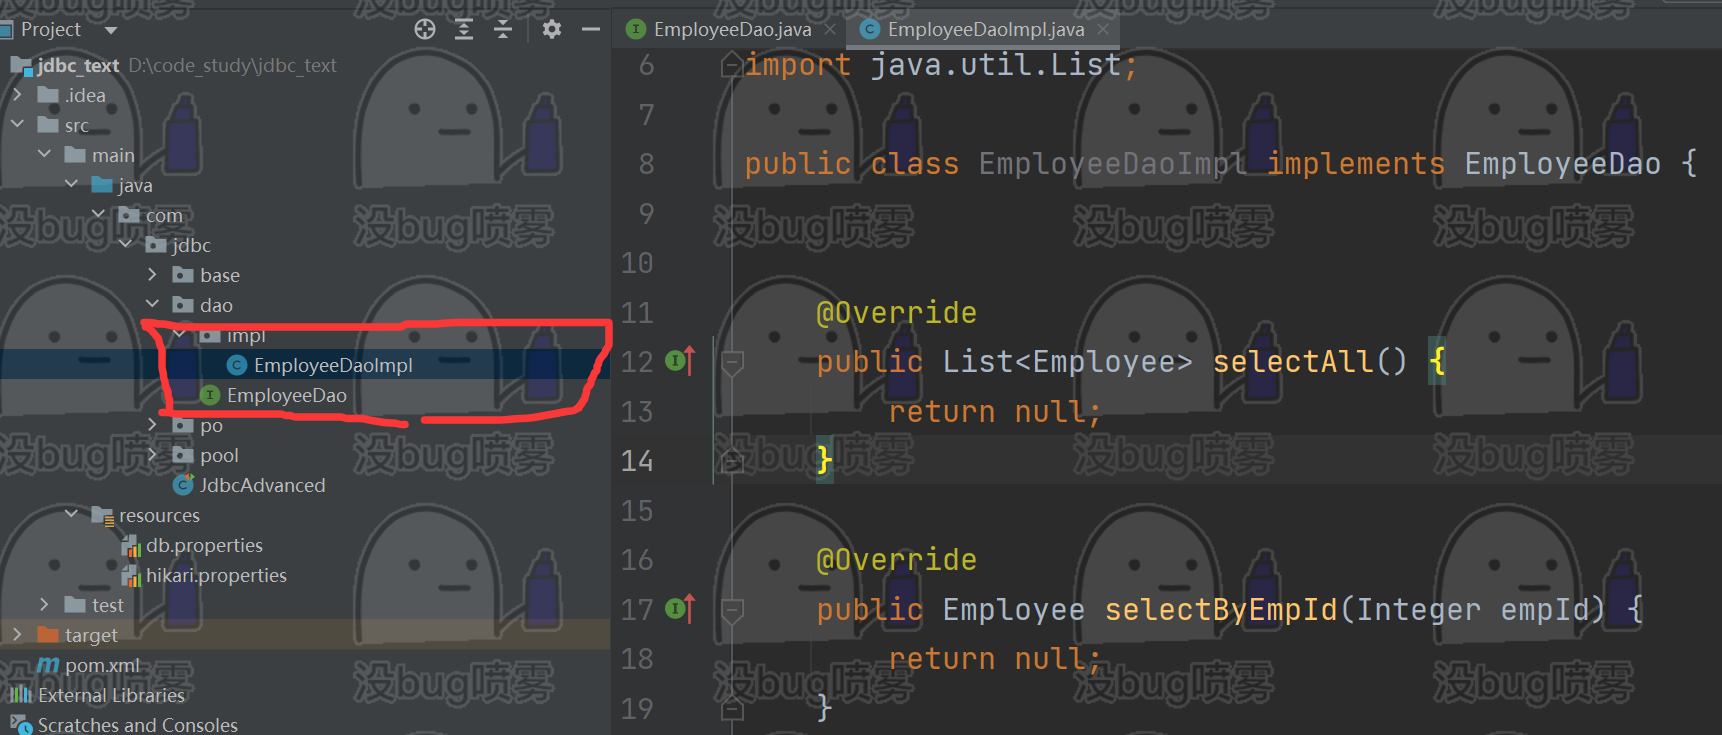
EmployeeDAO接口:
public interface EmployeeDao {List<Employee> selectAll();Employee selectByEmpId(Integer empId);int insert(Employee employee);int update(Employee employee);int deleteById(Integer empId);}
实现类:
public class EmployeeDaoImpl implements EmployeeDao {@Overridepublic List<Employee> selectAll() {return null;}@Overridepublic Employee selectByEmpId(Integer empId) {return null;}@Overridepublic int insert(Employee employee) {return 0;}@Overridepublic int update(Employee employee) {return 0;}@Overridepublic int deleteById(Integer empId) {return 0;}
}
②、BaseDAO搭建增删改查
每个增删改方法执行前,都需要执行下面这六步操作,而BaseDAO其实就是将这些重复步骤抽离出来。1、2、6步骤在工具类中已经封装好了,而BaseDAO其实就是处理中间三步的过程。
//1.注册驱动//2.获取连接//3.预编译sql语句//4.为占位符赋值,执行sql,接收返回结果//5.处理结果//6.释放资源
public class BaseDAO {/*** 通用增删改方法,返回结果均为一个int整数,表示被影响的行数** @param sql sql语句* @param params 给占位符要赋值的参数值。* @return* @throws Exception*/public int executeUpdate(String sql, Object... params) throws Exception {Connection connection = JDBCUtil_v2.getConnection();//3.预编译sql语句PreparedStatement preparedStatement = connection.prepareStatement(sql);//4.为占位符赋值,执行sql,接收返回结果if (params == null && params.length > 0) {for (int i = 0; i < params.length; i++) {preparedStatement.setObject(i + 1, params[i]);}}int row = preparedStatement.executeUpdate();//6.释放资源JDBCUtil_v2.release();//5.处理结果return row;}/*** 通用查询方法,返回结果为一个泛型集合,通过反射实现多行多列、单行多列、单行单列查询** @param clazz* @param sql* @param params* @param <T>* @return* @throws Exception*/public <T> List<T> executeQuery(Class<T> clazz, String sql, Object... params) throws Exception {Connection connection = JDBCUtil_v2.getConnection();//3.预编译sql语句PreparedStatement preparedStatement = connection.prepareStatement(sql);//4.为占位符赋值,执行sql,接收返回结果if (params == null && params.length > 0) {for (int i = 0; i < params.length; i++) {preparedStatement.setObject(i + 1, params[i]);}}ResultSet resultSet = preparedStatement.executeQuery();//获取结果集中的元数据对象//包含了:列的数量 和 每个列的名称ResultSetMetaData metaData = resultSet.getMetaData();int columnCount = metaData.getColumnCount();List<T> list = new ArrayList<>();//5.处理结果while (resultSet.next()) {// 通过反射创建一个实例T t = clazz.newInstance();// 循环遍历当前列,循环几次for (int i = 1; i <= columnCount; i++) {//通过下标获取列的值Object value = resultSet.getObject(i);//通过下标获取列的名字String fieldName = metaData.getColumnLabel(i);Field field = clazz.getDeclaredField(fieldName);field.setAccessible(true);field.set(t, value);}list.add(t);}resultSet.close();preparedStatement.close();//6.释放资源JDBCUtil_v2.release();return list;}/*** 单个查询,在上面集合基础上进行单个查询的优化* @param clazz* @param sql* @param params* @return* @param <T>* @throws Exception*/public <T> T executeQueryBean(Class<T> clazz, String sql, Object... params) throws Exception {List<T> list = this.executeQuery(clazz, sql, params);if (list == null) {return null;}return list.get(0);}}
EmployeeDaoImpl中调用BaseDAO实现代码:
public class EmployeeDaoImpl extends BaseDAO implements EmployeeDao {@Overridepublic List<Employee> selectAll() {try {String sql = "select emp_id empId, emp_name empName, emp_salary empSalary, emp_age empAge from t_emp";return executeQuery(Employee.class, sql, null);} catch (Exception e) {throw new RuntimeException(e);}}@Overridepublic Employee selectByEmpId(Integer empId) {try {String sql = "select emp_id empId, emp_name empName, emp_salary empSalary, emp_age empAge from t_emp where emp_id = ?";return executeQueryBean(Employee.class, sql, 1);} catch (Exception e) {throw new RuntimeException(e);}}@Overridepublic int insert(Employee employee) {try {String sql = "insert into t_emp (emp_name, emp_salary, emp_age) values (?, ?, ?)";return executeUpdate(sql, employee.getEmpName(), employee.getEmpSalary(), employee.getEmpAge());} catch (Exception e) {throw new RuntimeException(e);}}@Overridepublic int update(Employee employee) {try {String sql = "update t_emp set emp_salary = ? where emp_id = ?";return executeUpdate(sql, employee.getEmpSalary(), employee.getEmpId());} catch (Exception e) {throw new RuntimeException(e);}}@Overridepublic int deleteById(Integer empId) {try {String sql = "delete from t_emp where emp_id = ?";return executeUpdate(sql, empId);} catch (Exception e) {throw new RuntimeException(e);}}
}
测试类代码:
@Testpublic void testEmployeeDAO() {EmployeeDao employeeDao = new EmployeeDaoImpl();// 1. 多个查询List<Employee> employees = employeeDao.selectAll();System.out.println(employees);// 2. 单个查询Employee employee0 = employeeDao.selectByEmpId(1);System.out.println(employee0);// 3.插入操作Employee employee = new Employee(null, "tom", 300.65, 38);int row = employeeDao.insert(employee);System.out.println(row);// 4.更新操作Employee employee2 = new Employee(10, "tom", 10000.0, 38);int row2 = employeeDao.update(employee2);System.out.println(row2);//5.删除操作int row3 = employeeDao.deleteById(10);System.out.println(row3);}
运行结果:
[Employee{empId=1, empName='张三', empSalary=777.77, empAge=32}, Employee{empId=2, empName='李四', empSalary=666.66, empAge=41}, Employee{empId=3, empName='王五', empSalary=111.0, empAge=23}, Employee{empId=4, empName='赵六', empSalary=123.0, empAge=26}, Employee{empId=5, empName='钱七', empSalary=123.0, empAge=28}]
Employee{empId=1, empName='张三', empSalary=777.77, empAge=32}
1
1
1
7、JDBC事务
数据库事务就是一串SQL语句执行的整体机制,不会单条执行完更新数据库更新数据,最终根据最终存内的参数
语向执行结果统一处理! 一个事务内所有语句都成功及事务成功,我们可以通过提交commit提交事务结果给事务
务,更新数据! 一个事务内任意一条语句的失败,即为事务失败,我们可以通过触发rollback回滚结果事务,数据回到事务之前状态!
public class JDBCTransactionDemo {public static void main(String[] args) {try (Connection conn = DriverManager.getConnection("jdbc:mysql:///jdbc_test", "root", "root")) {conn.setAutoCommit(false); // 开始手动事务// 插入表1PreparedStatement ps1 = conn.prepareStatement("INSERT INTO table1 (col1) VALUES (?)");ps1.setString(1, "data1");ps1.executeUpdate();// 插入表2(假设这里会失败,例如表不存在)PreparedStatement ps2 = conn.prepareStatement("INSERT INTO table2 (col2) VALUES (?)");ps2.setString(1, "data2");ps2.executeUpdate();conn.commit(); // 提交事务System.out.println("Transaction committed.");} catch (SQLException e) {// 回滚处理try{conn.rollback();} catch(Exception e) {throw new RuntimeException(e);}}}
}


