很早之前的文章,搬运到这里。防止几个app之间来回跳转,方便观看。
因看了一堆源码,暂未看完,所以简单的先聊聊afl的具体执行,目前主要看了afl-fuzz这部分(也还没有看完,看了一大半),afl-gcc和 afl-clang 这块还没有看;(2022.4.10
- 初始化环境设置,读取一堆环境变量,以及一堆参数,对初始化配置进行一定的设置;-i测试样例的所在目录;-o结果输入位置;-f模糊测试位置?(这块还会再去调试下);-t超时时间设置;-m内存设置;-q QEMU模式;-d快速模式;-n无仪表模式;-x字典;
static void fix_up_banner(u8* name)修剪并且创建一个运行横幅(这一块一直没搞懂什么是横幅,接下来了解- 首先开始第一轮测试(预测试,也就是简单的判断运行过程之中是否存在一些错误之类的,调用alibrate_case函数对其进行校准,其实就是看看错误之类的东西,还有就是看下服务是否启动,没有则调用init_forkserver函数;(测试用例是使用queue队列来进行排队的;
- init_forkserver函数,该函数之间是使用pipe管道通信;子进程会存有一个仅供子进程执行的流程,如果发现"hello",说明服务准备好了;
- run_target函数,针对进程的交互,去执行子进程,并监控一些内容,如超时等;
- 然后进入主循环,主要函数为fuzz_one,取出testcase进行模糊处理;还有就是call_queue函数为精简队列,将一些不必要的testcase剔除;
上述简单了说了一些较为重要的函数,还有很多没有说明,因目前还未完整的看一遍函数,所以先不会说太多(省的误人子弟,等我搞懂了,然后再分享一下)
接下来还是会对其进行源码进行分析,然后调试调试;
2. afl调试(2022.4.17
这里不会过多分享调试内容,首先自己未调试结束,暂未搞懂每个函数具体功能(耽误太长时间了
主要分享一下调试的时候应该注意的一些东西;
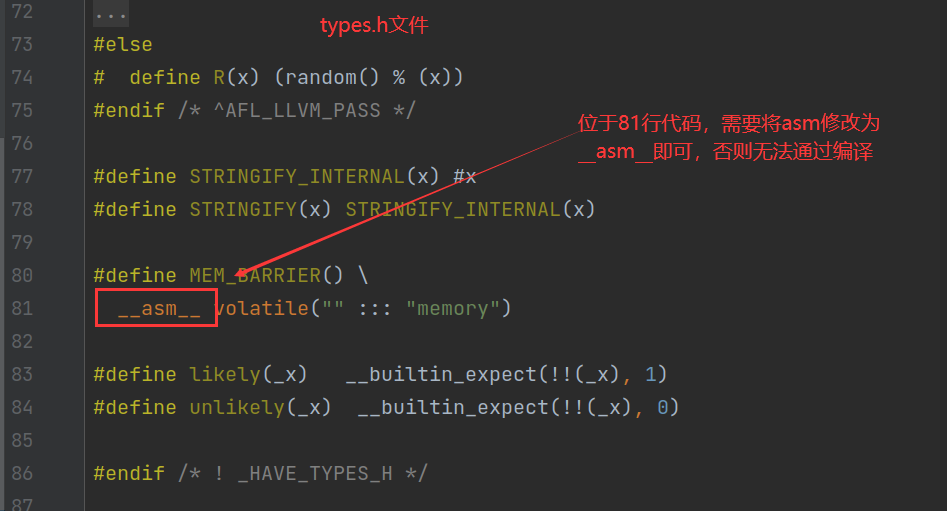
调试的时候需要将该asm修改为__asm__即可
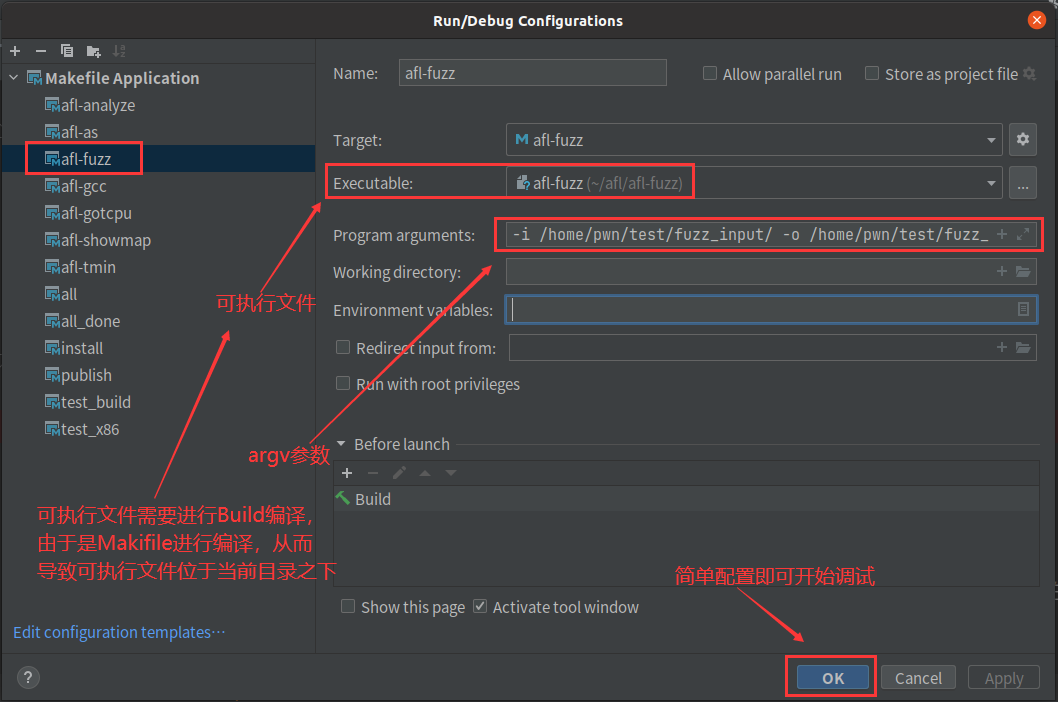
调试时的编辑部分如下:
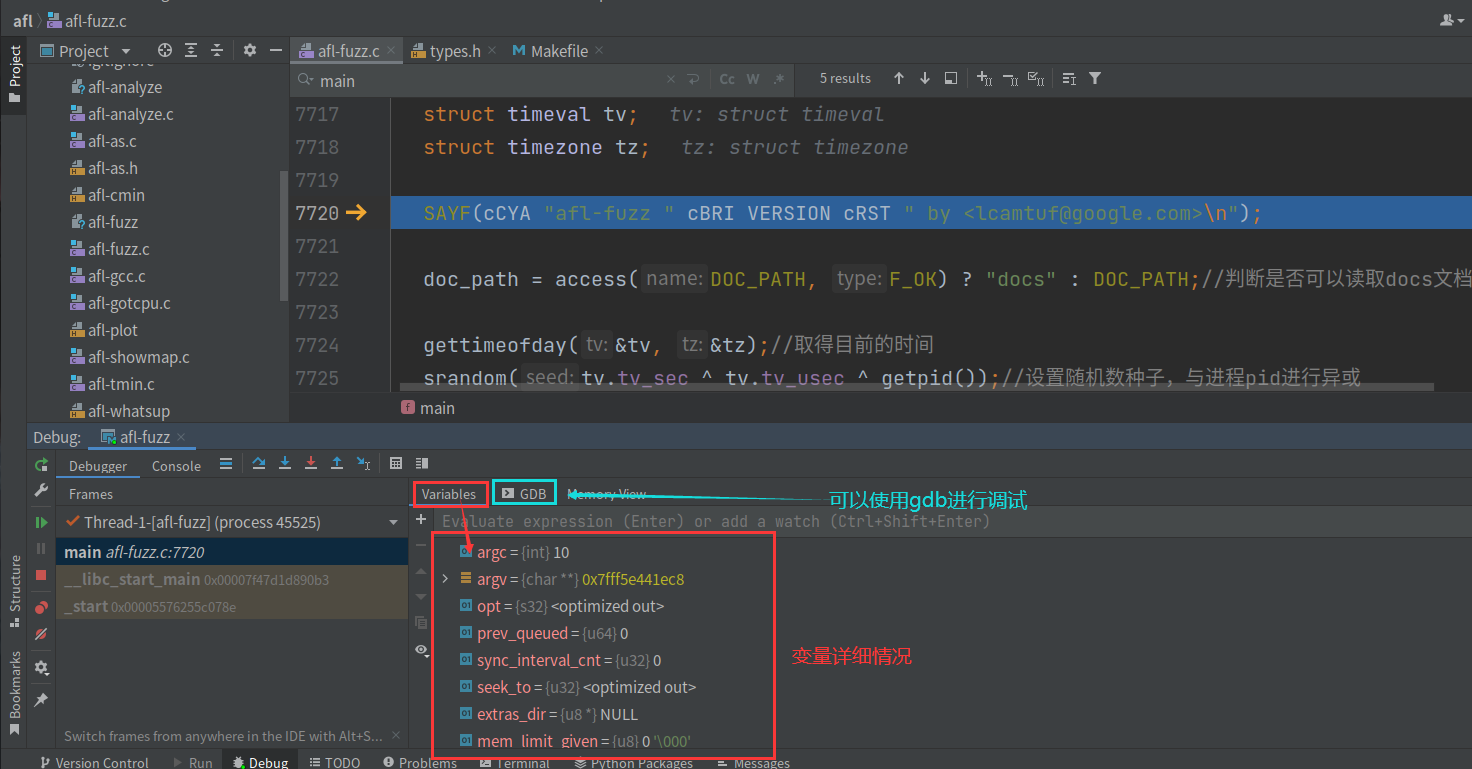
调试界面如下:
调试过程就先不分享了。因为这部分确实本周没有将流程过一遍,有点小忙;
1. Fuzzing101-Exercise01(2022.4.24
大体流程的话:forkserver -》 while开始执行fuzz -》 fuzz_one(对数据执行变异策略)
主体三个步骤,其中包括很多细节,但整体流程可以分为这三步;原想分享一下调试过程,但是感觉有些太过于单薄,分享一下Exercise01吧;
学习过程之中参考链接:(其实这些链接里都是一些大师傅写的比较好的内容,可以读一读,比我要厉害太多了
- AFL二三事
- sakuraのAFL源码全注释
- AFL afl_fuzz.c 详细分析
- AFL 漏洞挖掘技术漫谈2 Fuzz 结果分析和代码覆盖率
- Clion_激活码(仅位于无网络链接状态下)
- AFL源码分析之afl-fuzz.c详细注释(一)hollk
- AFL使用指南
Fuzzing101项目地址https://github.com/antonio-morales/Fuzzing101
环境位于docker之中的ubuntu20.04的容器之中!首先安装AFL
sh-5.0# cd $HOME
sh-5.0# pwd
/root
sh-5.0# apt update; apt install git
sh-5.0# git clone https://github.com/google/AFL.git && cd AFL/
修改一下/llvm_mode/afl-clang-fast.c源码,然后进行编译;
sh-5.0# apt-get install vim-gtk
sh-5.0# vim ./llvm_mode/afl-clang-fast.c
如下进行删除
---------------131~134行-------------------
#ifndef __ANDROID__cc_params[cc_par_cnt++] = "-mllvm";cc_params[cc_par_cnt++] = "-sanitizer-coverage-block-threshold=0";
#endif
-------------------------------------------
将这部分内容删掉,保存退出
按照顺序输入命令即可;
sh-5.0# apt install build-essential
sh-5.0# apt-get install gcc git make wget build-essential llvm clang
sh-5.0# make
sh-5.0# cd ./llvm_mode/
sh-5.0# make AFL_TRACE_PC=1
sh-5.0# make
sh-5.0# $HOME/AFL/afl-fuzz -V
afl-fuzz 2.57b by <lcamtuf@google.com>
下载fuzz目标
sh-5.0# cd $HOME
sh-5.0# mkdir fuzzing_xpdf && cd fuzzing_xpdf
sh-5.0# wget https://dl.xpdfreader.com/old/xpdf-3.02.tar.gz
sh-5.0# tar -xvzf xpdf-3.02.tar.gz
sh-5.0# cd xpdf-3.02/
sh-5.0# vim ./configure
配置环境变量,主要是生成Makefile时指定编译器;并进行编译,此时编译器将是我们所指定的afl-clang-fast啦
sh-5.0# export CC=$HOME/AFL/afl-clang-fast
sh-5.0# export CXX=$HOME/AFL/afl-clang-fast++
sh-5.0# ./configure --prefix="$HOME/fuzzing_xpdf/install/"
sh-5.0# make
sh-5.0# make install
验证其是否使用afl-clang-fast进行了编译
sh-5.0# cd $HOME/fuzzing_xpdf/install/bin/
sh-5.0# strings ./pdftotext | grep __sanitizer_cov
此时便可以正式开始fuzz啦;不过在此之前,我们要下载一些种子,也就是我们最开始的输入,随后的变异也是根据该种子进行变异的;
sh-5.0# cd $HOME/fuzzing_xpdf
sh-5.0# mkdir pdf_examples && cd pdf_examples
sh-5.0# wget https://github.com/mozilla/pdf.js-sample-files/raw/master/helloworld.pdf
sh-5.0# wget http://www.africau.edu/images/default/sample.pdf
sh-5.0# wget https://www.melbpc.org.au/wp-content/uploads/2017/10/small-example-pdf-file.pdf
测试工具是否可以使用;
sh-5.0# $HOME/fuzzing_xpdf/install/bin/pdfinfo -box -meta $HOME/fuzzing_xpdf/pdf_examples/helloworld.pdf
Tagged:         no
Pages:          1
Encrypted:      no
Page size:      200 x 200 pts
MediaBox:           0.00     0.00   200.00   200.00
CropBox:            0.00     0.00   200.00   200.00
BleedBox:           0.00     0.00   200.00   200.00
TrimBox:            0.00     0.00   200.00   200.00
ArtBox:             0.00     0.00   200.00   200.00
File size:      678 bytes
Optimized:      no
PDF version:    1.7
sh-5.0# echo core >/proc/sys/kernel/core_pattern
sh: /proc/sys/kernel/core_pattern: Read-only file system
此时我们可以发现报错了,这是因为环境问题;环境位于docker之中,而docker容器的底层基本文件系统是可读而不可修改的;故使用privileged参数启动docker;
[root@VM-4-13-centos ~]# docker run -it --privileged ubuntu:20.04 /bin/sh
然后开始执行fuzz
sh-5.0# $HOME/AFL/afl-fuzz -i $HOME/fuzzing_xpdf/pdf_examples/ -o $HOME/fuzzing_xpdf/out/ -m none -- $HOME/fuzzing_xpdf/install/bin/pdftotext @@ $HOME/fuzzing_xpdf/output
但是长时间的fuzz,将会由于网络原因从而导致终端关闭而fuzz被迫终止;此时我们采用screen软件来模拟终端,哪怕被迫终止,也可以进行恢复操作;
同样的,也可以执行以下命令进行恢复;(输入文件以-代指,表明此时处于恢复状态
sh-5.0# $HOME/AFL/afl-fuzz -i - -o $HOME/fuzzing_xpdf/out/ -m none -- $HOME/fuzzing_xpdf/install/bin/pdftotext @@ $HOME/fuzzing_xpdf/output
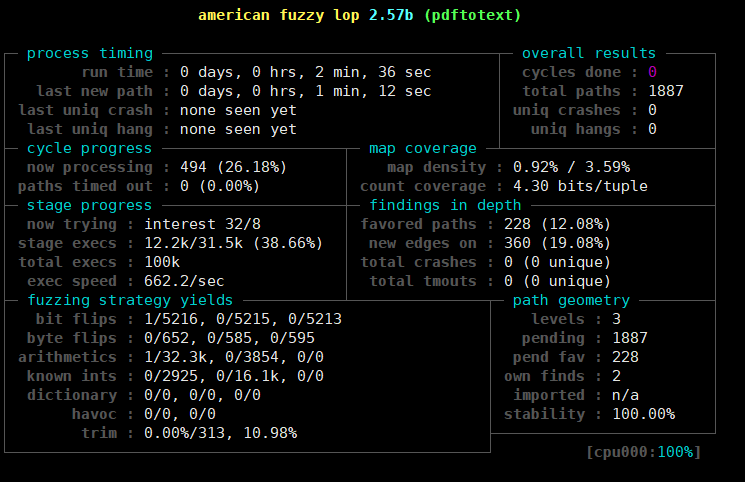
本次使用的是我的远程服务器docker,跑了一下午(正常两个小时就可以了);可能是单核服务器,而且开了docker,到时候,看看能不能借用下学校的服务器跑下;这个应该多开几个核的,要不跑起来实在是太慢了;
Fuzzing101(2022.5.1
Exercise01
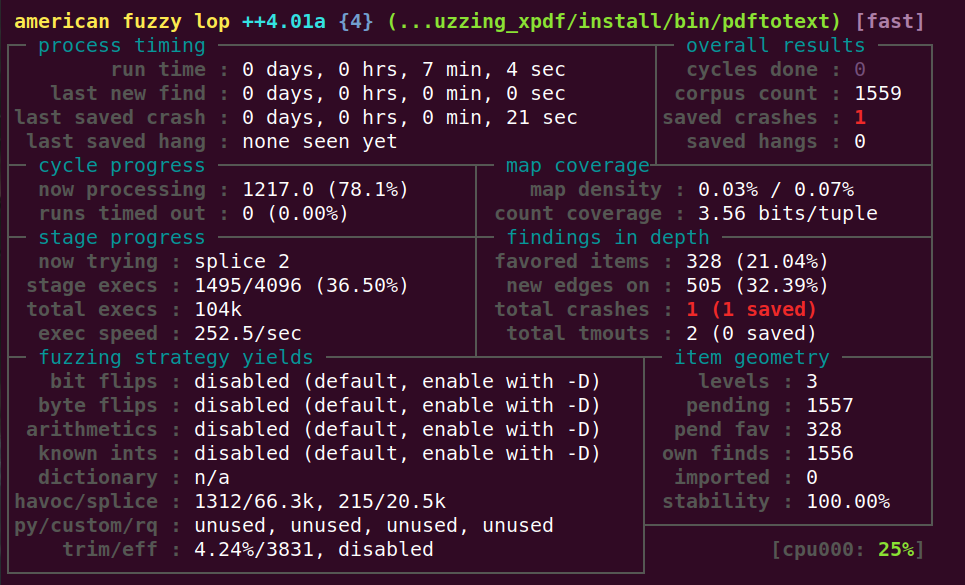
Exercise01因为AFL跑出crash太慢了,所以换称了AFLplusplus来跑一下;
pwn@pwn-virtual-machine:~/fuzzing_xpdf/xpdf-3.02$ cd $HOME
pwn@pwn-virtual-machine:~/fuzzing_xpdf/xpdf-3.02$ git clone https://github.com/AFLplusplus/AFLplusplus && cd AFLplusplus
pwn@pwn-virtual-machine:~/fuzzing_xpdf/xpdf-3.02$ export LLVM_CONFIG="llvm-config-11"
pwn@pwn-virtual-machine:~/fuzzing_xpdf/xpdf-3.02$ make distrib
pwn@pwn-virtual-machine:~/fuzzing_xpdf/xpdf-3.02$ sudo make install
使用AFL中的afl-clang-fast来对目标文件进行编译;
pwn@pwn-virtual-machine:~/fuzzing_xpdf/xpdf-3.02$ export CC=$HOME/AFLplusplus/afl-clang-fast
pwn@pwn-virtual-machine:~/fuzzing_xpdf/xpdf-3.02$ export CXX=$HOME/AFLplusplus/afl-clang-fast++
pwn@pwn-virtual-machine:~/fuzzing_xpdf/xpdf-3.02$ ./configure --prefix="$HOME/fuzzing_xpdf/install/"
pwn@pwn-virtual-machine:~/fuzzing_xpdf/xpdf-3.02$ make
pwn@pwn-virtual-machine:~/fuzzing_xpdf/xpdf-3.02$ make install
使用如下命令进行模糊测试;
pwn@pwn-virtual-machine:~/fuzzing_xpdf$ $HOME/AFLplusplus/afl-fuzz -i $HOME/fuzzing_xpdf/pdf_examples/ -o $HOME/fuzzing_xpdf/out/ -s 123 -m none -S 4 -- $HOME/fuzzing_xpdf/install/bin/pdftotext @@ $HOME/fuzzing_xpdf/output
使用gcc重新编译,验证漏洞;
pwn@pwn-virtual-machine:~$ cd $HOME/fuzzing_xpdf/xpdf-3.02/
pwn@pwn-virtual-machine:~/fuzzing_xpdf/xpdf-3.02$  rm -r $HOME/fuzzing_xpdf/install
pwn@pwn-virtual-machine:~/fuzzing_xpdf/xpdf-3.02$  make clean
pwn@pwn-virtual-machine:~/fuzzing_xpdf/xpdf-3.02$  CFLAGS="-g -O0" CXXFLAGS="-g -O0" ./configure --prefix="$HOME/fuzzing_xpdf/install/"
pwn@pwn-virtual-machine:~/fuzzing_xpdf/xpdf-3.02$  make
pwn@pwn-virtual-machine:~/fuzzing_xpdf/xpdf-3.02$  make install
使用gdb来对漏洞进行验证;
pwn@pwn-virtual-machine:~$ cd $HOME/fuzzing_xpdf/install/bin
pwn@pwn-virtual-machine:~/fuzzing_xpdf/install/bin$ gdb --args ./pdftotext $HOME/fuzzing_xpdf/out/4/crashes/id:000000,sig:11,src:001217,time:403188,execs:98992,op:havoc,rep:16

Exercise02
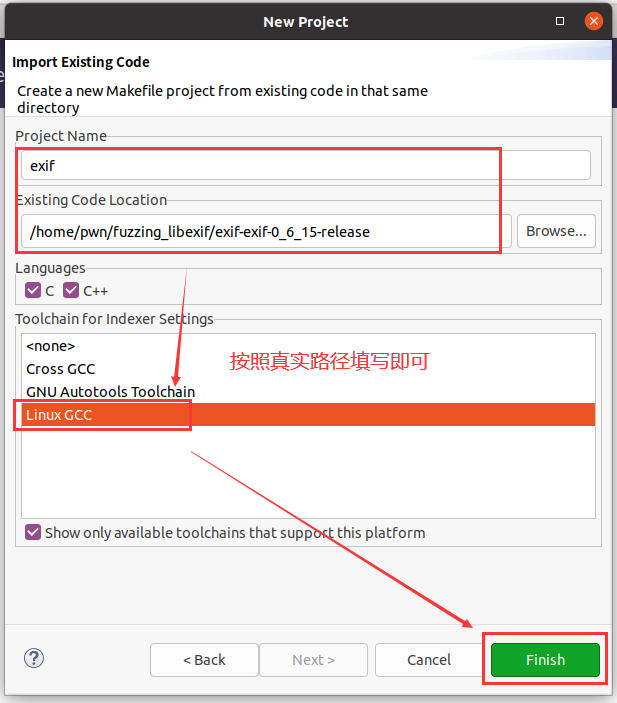
Exercise02该练习与练习1相差无几;唯一不同的便是需要我们来利用eclipse来验证漏洞;
pwn@pwn-virtual-machine:~$ sudo apt install default-jdk
pwn@pwn-virtual-machine:~$ wget https://www.eclipse.org/downloads/download.php?file=/technology/epp/downloads/release/2022-03/R/eclipse-java-2022-03-R-linux-gtk-x86_64.tar.gz
如果无法下载,则可使用游览器进行下载安装
pwn@pwn-virtual-machine:~$ tar -zxvf eclipse-cpp-2022-03-R-linux-gtk-x86_64.tar.gz
pwn@pwn-virtual-machine:~$ cd ./eclipse/
pwn@pwn-virtual-machine:~/eclipse$ ./eclipse
然后选择File->Import->C/C+±>Existing Code as Makefile Project即可;
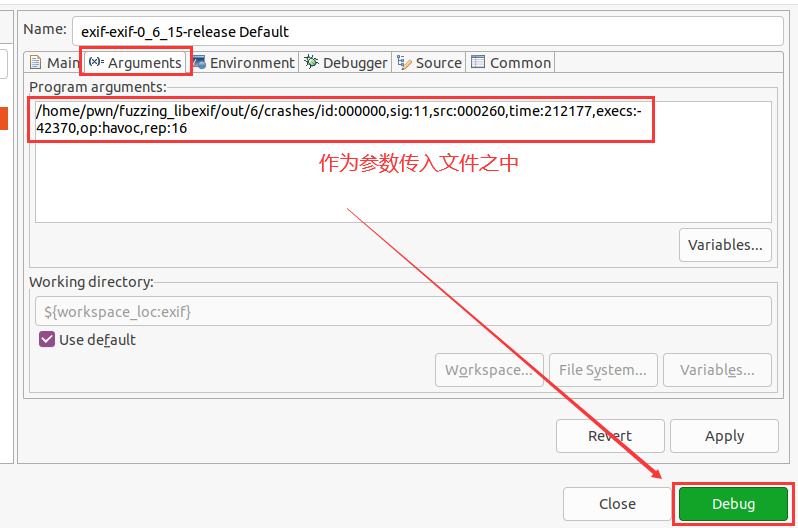
然后功能栏之中选择Run->Debug Configurations;

然后配置参数文件的位置,即是我们发现crashes的文件位置;
故可以发现错误位置;
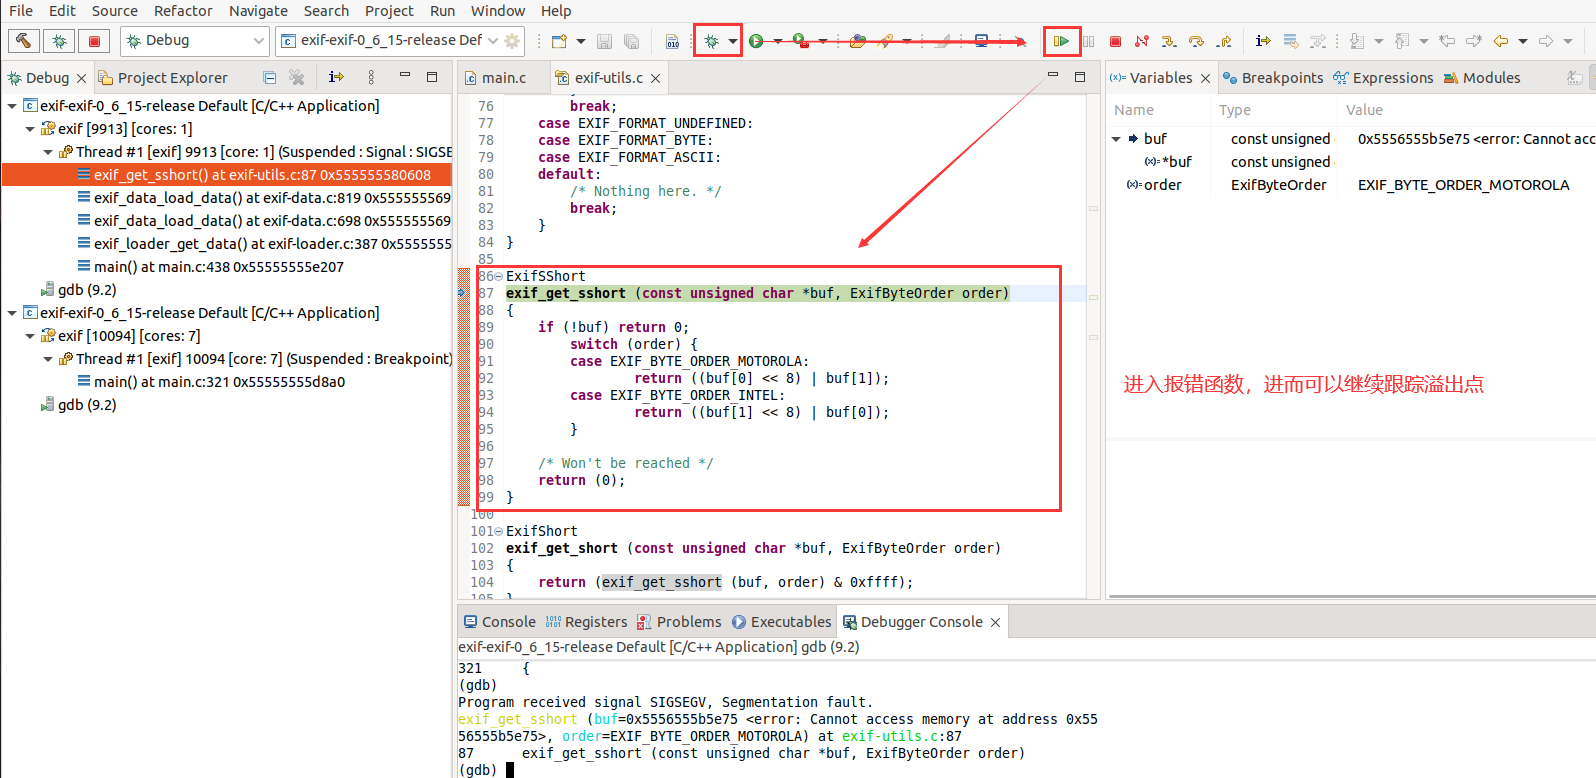
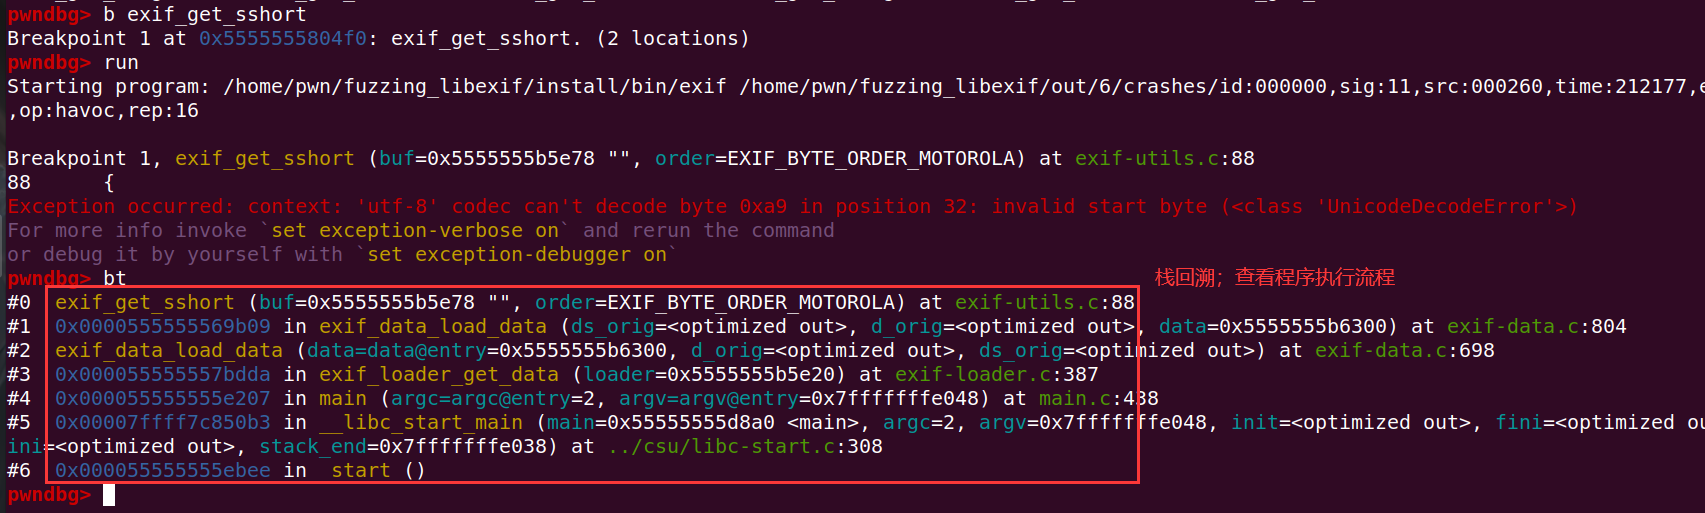
同样的也可以使用pwndbg进行栈回溯,来查看程序流程;
Exercise03
Exercise03则使用到了ASAN;该ASAN其实就是一个漏洞检测的工具,通过该工具可以发现一些详细漏洞;
编译目标文件的过程需要注意环境变量AFL_USE_ASAN;
pwn@pwn-virtual-machine:~/fuzzing_tcpdump/tcpdump-tcpdump-4.9.2$ AFL_USE_ASAN=1 ./configure --prefix="$HOME/fuzzing_tcpdump/install/"
pwn@pwn-virtual-machine:~/fuzzing_tcpdump/tcpdump-tcpdump-4.9.2$ AFL_USE_ASAN=1 make
pwn@pwn-virtual-machine:~/fuzzing_tcpdump/tcpdump-tcpdump-4.9.2$ AFL_USE_ASAN=1 make install
pwn@pwn-virtual-machine:~$ $HOME/fuzzing_tcpdump/install/sbin/tcpdump -vvvvXX -ee -nn -r /home/pwn/fuzzing_tcpdump/out/4/crashes/id\:000000\,sig\:06\,src\:010311\,time\:69062945\,execs\:10977858\,op\:havoc\,rep\:4
reading from file /home/pwn/fuzzing_tcpdump/out/4/crashes/id:000000,sig:06,src:010311,time:69062945,execs:10977858,op:havoc,rep:4, link-type EN10MB (Ethernet)
23:17:28.958610 00:04:23:57:a5:7a > ff:ff:ff:ff:ff:ff, ethertype IPv4 (0x0800), length 221: truncated-ip - 48 bytes missing! (tos 0x0, ttl 128, id 32903, offset 0, flags [none], proto UDP (17), length 255, bad cksum 7c4e (->391d)!)192.169.1.249.138 > 187.168.1.255.138:
>>> NBT UDP PACKET(138) Res=0x110E ID=0x891D IP=192 (0xc0).168 (0xa8).1 (0x1).249 (0xf9) Port=138 (0x8a) Length=31234 (0x7a02) Res2=0x2FF
SourceName=
WARNING: Short packet. Try increasing the snap length0x0000:  ffff ffff ffff 0004 2357 a57a 0800 4500  ........#W.z..E.0x0010:  00ff 8087 0000 8011 7c4e c0a9 01f9 bba8  ........|N......0x0020:  01ff 008a 008a 00bb 53ec 110e 891d c0a8  ........S.......0x0030:  01f9 008a 7a02 02ff 7f45 4545 5454 5444  ....z....EEETTTD0x0040:  4a44 4646 4444 4145 4b43 3743 4143 4143  JDFFDDAEKC7CACAC0x0050:  4143 4143 4143 4141 4100 2045 4246 4345  ACACACAAA..EBFCE0x0060:  4345 4645                                CEFE
23:17:28.958708 00:04:23:57:a5:7a > ff:ff:ff:ff:ff:ff, ethertype IPv4 (0x0800), length 221: (tos 0x0, ttl 128, id 14472, offset 0, flags [none], proto UDP (17), length 207, bad cksum 7c4d (->7e69)!)192.168.0.0.138 > 192.133.1.255.161:  [|snmp]0x0000:  ffff ffff ffff 0004 2357 a57a 0800 4500  ........#W.z..E.0x0010:  00cf 3888 0000 8011 7c4d c0a8 0000 c085  ..8.....|M......0x0020:  01ff 008a 00a1 0200 0400 00ff ffff e000  ................0x0030:  0000 0000 5c00 0000 0010 4545 4b46 4144  ....\.....EEKFAD0x0040:  4a44 4646 4044 4145 4b43 4143 4161 4100  JDFF@DAEKCACAaA.0x0050:  0423 4143 4143 3100 0400 2041 4247 4346  .#ACAC1....ABGCF0x0060:  5046 5045                                PFPE
20:43:21.639415 c2:00:1f:fa:00:01 > 33:33:00:00:00:05, ethertype IPv6 (0x86dd), length 90: (class 0xe0, hlim 1, next-header OSPF (89) payload length: 36) fe80::1 > ff02::5: OSPFv3, unknown packet type (0), length 360x0000:  3333 0000 0005 c200 1ffa 0001 86dd 6e00  33............n.0x0010:  0000 0024 5901 fe80 0000 0000 0000 0000  ...$Y...........0x0020:  0000 0000 0001 ff02 0000 0000 0000 0000  ................0x0030:  0000 0000 0005 0300 0002 fe80 0000 0000  ................0x0040:  0000 0000 0000 0000 0001 0304 00e8 020a  ................0x0050:  0028 0000 0000 0000 0000                 .(........
20:43:31.662021 c2:00:1f:fa:00:01 > 33:33:00:00:00:05, ethertype IPv6 (0x86dd), length 90: (class 0xe0, hlim 1, next-header OSPF (89) payload length: 36) fe80::1 > ff02::2: OSPFv20, unknown packet type (246), length 360x0000:  3333 0000 0005 c200 1ffa 0001 86dd 6e00  33............n.0x0010:  0000 0024 5901 fe80 0000 0000 0000 0000  ...$Y...........0x0020:  0000 0000 0001 ff02 0000 0000 0000 0000  ................0x0030:  0000 0000 0002 14f6 0020 0000 2001 0000  ................0x0040:  0000 0101 0101 0006 2001 0000 0000 7fff  ................0x0050:  0101 8000 0000 0000 0000                 ..........
20:43:41.642109 c2:00:1f:fa:00:01 > 33:33:00:00:00:06, ethertype IPv6 (0x86dd), length 90: (class 0xe0, hlim 1, next-header OSPF (89) payload length: 36) fe80::1 > ff02::5: OSPFv3, Hello, length 36Router-ID 1.1.1.1, Area 0.0.0.1Options [V6, External, Router]Hello Timer 10s, Dead Timer 40s, Interface-ID 0.0.0.5, Priority 1Neighbor List:0x0000:  3333 0000 0006 c200 1ffa 0001 86dd 6e00  33............n.0x0010:  0000 0024 5901 fe80 0000 0000 0000 0000  ...$Y...........0x0020:  0000 0000 0001 ff02 0000 0000 0000 0000  ................0x0030:  0000 0000 0005 0301 0024 0101 0101 0000  .........$......0x0040:  0001 fb86 0000 0000 0005 0100 0013 000a  ................0x0050:  0028 0000 0000 0000 0000                 .(........
20:43:46.469862 c2:01:1f:fa:00:01 > 33:33:00:00:00:05, ethertype IPv6 (0x86dd), length 90: (class 0xe0, hlim 1, next-header OSPF (89) payload length: 36) fe80::2 > ff02:ffdd::5: OSPFv3, Hello, length 36Router-ID 2.2.2.2, Area 0.0.0.1Options [V6, External, Router]Hello Timer 10s, Dead Timer 100s, Interface-ID 0.0.0.5, Priority 1Neighbor List:0x0000:  3333 0000 0005 c201 1ffa 0001 86dd 6e00  33............n.0x0010:  0000 0024 5901 fe80 0000 0000 0000 0000  ...$Y...........0x0020:  0000 0000 0002 ff02 ffdd 0000 0000 0000  ................0x0030:  0000 0000 0005 0301 0024 0202 0202 0000  .........$......0x0040:  0001 f983 0000 0000 0005 0100 0013 000a  ................0x0050:  0064 0000 0000 0000 0000                 .d........
15:32:23.641566 c2:00:1f:fa:00:01 > 33:33:00:00:00:05, ethertype IPv6 (0x86dd), length 94: (class 0xe0, hlim 1, next-header OSPF (89) payload length: 40) fe80::e1:ff00:0:1 > ff02::5: OSPFv3, Hello, length 40Router-ID 1.1.1.1, Area 0.0.0.1Options [V6, External, Router]Hello Timer 10s, Dead Timer 40s, Interface-ID 0.0.0.5, Priority 1Designated Router 1.1.1.1Neighbor List:2.2.2.20x0000:  3333 0000 0005 c200 1ffa 0001 86dd 6e00  33............n.0x0010:  0000 0028 5901 fe80 0000 0000 0000 00e1  ...(Y...........0x0020:  ff00 0000 0001 ff02 0000 0000 0000 0000  ................0x0030:  0000 0000 0005 0301 0028 0101 0101 0000  .........(......0x0040:  0001 f578 0000 0000 0005 0100 0013 000a  ...x............0x0050:  0028 0101 0101 0000 0000 0202 0202       .(............
20:43:51.657571 c2:01:1f:fa:00:01 > c2:00:1f:fa:00:01, ethertype IPv6 (0x86dd), length 82: (class 0xe0, hlim 0, next-header OSPF (89) payload length: 28) ::1fe:8000:0:0:0 > ::1: OSPFv3, Database Description, length 28Router-ID 2.2.2.2, Area 0.0.0.1Options [V6, External, Router], DD Flags [Init, More, Master], MTU 1500, DD-Sequence 0x00001d460x0000:  c200 1ffa 0001 c201 1ffa 0001 86dd 6e00  ..............n.0x0010:  0000 001c 5900 0000 0000 0000 01fe 8000  ....Y...........0x0020:  0000 0000 0000 0000 0000 0000 0000 0000  ................0x0030:  0000 0000 0001 0302 001c 0202 0202 0000  ................0x0040:  0001 d826 0000 0000 0013 05dc 0007 0000  ...&............0x0050:  1d46                                     .F
20:43:51.661568 c2:00:1f:fa:00:01 > c2:01:1f:fa:00:01, ethertype IPv6 (0x86dd), length 82: (class 0xe0, hlim 1, next-header OSPF (89) payload length: 28) fe80::1 > fe80::2: OSPFv3, Database Description, length 28Router-ID 1.1.1.1, Area 0.0.0.1Options [V6, External, Router], DD Flags [Init, More, Master], MTU 1500, DD-Sequence 0x0000242c0x0000:  c201 1ffa 0001 c200 1ffa 0001 86dd 6e00  ..............n.0x0010:  0000 001c 5901 fe80 0000 0000 0000 0000  ....Y...........0x0020:  0000 0000 0001 fe80 0000 0000 0000 0000  ................0x0030:  0000 0000 0002 0302 001c 0101 0101 0000  ................0x0040:  0001 d342 0000 0000 0013 05dc 0007 0000  ...B............0x0050:  242c                                     $,
20:43:51.665572 c2:00:1f:fa:00:01 > c2:01:1f:fa:00:01, ethertype IPv6 (0x86dd), length 222: (class 0xe0, hlim 1, next-header OSPF (89) payload length: 168) fe80::1 > fe80::2: OSPFv3, Database Description, length 168Router-ID 1.1.1.1, Area 0.0.0.1
=================================================================
==192017==ERROR: AddressSanitizer: heap-buffer-overflow on address 0x60b000000154 at pc 0x562fd2e76411 bp 0x7fff259dcc10 sp 0x7fff259dcc00
READ of size 2 at 0x60b000000154 thread T0#0 0x562fd2e76410 in EXTRACT_16BITS extract.h:184#1 0x562fd2e76410 in ospf6_print_lshdr print-ospf6.c:395#2 0x562fd2e76410 in ospf6_print_lshdr print-ospf6.c:387#3 0x562fd2e78434 in ospf6_decode_v3 print-ospf6.c:790#4 0x562fd2e78434 in ospf6_print print-ospf6.c:1005#5 0x562fd2db04bb in ip6_print print-ip6.c:387#6 0x562fd2d62e19 in ethertype_print print-ether.c:337#7 0x562fd2d64316 in ether_print print-ether.c:236#8 0x562fd2ccd5fa in pretty_print_packet print.c:332#9 0x562fd2ca964a in print_packet tcpdump.c:2497#10 0x562fd2fc0252 in pcap_offline_read savefile.c:507#11 0x562fd2f6a034 in pcap_loop pcap.c:875#12 0x562fd2c9f0b1 in main tcpdump.c:2000#13 0x7f1a571a30b2 in __libc_start_main (/lib/x86_64-linux-gnu/libc.so.6+0x240b2)#14 0x562fd2ca73bd in _start (/home/pwn/fuzzing_tcpdump/install/sbin/tcpdump+0x14c3bd)0x60b000000154 is located 0 bytes to the right of 100-byte region [0x60b0000000f0,0x60b000000154)
allocated by thread T0 here:#0 0x7f1a574cf808 in __interceptor_malloc ../../../../src/libsanitizer/asan/asan_malloc_linux.cc:144#1 0x562fd2fc4f35 in pcap_check_header sf-pcap.c:401#2 0x562fd2fc1131 in pcap_open_offline_with_tstamp_precision savefile.c:260SUMMARY: AddressSanitizer: heap-buffer-overflow extract.h:184 in EXTRACT_16BITS
Shadow bytes around the buggy address:0x0c167fff7fd0: 00 00 00 00 00 00 00 00 00 00 00 00 00 00 00 000x0c167fff7fe0: 00 00 00 00 00 00 00 00 00 00 00 00 00 00 00 000x0c167fff7ff0: 00 00 00 00 00 00 00 00 00 00 00 00 00 00 00 000x0c167fff8000: fa fa fa fa fa fa fa fa fd fd fd fd fd fd fd fd0x0c167fff8010: fd fd fd fd fd fa fa fa fa fa fa fa fa fa 00 00
=>0x0c167fff8020: 00 00 00 00 00 00 00 00 00 00[04]fa fa fa fa fa0x0c167fff8030: fa fa fa fa fa fa fa fa fa fa fa fa fa fa fa fa0x0c167fff8040: fa fa fa fa fa fa fa fa fa fa fa fa fa fa fa fa0x0c167fff8050: fa fa fa fa fa fa fa fa fa fa fa fa fa fa fa fa0x0c167fff8060: fa fa fa fa fa fa fa fa fa fa fa fa fa fa fa fa0x0c167fff8070: fa fa fa fa fa fa fa fa fa fa fa fa fa fa fa fa
Shadow byte legend (one shadow byte represents 8 application bytes):Addressable:           00Partially addressable: 01 02 03 04 05 06 07 Heap left redzone:       faFreed heap region:       fdStack left redzone:      f1Stack mid redzone:       f2Stack right redzone:     f3Stack after return:      f5Stack use after scope:   f8Global redzone:          f9Global init order:       f6Poisoned by user:        f7Container overflow:      fcArray cookie:            acIntra object redzone:    bbASan internal:           feLeft alloca redzone:     caRight alloca redzone:    cbShadow gap:              cc
==192017==ABORTING
关于ASAN的一些参考链接:
- AddressSanitizer-Clang 15.0.0git 文档
- ASAN.github
- ASAN的一些例子
Exercise04
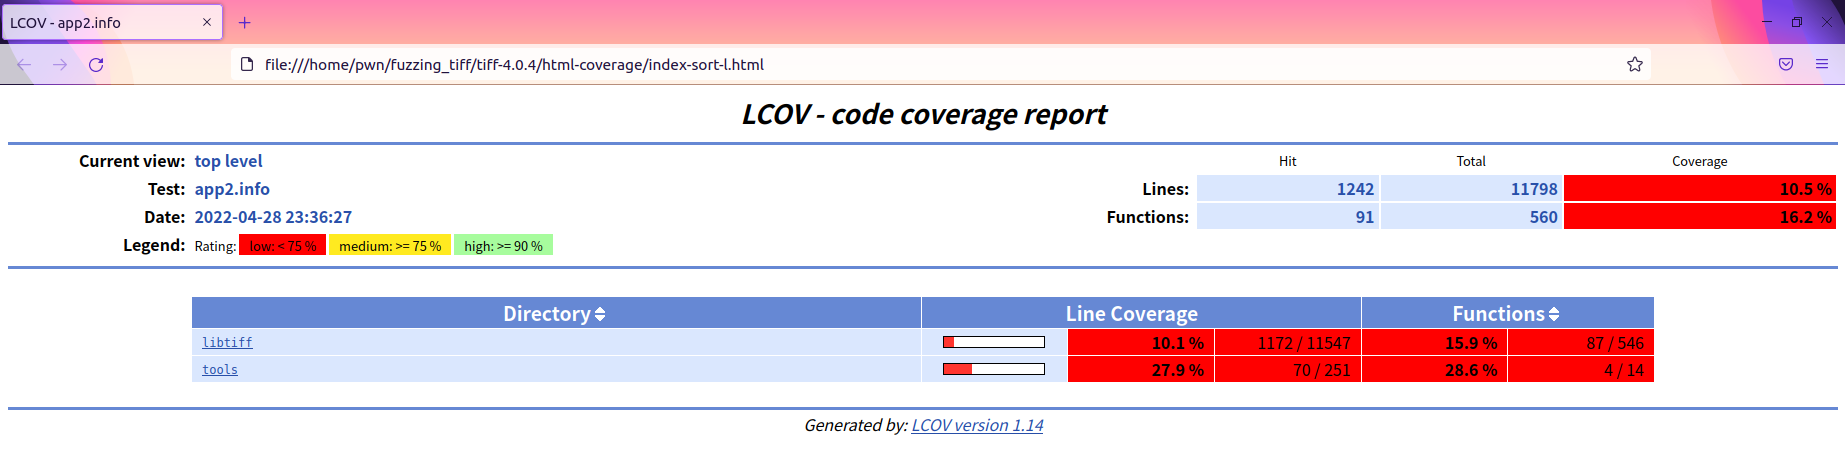
该练习需要的是图形化查看代码覆盖率;
测试过程与练习1相同,唯有跑出crash之后不一样;
pwn@pwn-virtual-machine:~$ cd $HOME/fuzzing_tiff/tiff-4.0.4/
pwn@pwn-virtual-machine:~/fuzzing_tiff/tiff-4.0.4$ lcov --zerocounters --directory ./
重置以前的计数器
pwn@pwn-virtual-machine:~/fuzzing_tiff/tiff-4.0.4$ lcov --capture --initial --directory ./ --output-file app.info
返回包含每条检测线的零覆盖率的“基线”覆盖率数据文件
pwn@pwn-virtual-machine:~/fuzzing_tiff$ $HOME/fuzzing_tiff/install/bin/tiffinfo -D -j -c -r -s -w $HOME/fuzzing_tiff/crashes/id_000000\,sig_06\,src_000182\,time_204982\,execs_151227\,op_havoc\,rep_8
让程序运行crash中的其中一个输出文件
pwn@pwn-virtual-machine:~/fuzzing_tiff/tiff-4.0.4$ lcov --no-checksum --directory ./ --capture --output-file app2.info
将当前覆盖状态保存到 app2.info 文件中
pwn@pwn-virtual-machine:~/fuzzing_tiff/tiff-4.0.4$ genhtml --highlight --legend -output-directory ./html-coverage/ ./app2.info
使用genhtml将app2.info中的覆盖率数据转换成HTML可视化状态
Exercise05(暂未crash
如下,该部分没有发现漏洞,那么问题可能出现于测试种子的问题,或许要考虑换一下种子的问题;

protobuf(fuzz(2022.5.15
首先我们想一个问题,如何将fuzz与pwn题目结合起来,那么将用到了fuzz结构感知,但是呢,其前置技能便是protobuf,故学习一下protobuf,其不仅仅用到了fuzz,有很多项目都会使用到该技术,比如即时通讯;
- 是什么?
protocol buffers 是一种灵活,高效,自动化机制的结构数据序列化方法-可类比 XML,但是比 XML 更小、更快、更为简单。你可以定义数据的结构,然后使用特殊生成的源代码轻松的在各种数据流中使用各种语言进行编写和读取结构数据。你甚至可以更新数据结构,而不破坏根据旧数据结构编译而成并且已部署的程序
- 相比于js、xml等反序列化有什么优点?或者说缺点?
首先便是protobuf的速度更快、体积更小、适合大型数据包的序列化、更高的环境适配性;
那么缺点呢?缺点其实也是优点;我们先来思考一下为什么protobuf比xml等速度快,是因为protibuf使用的是二进制传输,而xml呢?使用的是文本;文本的优点便是我们能够清晰的看到其中的一些内容,但相应的体积会更大;而二进制,则无法直观的看到一些内容,但是体积小;所以缺点便是无法直观查看序列化内容;
- 如何使用、或者说如何工作?
首先我们可以写一个简单的proto文件:
syntax = "proto2";message SearchRequest {required string query = 1;optional int32 page_number = 2;optional int32 result_per_page = 3;
}
如上,便是一个即为简单的proto文件;使用protoc ./test.proto --cpp_out=./便可以生成C++代码,同样的,也支持生成其它语言等;
首先可以发现syntax = "proto2"该部分申明了版本,存在两个版本,分别为proto2、proto3(该两个版本其中API不完全兼容);定义了三个字段query、page_number、result_per_page,同时存在字段修饰符required、optional、repeated;以及类型string、int32等;
而赋值之后为唯一编号,同一message不可重复;此时已生成了两个文件,分别为test.pb.cc、test.pb.h文件;那么我们编写程序的时候就可以使用导入文件使用定制的序列化等;
此为编写的C语言程序;
#include "test.pb.h"using std::cout;
using std::endl;
int main()
{SearchRequest s;s.set_query("njh");s.set_page_number(100);s.set_result_per_page(200);cout << "SearchRequest:" << endl;cout << "-|-query: " << s.query() << endl;cout << "-|-page_number: " << s.page_number() << endl;cout << "-|-result_per_page: " << s.result_per_page() << endl;return 0;
}
pwn@pwn-virtual-machine:~/ppB$ clang+±12 -o test test.c test.pb.cc -lprotobuf
clang: warning: treating ‘c’ input as ‘c++’ when in C++ mode, this behavior is deprecated [-Wdeprecated]
pwn@pwn-virtual-machine:~/ppB$ ./test
SearchRequest:
-|-query: njh
-|-page_number: 100
-|-result_per_page: 200
如上编译命令,将会得到test可执行文件,执行无报错;
好了,本次就先简单的分享一下简单例子的编写,下周再深入的分享一下;
fuzz(libfuzz(2022.5.29
这里首先分享一下fuzz;
这里先给出一个官方学习链接,其它的一些proto文件以及一些Fuzz的target目标文件就不说了(链接之中存在,比较简单;
我们直接来看lpm_libcfuzz.cc文件;
#include "libprotobuf-mutator/src/libfuzzer/libfuzzer_macro.h"
#include "test.pb.h"#include <bits/stdc++.h>using std::cin;
using std::cout;
using std::endl;std::string ProtoToData(const Pwn &pwn) {//protbuf反序列化转字节流数据std::stringstream all;//流const auto &aa = pwn.a();const auto &bb = pwn.b();//获取两个字段all.write((const char*)&aa, sizeof(aa));//读入aa之中的二制流数据if(bb.size() != 0) {all.write(bb.c_str(), bb.size());//读入bb之中的二进制流数据}std::string res = all.str();//将all之中的数据转换为string类型,赋值resif (bb.size() != 0 && res.size() != 0) {// set PROTO_FUZZER_DUMP_PATH env to dump the serialized protobufif (const char *dump_path = getenv("PROTO_FUZZER_DUMP_PATH")) {std::ofstream of(dump_path);of.write(res.data(), res.size());}}return res;
}extern "C" int FuzzTEST(const uint8_t* data, size_t size); // our customized fuzzing function
//LibFuzzer封装DEFINE_PROTO_FUZZER;
DEFINE_PROTO_FUZZER(const Pwn &pwn) {auto s = ProtoToData(pwn); // convert protobuf to raw dataFuzzTEST((const uint8_t*)s.data(), s.size()); // fuzz the function
}
看的比较乱一点;其实我们直接看ProtoToData函数,功能为将protbuf反序列化转字节流数据;还存在着一个宏(但是确是个函数的结构),这里我们追踪一下代码;
如下为宏定义(经过了几层宏的转换,DEFINE_PROTO_FUZZER等价于DEFINE_PROTO_FUZZER_IMPL
#define DEFINE_PROTO_FUZZER_IMPL(use_binary, arg)                              \static void TestOneProtoInput(arg);                                          \using FuzzerProtoType = std::remove_const<std::remove_reference<             \std::function<decltype(TestOneProtoInput)>::argument_type>::type>::type; \DEFINE_CUSTOM_PROTO_MUTATOR_IMPL(use_binary, FuzzerProtoType)                \DEFINE_CUSTOM_PROTO_CROSSOVER_IMPL(use_binary, FuzzerProtoType)              \DEFINE_TEST_ONE_PROTO_INPUT_IMPL(use_binary, FuzzerProtoType)                \DEFINE_POST_PROCESS_PROTO_MUTATION_IMPL(FuzzerProtoType)                     \static void TestOneProtoInput(arg)当然,此时我们发现其较为晦涩难懂,故我们将其进行一定的复原:
#define DEFINE_PROTO_FUZZER_IMPL(use_binary, arg)static void TestOneProtoInput(arg);//声明TestOneProtoInput函数;using FuzzerProtoType = std::remove_const<std::remove_reference<std::function<decltype(TestOneProtoInput)>::argument_type>::type>::type;#define DEFINE_CUSTOM_PROTO_MUTATOR_IMPL(use_binary, Proto)extern "C" size_t LLVMFuzzerCustomMutator(uint8_t* data, size_t size, size_t max_size, unsigned int seed) {using protobuf_mutator::libfuzzer::CustomProtoMutator;Proto input;return CustomProtoMutator(use_binary, data, size, max_size, seed, &input);}#define DEFINE_CUSTOM_PROTO_CROSSOVER_IMPL(use_binary, Proto)extern "C" size_t LLVMFuzzerCustomCrossOver(const uint8_t* data1, size_t size1, const uint8_t* data2, size_t size2,uint8_t* out, size_t max_out_size, unsigned int seed) {using protobuf_mutator::libfuzzer::CustomProtoCrossOver;Proto input1;Proto input2;return CustomProtoCrossOver(use_binary, data1, size1, data2, size2, out,max_out_size, seed, &input1, &input2);}#define DEFINE_TEST_ONE_PROTO_INPUT_IMPL(use_binary, Proto)extern "C" int LLVMFuzzerTestOneInput(const uint8_t* data, size_t size) {using protobuf_mutator::libfuzzer::LoadProtoInput;Proto input;//声明位于栈上的protoif (LoadProtoInput(use_binary, data, size, &input))//对二进制的proto进行解析为结构化的数据TestOneProtoInput(input);//调用TestOneProtoInput函数,而该函数实现即为DEFINE_PROTO_FUZZER_IMPL的实现return 0;}#define DEFINE_POST_PROCESS_PROTO_MUTATION_IMPL(Proto)using PostProcessorRegistration =protobuf_mutator::libfuzzer::PostProcessorRegistration<Proto>;static void TestOneProtoInput(arg)经过一定的复原,可以发现DEFINE_PROTO_FUZZER_IMPL该任然较为晦涩,但是其中的大部分代码仅仅为初始化工作,我们并不需要关心其中的实现
到这里其实我们可以发现了该宏类似函数结构的函数体,其实是TestOneProtoInput函数的函数体;而到达该TestOneProtoInput函数之间,经历过几层的初始化工作;
普通libfuzzer与加了libprotobuf-mutator之后的对比可以参考一下;
pwn@pwn-virtual-machine:~/test$ ls
harness.cc  lpm_libcfuzz.cc  pwn.pb.cc  pwn.pb.h  pwn.proto
pwn@pwn-virtual-machine:~/test$ clang++-12 -g -fsanitize=fuzzer,address -c -DLLVMFuzzerTestOneInput=FuzzTEST harness.cc
pwn@pwn-virtual-machine:~/test$ clang++-12 -g -fsanitize=fuzzer,address -o lpm_libcfuzz harness.o lpm_libcfuzz.cc pwn.pb.cc
In file included from lpm_libcfuzz.cc:1:
/usr/local/include/libprotobuf-mutator/src/libfuzzer/libfuzzer_macro.h:24:10: fatal error: 'port/protobuf.h' file not found
#include "port/protobuf.h"
^~~~~~~~~~~~~~~~~
1 error generated.
此时发现错误,该错误是因为protobuf版本问题;本机之中所安装的protobuf版本较新,而与Libfuzzer之中的protobuf版本不一致,故导致了该错误;
pwn@pwn-virtual-machine:~/test$ /home/pwn/libprotobuf-mutator/build/external.protobuf/bin/protoc pwn.proto --cpp_out=./
切换为Libfuzzer之中的protobuf来生成库;并重新进行编译
pwn@pwn-virtual-machine:~/test$ clang++-12 -g -fsanitize=fuzzer,address -o lpm_libcfuzz harness.o lpm_libcfuzz.cc pwn.pb.cc /home/pwn/libprotobuf-mutator/build/src/libfuzzer/libprotobuf-mutator-libfuzzer.a /home/pwn/libprotobuf-mutator/build/src/libprotobuf-mutator.a /home/pwn/libprotobuf-mutator/build/external.protobuf/lib/libprotobufd.a -I /home/pwn/libprotobuf-mutator/build/external.protobuf/include/ -I /home/pwn/libprotobuf-mutator
clang: error: linker command failed with exit code 1 (use -v to see invocation)但是发生了该错误,该错误是由于链接器的问题;由上述命令进行编译将会避免该错误的发生;

extern "C" int FuzzTEST(const uint8_t* data, size_t size); // our customized fuzzing function
bool hasRegister = false;
DEFINE_PROTO_FUZZER(const Pwn &pwn) {/* Register post processor with our custom mutator method */if(!hasRegister) {protobuf_mutator::libfuzzer::RegisterPostProcessor(Pwn::descriptor(),[](google::protobuf::Message* message, unsigned int seed) {Pwn *t = static_cast<Pwn *>(message);/* test.b will only be "FUCK" or "SHIT" */if (seed % 2) {t->set_b("FUCK");}else {t->set_b("SHIT");}});hasRegister = true; return;}auto s = ProtoToData(pwn); // convert protobuf to raw dataFuzzTEST((const uint8_t*)s.data(), s.size()); // fuzz the function
}
此时再次fuzz之后,我们将会发现pwn这个message的字段b不是"FUCK"就是"SHIT"字符;故实现了自定义变异的功能;
这是前三个的练习,后两个练习下载分享一下吧;
AFL自定义fuzz(2022.6.5
此时我们再来思考一个问题,那便是libfuzz的缺点,便是进程间;这导致了如果目标程序崩溃了则整个模糊测试都将崩溃;此时我们可以利用AFL来自定义变异,此时便不再害怕目标程序崩溃了,但可能损失了些性能;
而目标程序如下:(极其简单、vuln.c
#include <stdio.h>
#include <string.h>
#include <math.h>
#include <stdlib.h>
#include <unistd.h>int main(int argc, char *argv[])
{char str[100]={};read(0, str, 100);int *ptr = NULL;if( str[0] == '\x02' || str[0] == '\xe8') {*ptr = 123; }return 0;
}
首先我们要AFL++之中的API和protobuf结构来编写代码,故首先可以编写一个.h代码结合该两部分;(lpm_aflpp_custom_mutator.h
#include "libprotobuf-mutator/src/mutator.h"
#include "pwn.pb.h"#include <bits/stdc++.h>extern "C" size_t afl_custom_fuzz(void *data, uint8_t *buf, size_t buf_size, uint8_t **out_buf, uint8_t *add_buf, size_t add_buf_size, size_t max_size); class MyMutator : public protobuf_mutator::Mutator {public:friend size_t afl_custom_fuzz(void *data, uint8_t *buf, size_t buf_size, uint8_t **out_buf, uint8_t *add_buf, size_t add_buf_size, size_t max_size);
};
此时我们便可以使用AFL++的API与protobuf结构啦,并且创建了个继承protobuf_mutator之中的Mutator类的MyMutator类,并在类中公开了友元函数afl_custom_fuzz,此时我们便可以使用其API啦;
此时我们就可以编写自定义变异函数啦:(lpm_aflpp_custom_mutator.cc
#include "lpm_aflpp_custom_mutator.h"using std::cin;
using std::cout;
using std::endl;
//protobuf转数据
std::string ProtoToData(const Pwn &pwn_proto) {std::stringstream all;const auto &aa = pwn_proto.a();const auto &bb = pwn_proto.b();all.write((const char*)&aa, sizeof(aa));if(bb.size() != 0) {all.write(bb.c_str(), bb.size());}std::string res = all.str();if (bb.size() != 0 && res.size() != 0) {// 将PROTO_FUZZER_DUMP_PATH env设置为转储序列化的protobufif (const char *dump_path = getenv("PROTO_FUZZER_DUMP_PATH")) {std::ofstream of(dump_path);of.write(res.data(), res.size());//往PROTO_FUZZER_DUMP_PATH环境变量之中写入}}return res;//返回string流
}/*** 初始化此自定义mutator** @指向内部状态对象的指针。暂时可以忽略* @这个变异子的种子-同一个种子应该总是以同样的方式变异* @返回指向此自定义mutator实例应使用的数据对象的指针。在一次afl fuzz运行中可能有多个该mutator实例!错误时返回NULL。*/
extern "C" void *afl_custom_init(void *afl, unsigned int seed) {srand(seed);//开始fuzz之前的初始化,进行随机化return afl;
}/*** 对给定输入执行自定义突变** @对于此fuzz案例,在afl_custom_init中返回param[in]数据指针* @指向要变异的输入数据的param[in]buf指针* @param[input] buf_size输入数据的大小* @param[out] out_buf我们将处理的缓冲区。我们可以重复使用。错误时为空。* @param[in] add_buf Buffer包含附加测试用例* @param[in] add_buf_size附加测试用例的大小* @param[in] max_size变异输出的最大大小。突变不能生成大于max_size的数据* @返回变异输出的大小*/
extern "C" size_t afl_custom_fuzz(void *data, // afl stateuint8_t *buf, size_t buf_size, // input data to be mutateduint8_t **out_buf, // output bufferuint8_t *add_buf, size_t add_buf_size,  // add_buf can be NULLsize_t max_size) {// 此函数可以命名为“afl_custom_fuzz”或“afl_custom_mutator”// 一个简单的测试表明,“buf”将是当前测试用例的内容// “add_buf”将是下一个测试用例(来自AFL++'s输入队列)// 在这里,我们实现了自己的自定义mutatorstatic MyMutator mutator;Pwn input;// mutate input.a ( integer )int id = rand() % 305;input.set_a(id);// mutate input.b ( string )std::string tmp = "";std::string new_string = mutator.MutateString(tmp, 1000); // use the default protobuf mutatorinput.set_b(new_string);// convert input from TEST to raw data, and copy to mutated_outconst Pwn *p = &input;std::string s = ProtoToData(*p); // convert TEST to raw data// Copy the raw data to output buffersize_t mutated_size = s.size() <= max_size ? s.size() : max_size; // check if raw data's size is larger than max_sizeuint8_t *mutated_out = new uint8_t[mutated_size+1];memcpy(mutated_out, s.c_str(), mutated_size);*out_buf = mutated_out;return mutated_size;
}/*** Deinitialize everything** @param data The data ptr from afl_custom_init*/
extern "C" void afl_custom_deinit(void *data) {// Honestly I don't know what I'm gonna do with this...return;
}
此时我们就可以开始编译so文件啦:
pwn@pwn-virtual-machine:~/test$ clang++-12 -fPIC -c lpm_aflpp_custom_mutator.cc pwn.pb.cc -I /home/pwn/libprotobuf-mutator/build/external.protobuf/include/ -I /home/pwn/libprotobuf-mutator/
pwn@pwn-virtual-machine:~/test$ ls
harness.cc  lpm_aflpp_custom_mutator.cc  lpm_aflpp_custom_mutator.o  lpm_libcfuzz.cc  pwn.pb.h  pwn.proto
harness.o   lpm_aflpp_custom_mutator.h   lpm_libcfuzz                pwn.pb.cc        pwn.pb.o  vuln.c
pwn@pwn-virtual-machine:~/test$ clang++-12 -shared -Wall -O3 -o lpm_aflpp_custom_mutator.so *.o /home/pwn/libprotobuf-mutator/build/src/libprotobuf-mutator.so
clang: error: no such file or directory: '/home/pwn/libprotobuf-mutator/build/src/libprotobuf-mutator.so'
此时报错,没有该文件libprotobuf-mutator.so;
该错误需要我们重新编译libprotobuf-mutator;编译的时候没有编译该文件,导致现在该文件的丢失;
pwn@pwn-virtual-machine:~/libprotobuf-mutator/build$ cmake .. -G Ninja -DCMAKE_C_COMPILER=clang-12 -DCMAKE_CXX_COMPILER=clang++-12 -DCMAKE_BUILD_TYPE=Debug -DLIB_PROTO_MUTATOR_DOWNLOAD_PROTOBUF=ON -DBUILD_SHARED_LIBS=ON
pwn@pwn-virtual-machine:~/libprotobuf-mutator/build$ ninja
pwn@pwn-virtual-machine:~/libprotobuf-mutator/build$ sudo ninja install
此时按上上步编译即可
不过这里需要连接外网,我的那个外网连接断了,现在还在找新的;只能说,多找几个外网;
接下来就好正了;直接使用afl-gcc编译vuln文件,然后指定环境变量AFL_CUSTOM_MUTATOR_ONLY=1 、AFL_CUSTOM_MUTATOR_LIBRARY指向so文件即可;然后fuzz即可


全生态接入系统技术白皮书)


