注解基础概念
1.什么是注解编程
指的是在类或者方法上加入特定的注解(@XXX) 完成特定功能的开发
@Component
public classXXX{}
2.为什么要讲注解编程
1.注解开发方便
代码简洁 开发速度大大提高
2.Spring开发潮流
Spring2.x引入注解 Spring3.x完善注解 Springboot普及 推广注解编程
3.注解的作用
- 替换XML这种配置形式,简化配置
- 替换接口,实现调用双方的契约性
通过注解的方式,在功能调用者和功能提供者之间达成约定,进而进行功能的调用。因为注解应用更为方便灵活
4.Spring注解的发展历程
1.Spring2.x开始支持注解编程 @Componet @Service @Scope
目的:提供这些注解只是为了在某些情况下简化XML的配置,作为XML开发的有益补充
2.Spring3.x @Configuration @Bean..
目的:彻底替换XML,基于纯注解编程
3.Spring 4.x Springboot
提倡使用注解常见开发
5.Spring注解开发的一个问题
Spring基于注解进行配置后,还能否解耦合呢?
Spring框架应用注解时,如果对注解配置的内容不满意,可以通过Spring配置文件进行覆盖
Spring基础注解(Spring2.x)
这个阶段注解 仅仅是简化XML配置 并不能完全替代XML
搭建开发环境
<context:compoent-scan base-package=""/>
作用:让Spring框架在设置包及其子包中扫描对应的注解 使其生效
对象创建相关注解
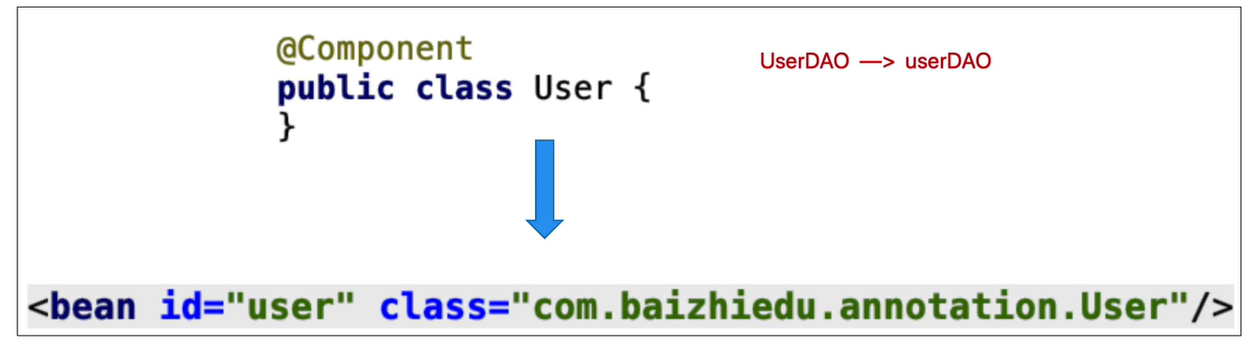
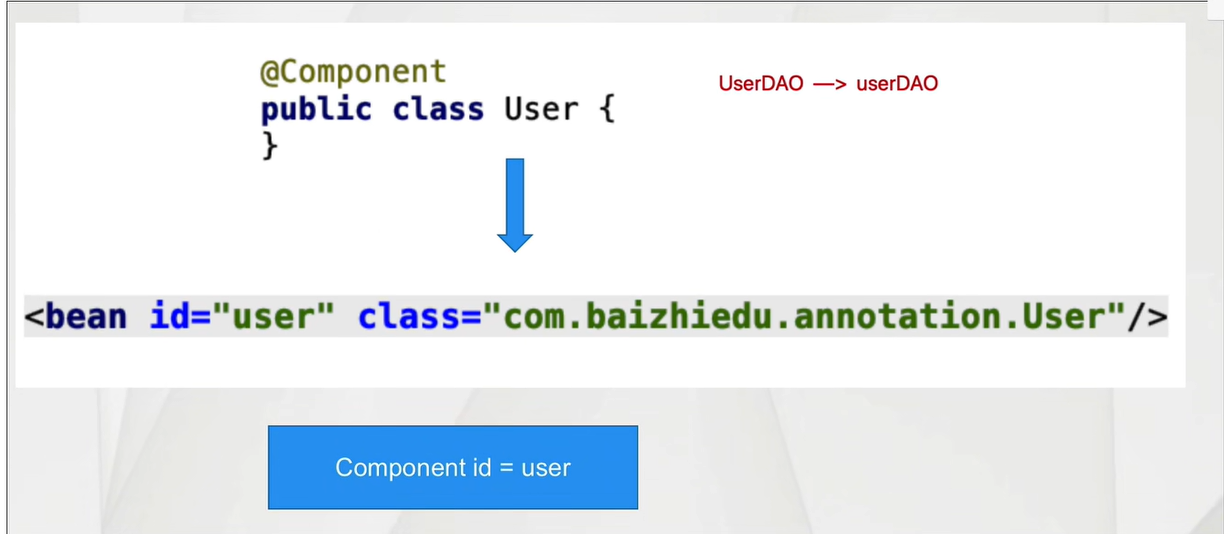
@Component
作用:替换原有Spring配置文件中的<bean>标签
注意:
id属性 component注解 提供了默认的设置方式 首单词首字母小写
class属性 通过反射获得class内容
@Component细节
- 如何显示指定工厂创建对象的id值
@Component("u")
- Spring配置文件覆盖注解配置内容
applicationContext.xml
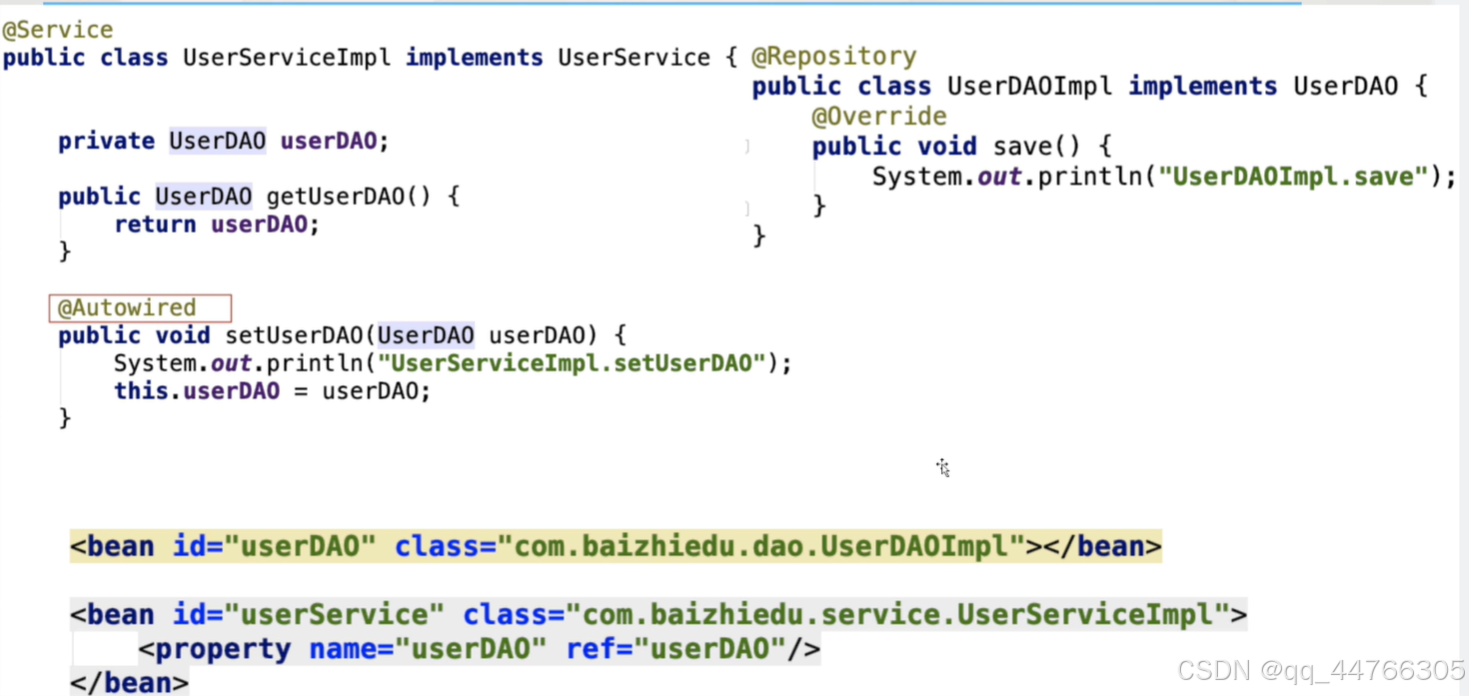
@Repository ---->XXXDAO
@Repository
public class UserDao{
}
@Service
@Service
public class UserService{
}
@Controller
@Controller
public class RegAction{
}
<bean id="和注解一致" class=""/>
id值 class的值 要和 注解中的设置保持一致@Repository
@Service
@Controller
注解:本质上这些衍生注解就是@Component
作用<bean
细节 @Service("s")
目的:更加准确的表达这一个类型的作用
注意:Spring整合Mybatis开发过程中 不使用@Repository @Component Dao的实现Spring创建了
- @Scope注解
作用:控制简单对象创建次数
<bean id="" class="" scope="singleton/prototype"/>

@Lazy注解
作用:延迟创建单例对象
一旦使用@Lazy注解后,Spring会在使用这个对象的时候,进行这个对象的创建
注入相关注解
@Autowired
@Autowired细节分析
1.Autowired注解基于类型注入
基于类型的注入:注入对象的类型,必须与目标成员变量类型想通过或者其子类(实现类)
2.Autowired Qualifier 基于名字进行注入(了解)
基于名字的注入:注入对象的id值,必须与Qualifier注解中设置的名字相同
3.Autowired注解放置位置
a)放置在对应成员变量的set方法上
b)直接把这个注解放置在成员变量上,Spring通过反射直接对成员变量进行注入(赋值)推荐
4.javaEE规范中类似功能的注解JSR250 @Resource(name="userDAOImpl") 基于名字进行注入
@Autowired()
@Qualifier("userDAOImpl")
注意:如果在应用Resource注解时,名字没有配对成功 那么会继续按照类型进行注入
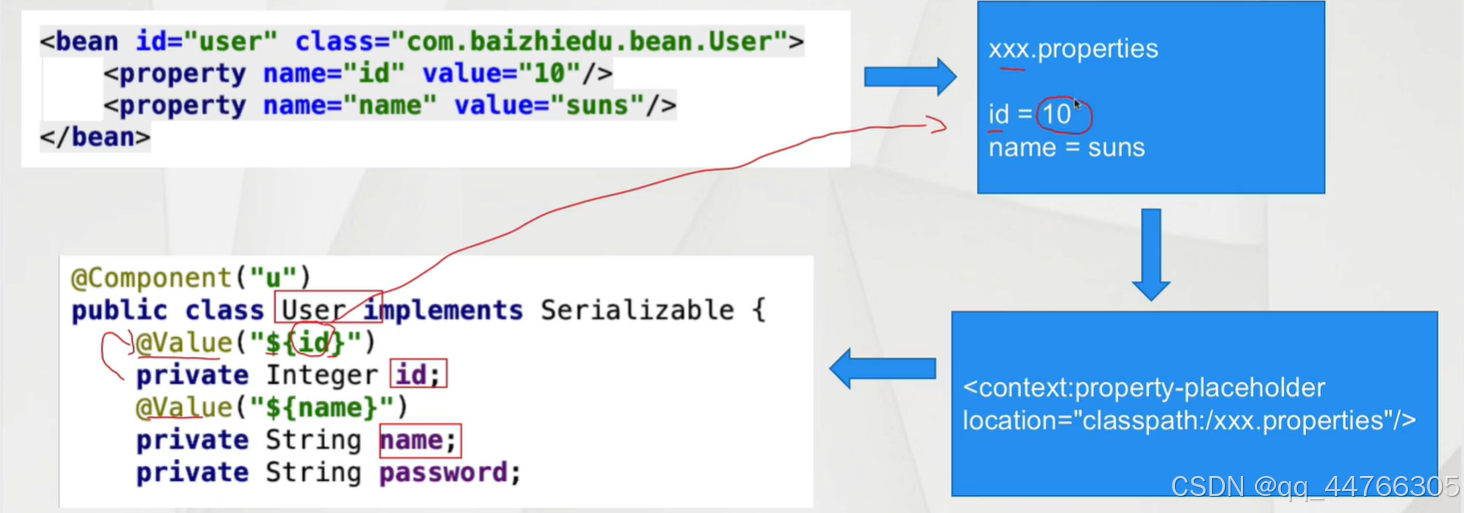
@Value注解
@Valye注解
1.设置 xxx.properties
id=10
name=gao
2.Spring工厂 读取这个配置文件
<context:property-placeholder location=""/>
3.代码
属性 @Value("${key}")
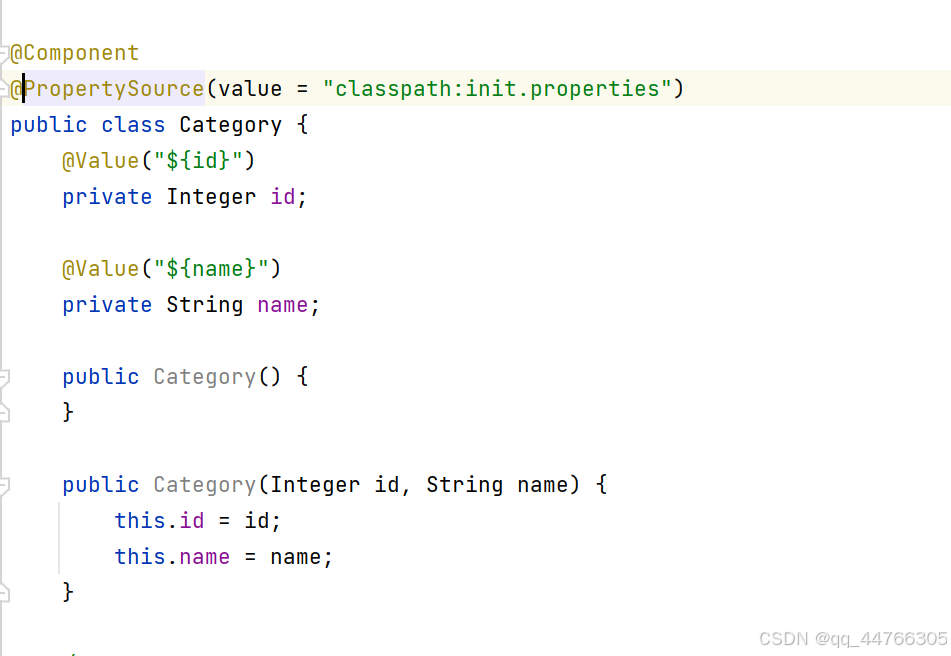
@PropertySource
替换Spring配置文件中的<context:property-placeholder>标签
@Value注解细节
- @Value注解不能应用在静态成员变量上
- @Value注解-properties 不能注入集合类型
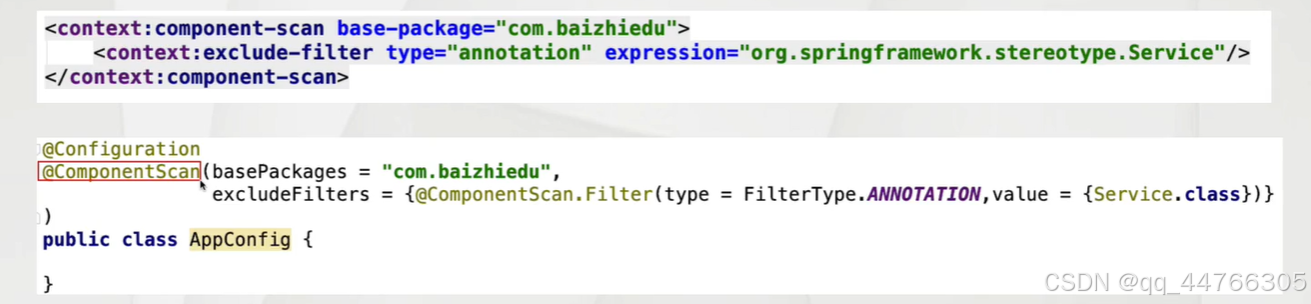
注解扫描详解
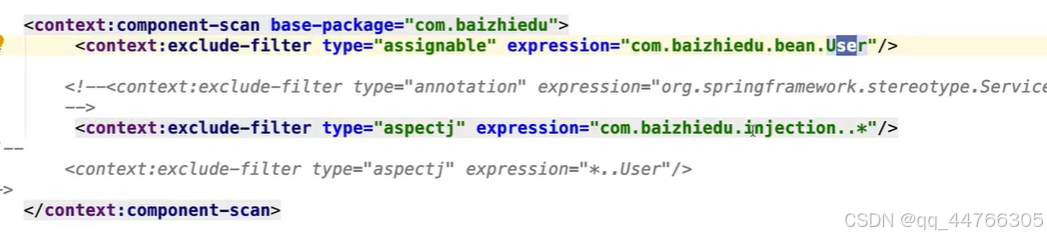
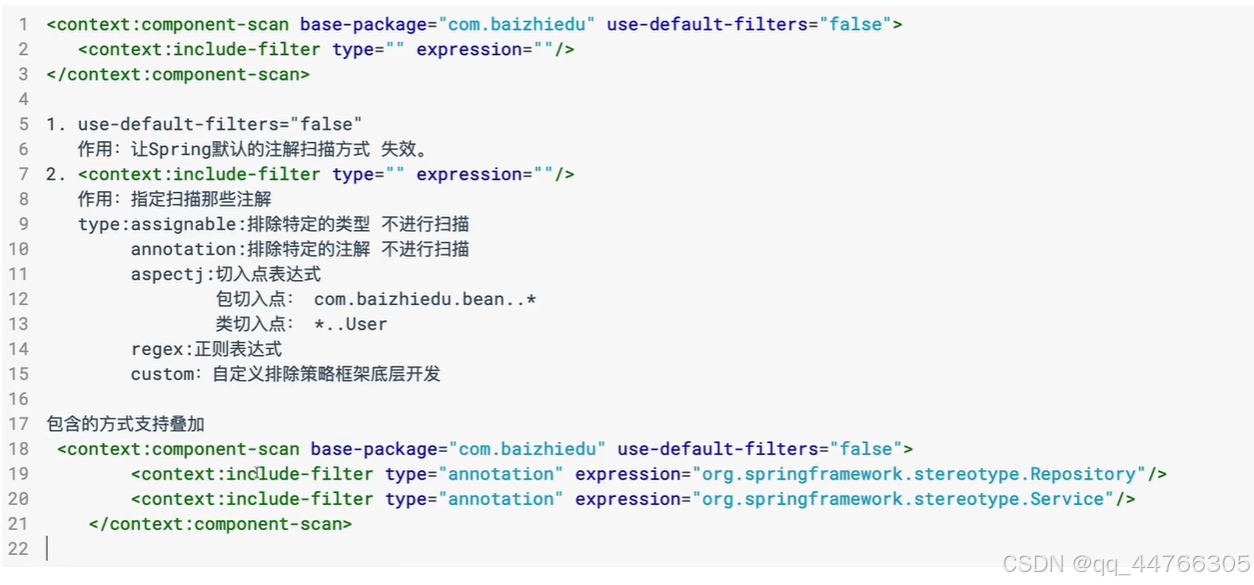
<context:component-scan base-package="">
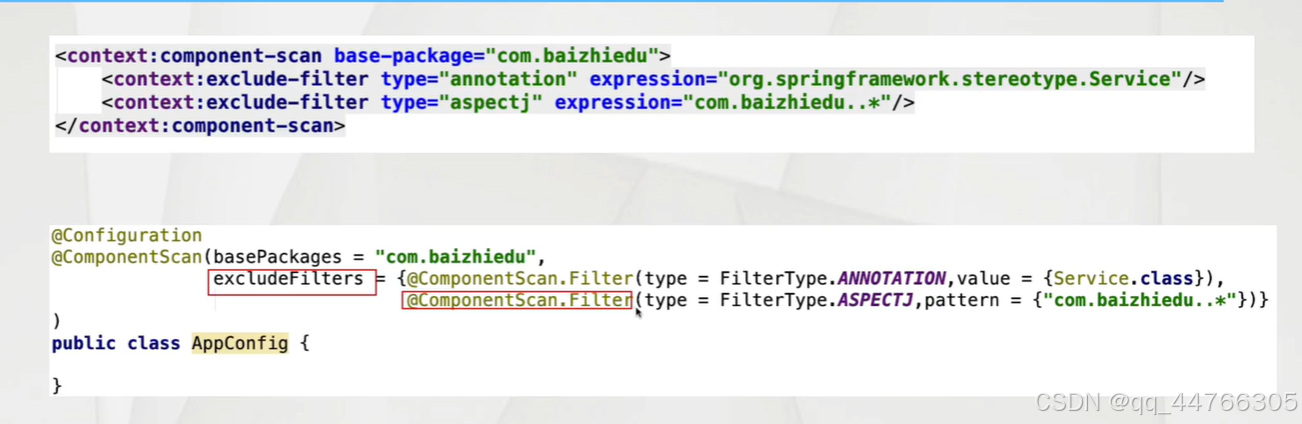
<context:exclude-fliter type="" expression=""/>
</context component-scan>
当前包 及其子包
type:assignable 排除特定类型 不进行创建
type="annotation" 排除带@Service注解类型
type="aspectj" 切入点表达式 只能应用包切入点 类切入点
type ="regex" 正则表达式
type ="custom" 自定义排除策略
第三种常用
---可以多个叠加


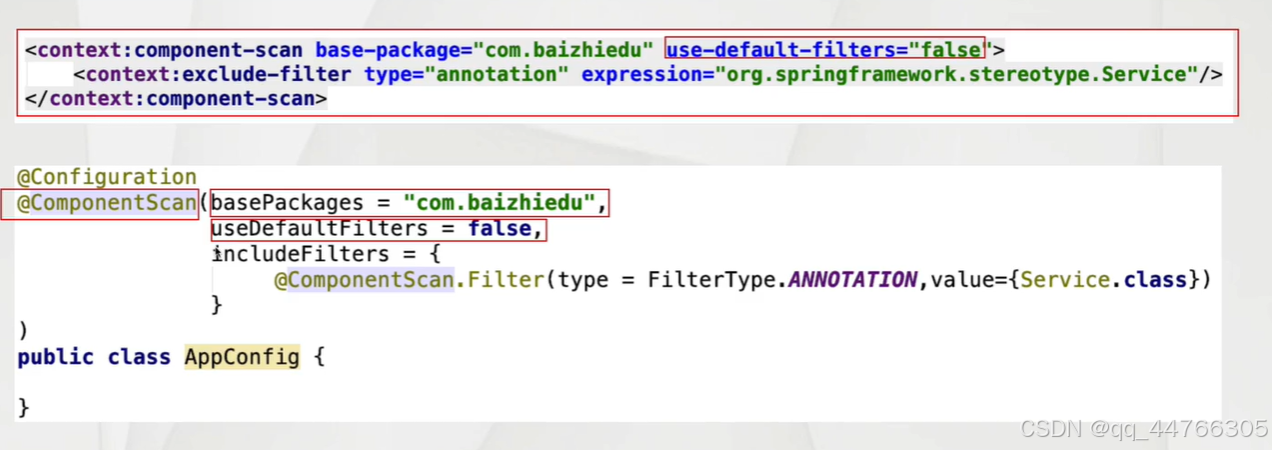
包含方式
基于注解开发的思考
配置互通
Spring注解配置 配置文件配置 互通
ref引用就是UserDaoImpl首字母小写创建的对象
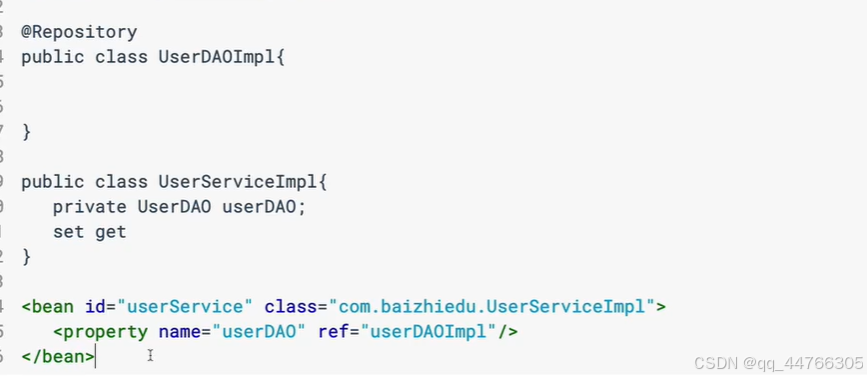
什么情况下使用注解 什么情况下使用配置文件
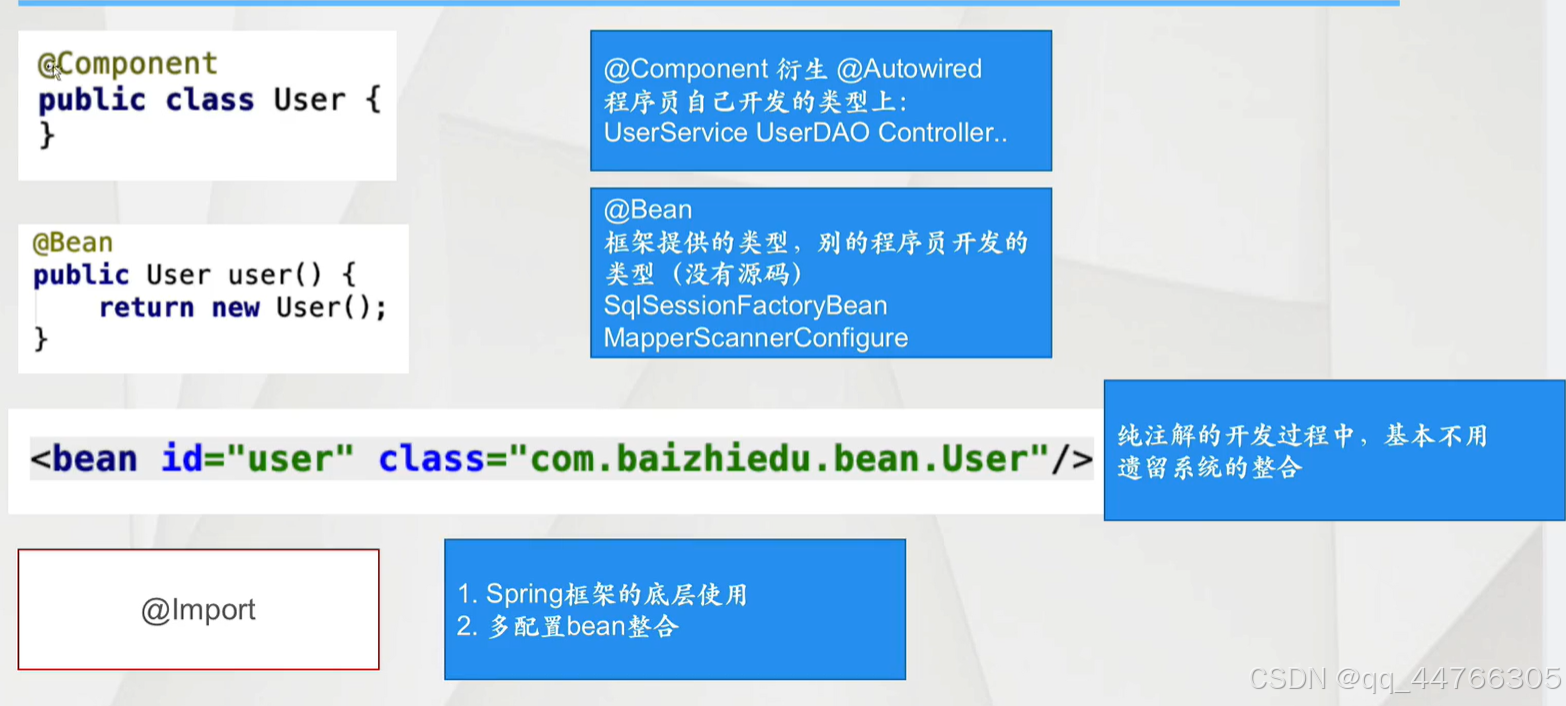
@Component 替换<bean
基础注解(@Componet @Autowired @Value) 程序员开发类型配置
1.程序员开发的类型上 可以加入对应注解 进行对象的创建
User UserService UserDao...2应用其它非程序员开发的类型时,还是需要<bean 进行配置的
SqlSessionFactoryBean MapperScannerConfigrue
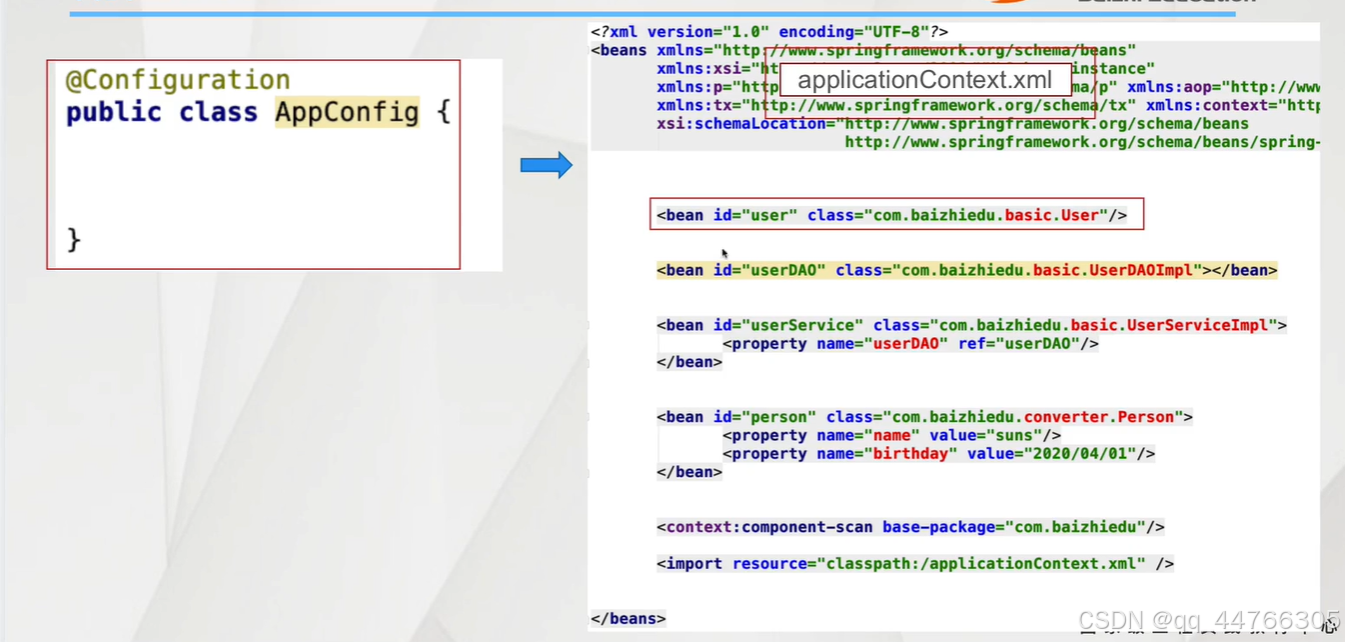
Spring的高级注解(Spring3.x及以上)
1.配置Bean
Spring在3.x提供新的注解 用于替换XML配置文件
@Configuration
public class AppConfig{
}
1.配置Bean 替换了XML的什么内容?
2.AnnotationConfigApplicationContext
1.创建工厂代码
ApplicationContext ctx=new AnnotationConfigApplicationContext
2.指定配置文件
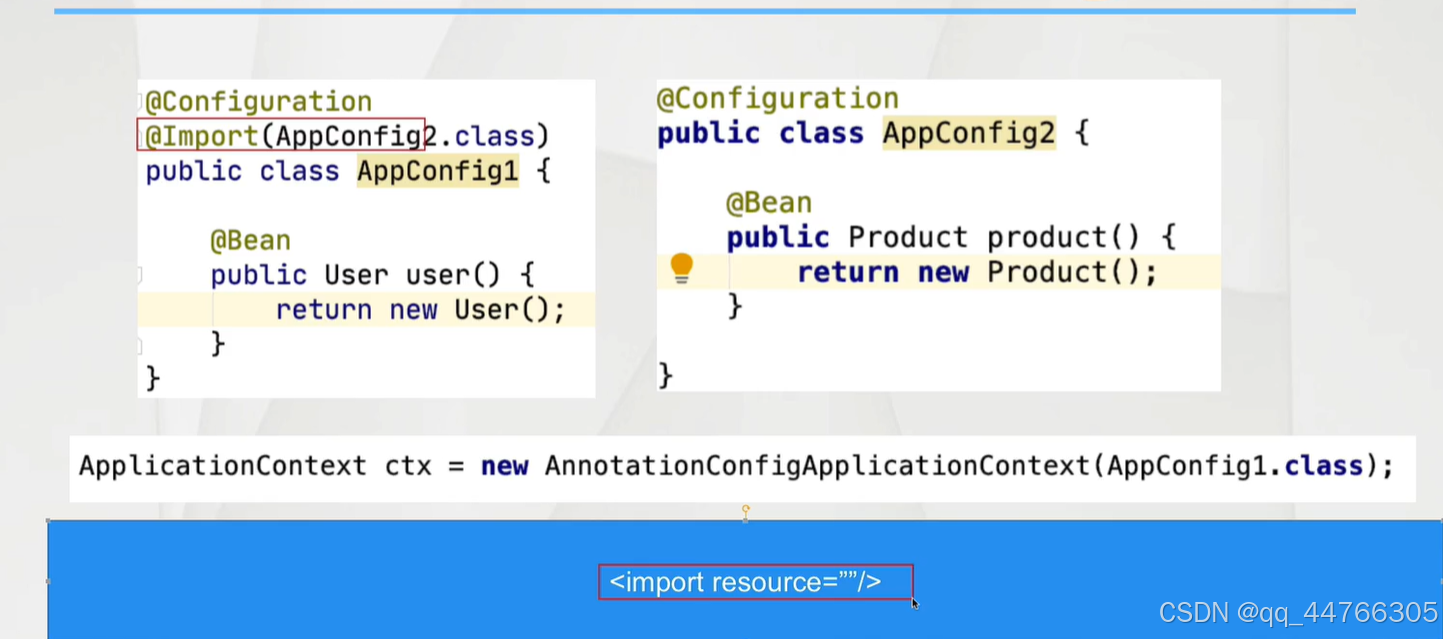
1.指定配置bean的Class
ApplicationContext ctx=new AnnotationConfigAplicationContext(AppConfig.class)
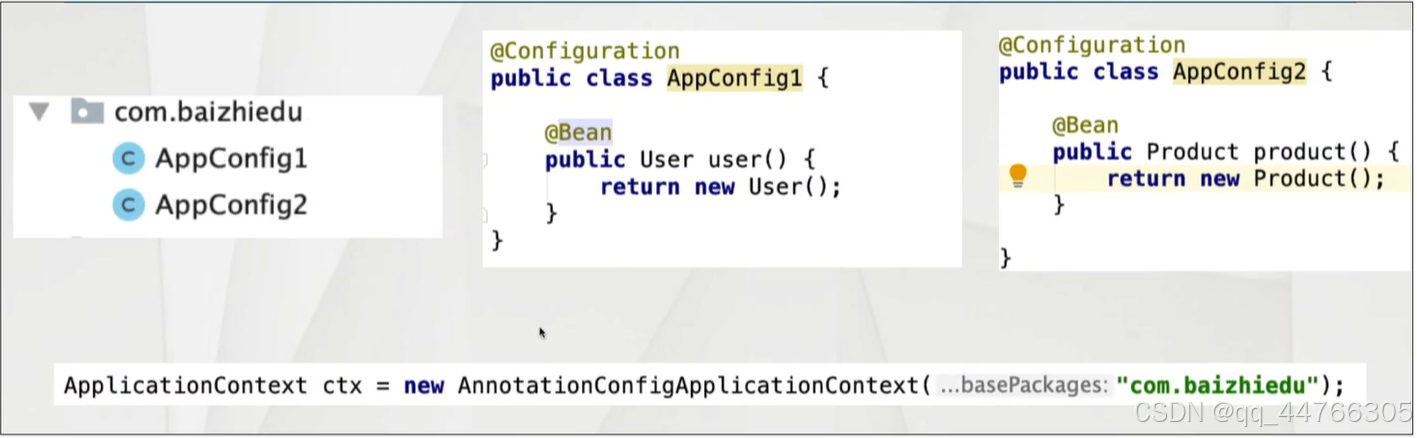
2,指定配置bean所在的路径
ApplicationContext ctx=new AnnotationConfigAplicationContext("包名");
配置Bean开发的细节分析
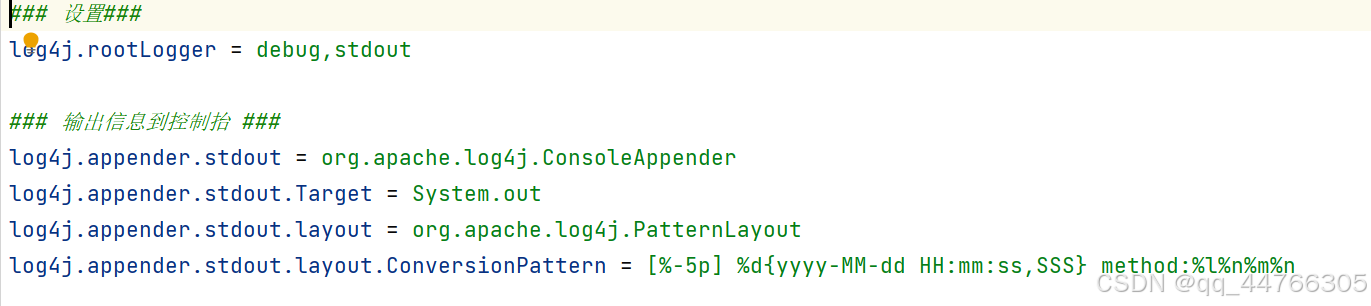
引入配置文件log.propertities
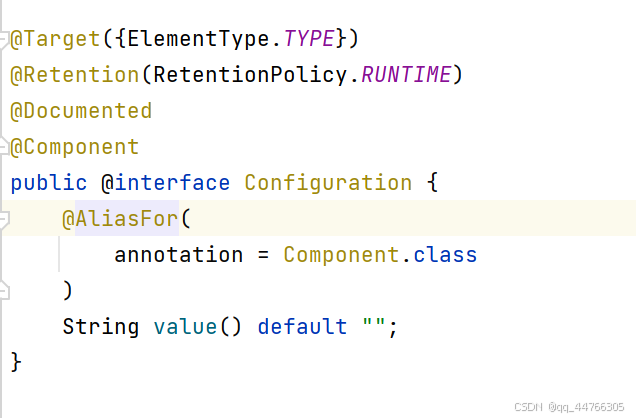
@Configuration的本质
@Component的衍生注解
可以应用<context:component-scan 进行扫描
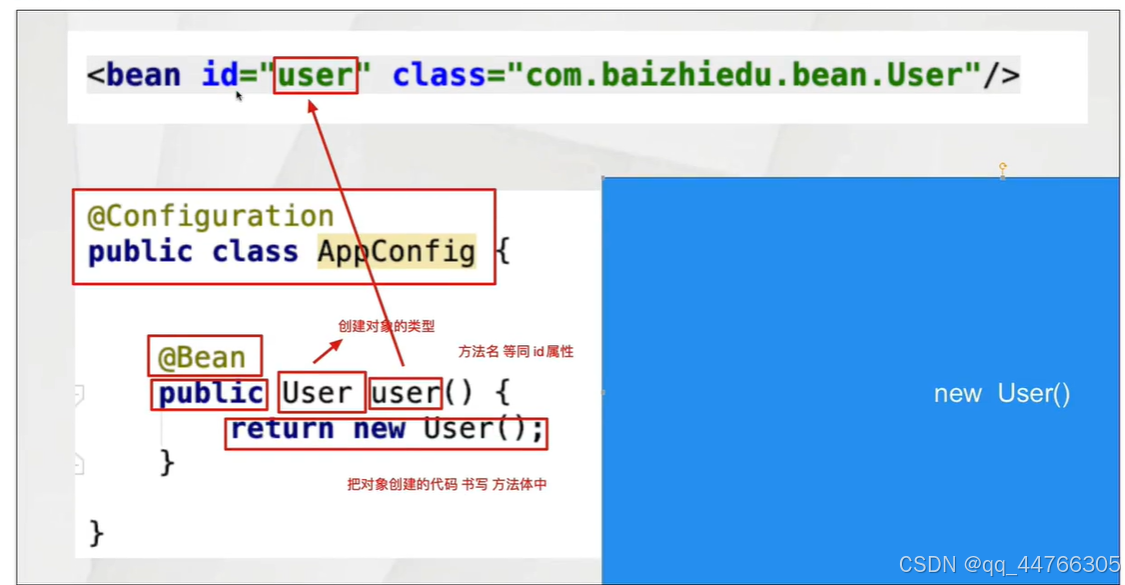
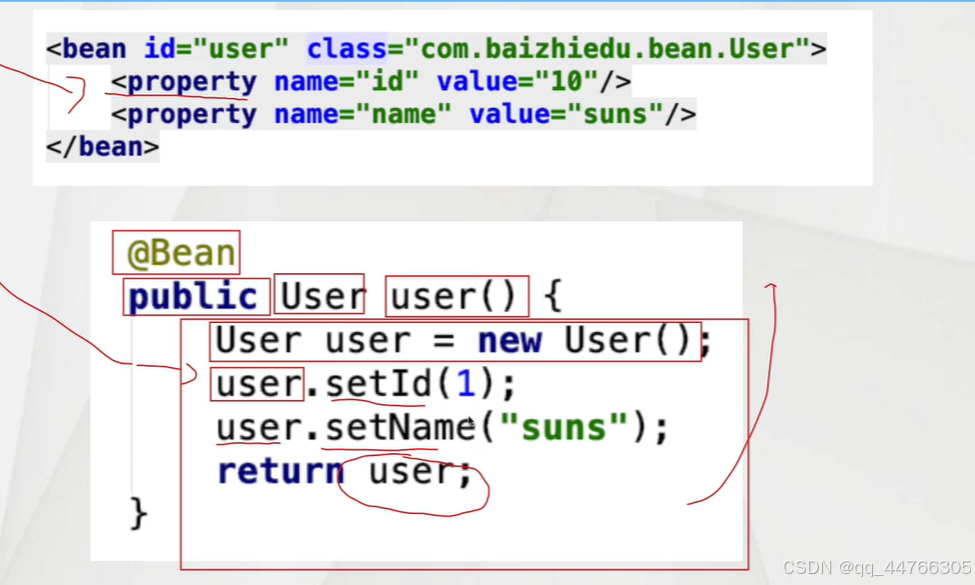
2.@Bean注解
@Bean注解在配置bean中进行使用,等同于XML配置文件中的<bean>标签
1.@Bean注解的基本使用
对象的创建
1.简单对象
直接通过new方式创建的对象
User UserService UserDao
2.复杂对象
不能通过new的方式直接创建的对象
Connection SqlSessionFactory
public class AppConfig {@Beanpublic User user(){return new User();}/*创建一个复杂对象*/@Beanpublic Connection connection() throws ClassNotFoundException, SQLException {Class.forName("com.mysql.jdbc.Driver");Connection connection = DriverManager.getConnection("jdbc:mysql://localhost:3306/sky_take_out?useSSL=false","root","123456");return connection;}
}
@Bean注解自定义id值
@Bean("u")public User user(){return new User();}/*@Bean控制对象的创建次数
@Bean("u")@Scope("singleton")public User user(){return new User();}@Bean用户自定义类型注入
package annotationHigh;import org.springframework.context.annotation.Bean;
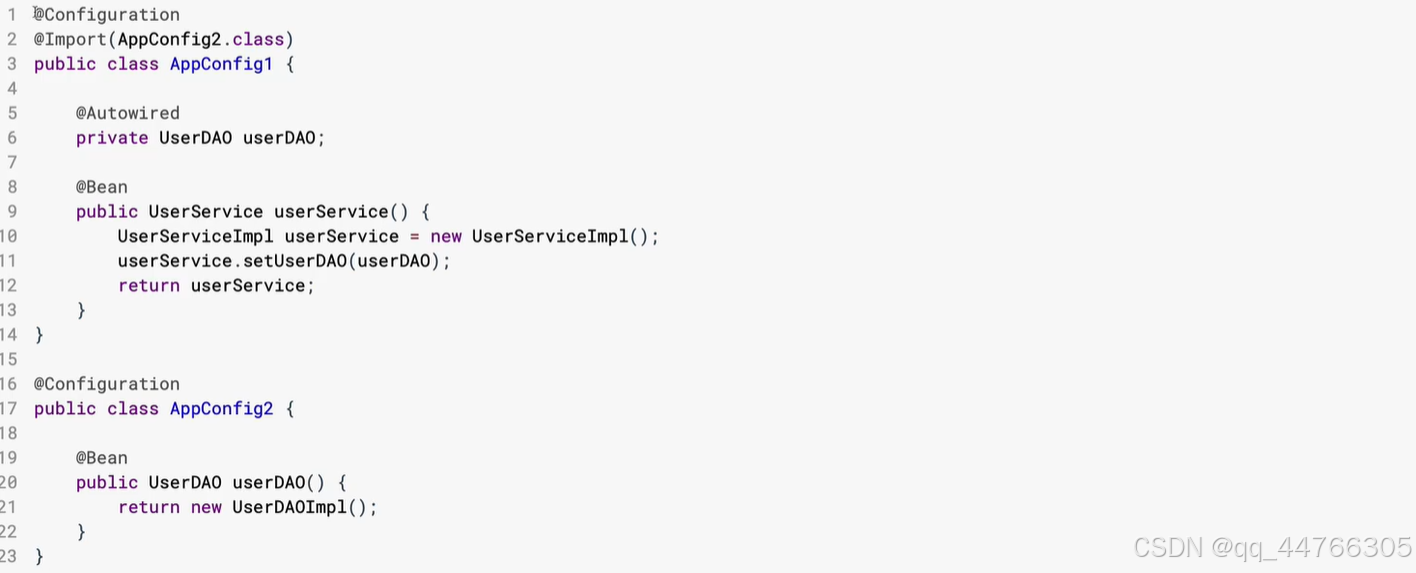
import org.springframework.context.annotation.Configuration;@Configuration
public class AppConfig1 {@Beanpublic User user(){return new User();}@Beanpublic UserDao userDao(){return new UserDaoImpl();}@Beanpublic UserService userService(UserDao userDao){UserServiceImpl userService = new UserServiceImpl();userService.setUserDao(userDao);return userService;}
// @Bean
// public UserService userService(){
// UserServiceImpl userService = new UserServiceImpl();
// userService.setUserDao(userDao());
// return userService;
// }
}@Bean(JDK类型注入)
@BeanJDK类型注入细节分析
如果直接在代码中进行set方法的调用 会存在耦合问题
package annotationHigh;import org.springframework.beans.factory.annotation.Value;
import org.springframework.context.annotation.Bean;
import org.springframework.context.annotation.Configuration;
import org.springframework.context.annotation.PropertySource;@Configuration
@PropertySource(value = "classpath:init.properties")
public class AppConfig1 {@Value("${id}")private Integer id;@Value("${name}")private String name;@Beanpublic User user(){return new User();}@Beanpublic UserDao userDao(){return new UserDaoImpl();}@Beanpublic UserService userService(UserDao userDao){UserServiceImpl userService = new UserServiceImpl();userService.setUserDao(userDao);return userService;}
//    @Bean
//    public UserService userService(){
//        UserServiceImpl userService = new UserServiceImpl();
//        userService.setUserDao(userDao());
//        return userService;
//    }@Beanpublic Customer customer(){Customer customer = new Customer();customer.setId(id);customer.setName(name);return customer;}
}
@ComponentScan注解
@ComponentScan注解在配置bean中进行使用,等同于XML配置文件中的<context:component-scan>标签
目的:进行相关注解的扫描:(@Component @Value ...@Autowired)
基本使用
@Configuration
@ComponentScan(basePackages ="annontation")
public class AppConfig2 {
}
排除、包含的使用
包含
Spring创建工厂的多种方式
1.多种配置的应用场景
2。配置优先级
@Component及其衍生注解<@Bean <配置文件bean标签
优先级高的配置 覆盖优先级低的配置
@Componentpublic class User{
}
@Bean
public User user(){
return new User();
}
<bean id="user"class=""/>
注意:id值 应该保持一致
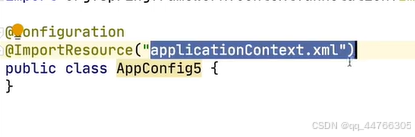
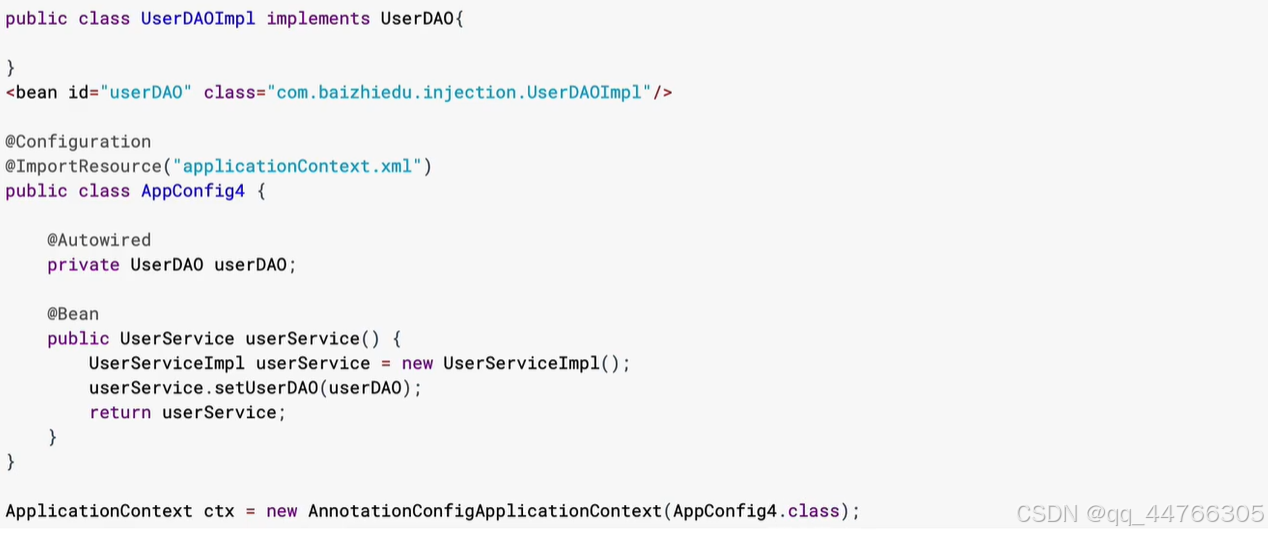
3.解决基于注解进行配置的耦合问题
@Configuration
//@ImportResources("applicationContext.xml")--------也会耦合
public class AppConfig4{
@Bean
public UserDao userDao(){
return new UserDaoImpl();
}
}
applicationContext.xml<bean id="userDao" class=""/>

4.整合多个配置信息
为什么会有多个配置信息
拆分多个配置bean的开发,是一种模块化开发的形式,也体现了面向对象各司其职的设计思想
5.多配置信息整合的方式
1.多个配置Bean的整合
2.配置Bean与@Component相关注解的整合
3.配置Bean与SpringXML配置文件的整合
整合洞中配置信息需要关注哪些要点
1.如何使多种配置信息 汇成一个整体
2.如何实现跨配置的注入
1.多个配置Bean的整合
base-package进行多个配置Bean的整合
@Import
1.可以创建对象
2.多种配置bean的整合
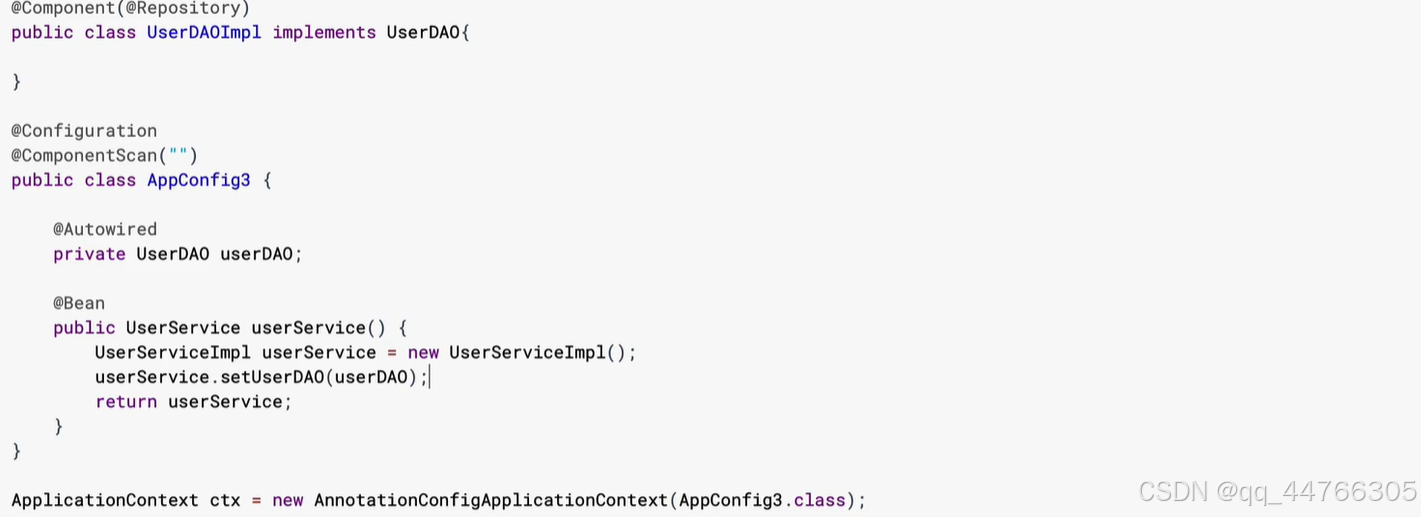
2.跨配置进行注入
在应用配置Bean的过程中,不管使用哪种方式进行配置信息的汇总,其操作方式都是通过成员变量加入@Autowired注解进行完成
配置Bean与@Component相关注解的整合
配置Bean与配置文件的整合
1.遗留系统的整合 2.配置覆盖
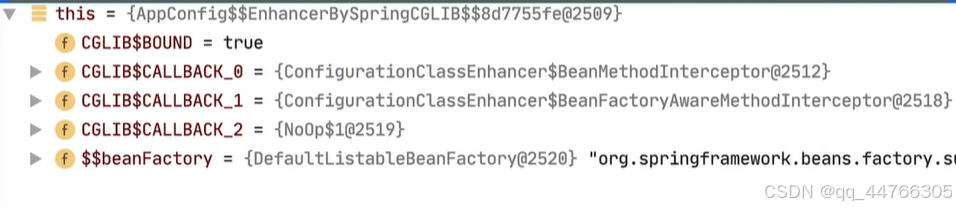
配置Bean的底层实现原理
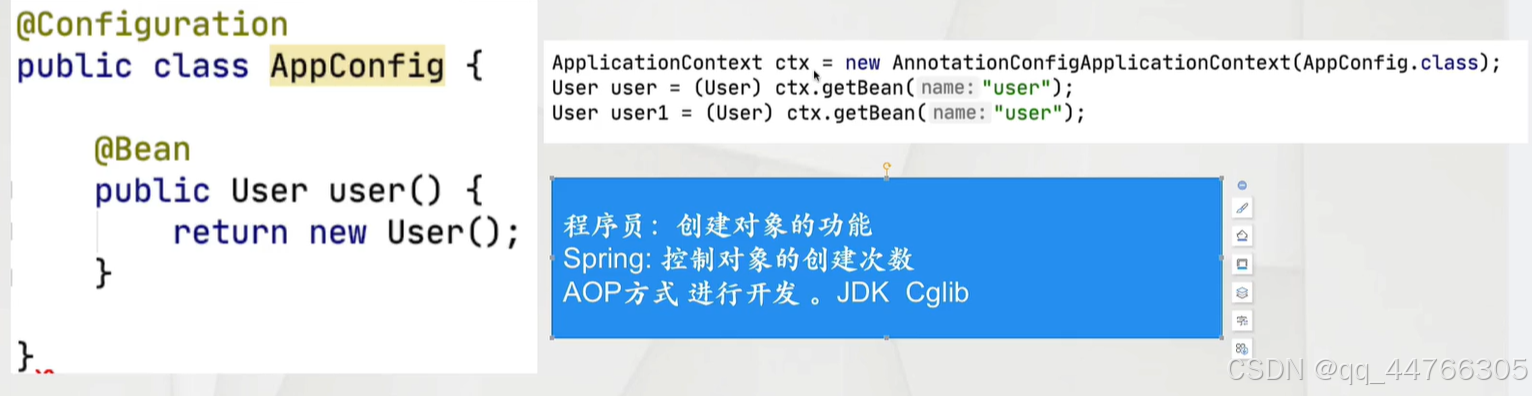
四维一体的开发思想
1.什么是四维一体
Spring开发一个功能的4种形式,虽然开发方式不同,但最终效果是一样的
1.基于schema
2.基于特定功能注解
3.基于原始<bean
4.基于@Bean注解
2.四维一体的开发案例
1. <context:property-placeholder
<?xml version="1.0" encoding="UTF-8"?>
<beans xmlns="http://www.springframework.org/schema/beans"xmlns:xsi="http://www.w3.org/2001/XMLSchema-instance"xmlns:context="http://www.springframework.org/schema/context"xsi:schemaLocation="http://www.springframework.org/schema/beans http://www.springframework.org/schema/beans/spring-beans.xsd http://www.springframework.org/schema/context http://www.springframework.org/schema/context/spring-context.xsd"><context:property-placeholder location="classpath:init.properties"/><bean id="category" class="annontation.Category"></bean><context:component-scan base-package="annontation"></context:component-scan>
</beans>
package annontation;import org.springframework.beans.factory.annotation.Value; import org.springframework.context.annotation.PropertySource; import org.springframework.stereotype.Component;//@Component //@PropertySource(value = "classpath:init.properties") public class Category {@Value("${id}")private Integer id;@Value("${name}")private String name;public Category() {}public Category(Integer id, String name) {this.id = id;this.name = name;}/*** 获取* @return id*/public Integer getId() {return id;}/*** 设置* @param id*/public void setId(Integer id) {this.id = id;}/*** 获取* @return name*/public String getName() {return name;}/*** 设置* @param name*/public void setName(String name) {this.name = name;}public String toString() {return "Categpry{id = " + id + ", name = " + name + "}";} }@PropertySource [推荐]
<?xml version="1.0" encoding="UTF-8"?>
<beans xmlns="http://www.springframework.org/schema/beans"xmlns:xsi="http://www.w3.org/2001/XMLSchema-instance"xmlns:context="http://www.springframework.org/schema/context"xsi:schemaLocation="http://www.springframework.org/schema/beans http://www.springframework.org/schema/beans/spring-beans.xsd http://www.springframework.org/schema/context http://www.springframework.org/schema/context/spring-context.xsd"><!--    <context:property-placeholder location="classpath:init.properties"/>-->
<!--    <bean id="category" class="annontation.Category"></bean>--><context:component-scan base-package="annontation"></context:component-scan>
</beans>
package annontation;import org.springframework.beans.factory.annotation.Value; import org.springframework.context.annotation.PropertySource; import org.springframework.stereotype.Component;@Component @PropertySource(value = "classpath:init.properties") public class Category {@Value("${id}")private Integer id;@Value("${name}")private String name;public Category() {}public Category(Integer id, String name) {this.id = id;this.name = name;}/*** 获取* @return id*/public Integer getId() {return id;}/*** 设置* @param id*/public void setId(Integer id) {this.id = id;}/*** 获取* @return name*/public String getName() {return name;}/*** 设置* @param name*/public void setName(String name) {this.name = name;}public String toString() {return "Categpry{id = " + id + ", name = " + name + "}";} }<bean id="" class="PropertySourcePlaceholderCoonfigure"/>
<?xml version="1.0" encoding="UTF-8"?>
<beans xmlns="http://www.springframework.org/schema/beans"xmlns:xsi="http://www.w3.org/2001/XMLSchema-instance"xmlns:context="http://www.springframework.org/schema/context"xsi:schemaLocation="http://www.springframework.org/schema/beans http://www.springframework.org/schema/beans/spring-beans.xsd http://www.springframework.org/schema/context http://www.springframework.org/schema/context/spring-context.xsd"><bean id="category" class="annontation.Category"></bean><bean id="propertyholder" class="org.springframework.context.support.PropertySourcesPlaceholderConfigurer"><property name="location" value="classpath:init.properties"></property></bean><context:component-scan base-package="annontation"></context:component-scan>
</beans>
@Bean [推荐]
package annontation;import org.springframework.context.annotation.Bean;
import org.springframework.context.annotation.ComponentScan;
import org.springframework.context.annotation.Configuration;
import org.springframework.context.annotation.PropertySource;
import org.springframework.context.support.PropertySourcesPlaceholderConfigurer;
import org.springframework.core.io.ClassPathResource;@Configuration
@ComponentScan(basePackages = "annontation")
public class AppConfig6 {@Beanpublic PropertySourcesPlaceholderConfigurer propertySourcesPlaceholderConfigurer() {PropertySourcesPlaceholderConfigurer propertySourcesPlaceholderConfigurer = new PropertySourcesPlaceholderConfigurer();propertySourcesPlaceholderConfigurer.setLocations(new ClassPathResource("init.properties"));return propertySourcesPlaceholderConfigurer;}
}
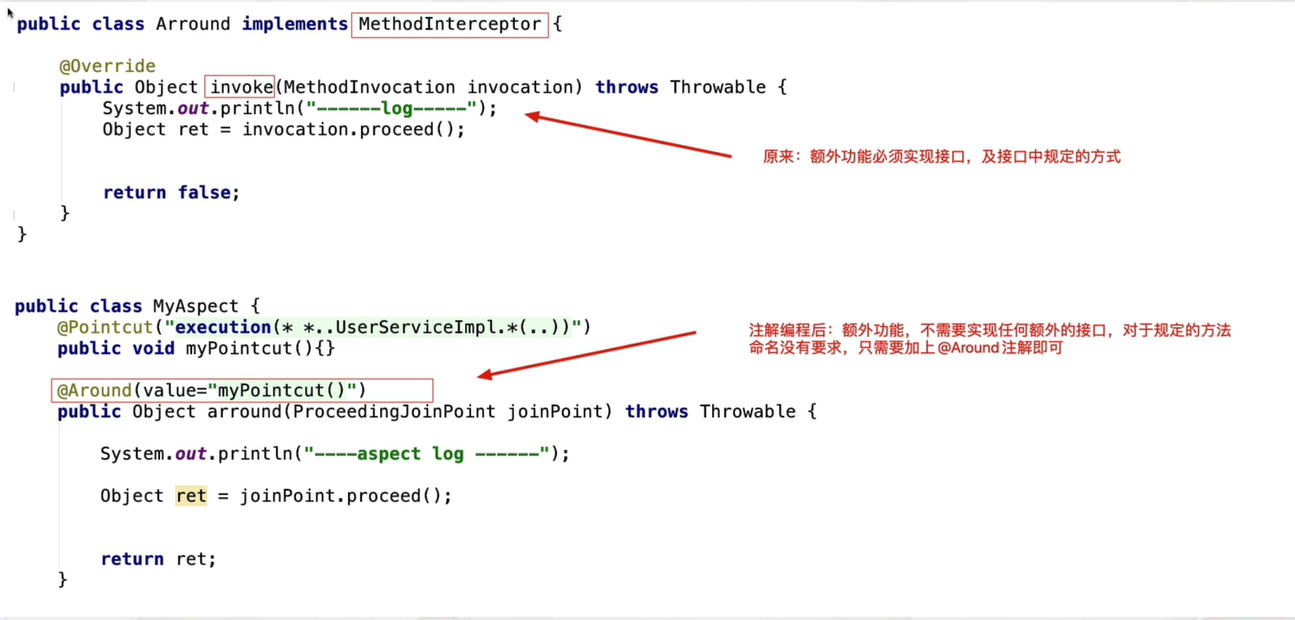
纯注解AOP开发
package annontation;import org.springframework.context.annotation.ComponentScan;
import org.springframework.context.annotation.Configuration;
import org.springframework.context.annotation.EnableAspectJAutoProxy;@Configuration
@ComponentScan(basePackages = "annontation")
@EnableAspectJAutoProxy
public class AppConfig7 {
}
package annontation;import org.aspectj.lang.ProceedingJoinPoint;
import org.aspectj.lang.annotation.Around;
import org.aspectj.lang.annotation.Aspect;
import org.aspectj.lang.annotation.Pointcut;
import org.springframework.stereotype.Component;@Aspect
@Component
public class MyAspect {//切入点@Pointcut("execution(* *(..))")public void myPointcut(){};//切面@Around(value="myPointcut()")public Object around(ProceedingJoinPoint joinPoint) throws Throwable{System.out.println("before");Object ret=joinPoint.proceed();System.out.println("after");return ret;}
}
细节分析
代理创建方式切换JDK Cglib
@EnableAspectjAutoProxy
切换为cglib
@EnableAspectJAutoProxy(proxyTargetClass = True)
纯注解版Spring+MyBatis整合
1.连接池
<bean id="dataSource" class="com.alibaba.druid.pool.DruidDataSource"><property name="url" value="jdbc:mysql://localhost:3306/db03?useSSL=false"/><property name="username" value="root"/><property name="password" value="123456"/><property name="driverClassName" value="com.mysql.jdbc.Driver"/>
</bean>
@Bean
public DruidDataSource dataSource(){
DruidDataSource dataSource=new DruidDataSource();
dataSource.setDriverClassName("");
dataSource.setUrl();
return dataSource;
}
2.SqlSessionFactoryBean<!-- 创建sqlSessionFactory SqlSessionFactoryBean--><bean id="sqlSessionFactory" class="org.mybatis.spring.SqlSessionFactoryBean"><property name="dataSource" ref="dataSource"/><property name="mapperLocations"><list><value>classpath:mybatis.mapper/*Mapper.xml</value></list></property></bean>@Bean public SqlSessionFactoryBean sqlSessionFactoryBean(DataSource dataSource){SqlSessionFactoryBean sqlSessionFactoryBean = new SqlSessionFactoryBean();sqlSessionFactoryBean.setDataSource(dataSource);sqlSessionFactoryBean.setMapperLocations(new ClassPathResource("mybatis.mapper/EmpMapper.xml"));return sqlSessionFactoryBean; }
编码
1.实体
2.表
3.Dao接口
4.Mapper文件
1. MapperLocations编码时通配写法
//设置Mapper文件路径
ResourcePatternResolver resolver=new PathMatchingResourcePatternResolver();
Resource[]resources=resolver.getResources("mybatis.mapper/*Mapper.xml");
sqlSessionFactoryBean.setMapperLocations(resources);
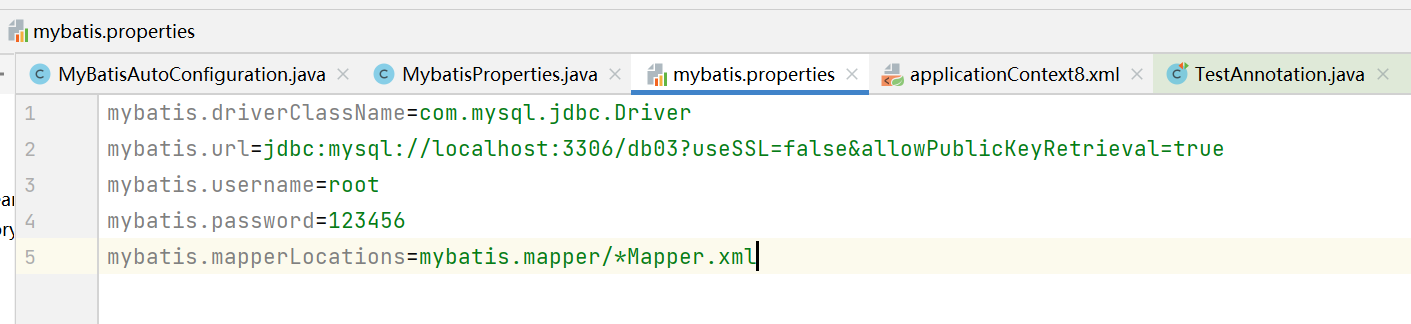
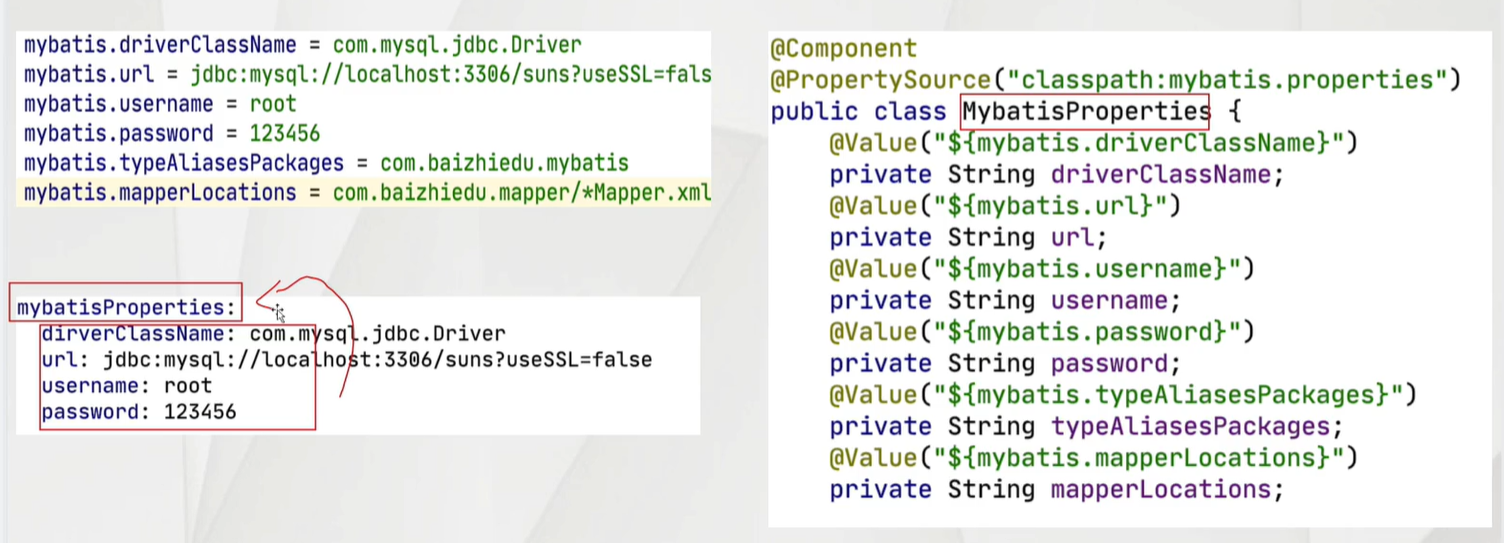
2.配置Bean数据耦合的问题
package mybatis;import org.springframework.beans.factory.annotation.Value;
import org.springframework.context.annotation.PropertySource;
import org.springframework.stereotype.Component;@Component
@PropertySource("classpath:mybatis.properties")
public class MybatisProperties {@Value("${mybatis.driverClassName}")private String driverClassName;@Value("${mybatis.url}")private String url;@Value("${mybatis.username}")private String username;@Value("${mybatis.password}")private String password;@Value("${mybatis.mapperLocations}")private String mapperLocations;public MybatisProperties() {}public MybatisProperties(String driverClassName, String url, String username, String password, String mapperLocations) {this.driverClassName = driverClassName;this.url = url;this.username = username;this.password = password;this.mapperLocations = mapperLocations;}/*** 获取* @return driverClassName*/public String getDriverClassName() {return driverClassName;}/*** 设置* @param driverClassName*/public void setDriverClassName(String driverClassName) {this.driverClassName = driverClassName;}/*** 获取* @return url*/public String getUrl() {return url;}/*** 设置* @param url*/public void setUrl(String url) {this.url = url;}/*** 获取* @return username*/public String getUsername() {return username;}/*** 设置* @param username*/public void setUsername(String username) {this.username = username;}/*** 获取* @return password*/public String getPassword() {return password;}/*** 设置* @param password*/public void setPassword(String password) {this.password = password;}/*** 获取* @return mapperLocations*/public String getMapperLocations() {return mapperLocations;}/*** 设置* @param mapperLocations*/public void setMapperLocations(String mapperLocations) {this.mapperLocations = mapperLocations;}public String toString() {return "MybatisProperties{driverClassName = " + driverClassName + ", url = " + url + ", username = " + username + ", password = " + password + ", mapperLocations = " + mapperLocations + "}";}
}
package mybatis;import com.alibaba.druid.pool.DruidDataSource; import org.mybatis.spring.SqlSessionFactoryBean; import org.mybatis.spring.annotation.MapperScan; import org.springframework.beans.factory.annotation.Autowired; import org.springframework.context.annotation.Bean; import org.springframework.context.annotation.ComponentScan; import org.springframework.context.annotation.Configuration; import org.springframework.core.io.ClassPathResource; import org.springframework.core.io.Resource; import org.springframework.core.io.support.PathMatchingResourcePatternResolver; import org.springframework.core.io.support.ResourcePatternResolver;import javax.sql.DataSource; import java.io.IOException;@Configuration @ComponentScan("mybatis") @MapperScan(basePackages = "mybatis") public class MyBatisAutoConfiguration {@Autowiredprivate MybatisProperties mybatisProperties;@Beanpublic DataSource dataSource(){DruidDataSource dataSource = new DruidDataSource();dataSource.setDriverClassName(mybatisProperties.getDriverClassName());dataSource.setUrl(mybatisProperties.getUrl());dataSource.setPassword(mybatisProperties.getPassword());dataSource.setUsername(mybatisProperties.getUsername());return dataSource;}@Beanpublic SqlSessionFactoryBean sqlSessionFactoryBean(DataSource dataSource) throws IOException {SqlSessionFactoryBean sqlSessionFactoryBean = new SqlSessionFactoryBean();sqlSessionFactoryBean.setDataSource(dataSource);ResourcePatternResolver resolver=new PathMatchingResourcePatternResolver();Resource[]resources=resolver.getResources(mybatisProperties.getMapperLocations());sqlSessionFactoryBean.setMapperLocations(resources);return sqlSessionFactoryBean;}}
纯注解版本事务编程
1.原始对象 XXX
<bean id="userService" class="xxx">
<property name="userDao" ref="userDao">
@Service
public class UserServiceImpl implements UserService{
@Autowired
private UserDao userDao;
}
2.额外功能
<!----DataSourceTransactionManager>
<bean id="dataSourceTransactionManager" class="org.spring.framework.jdbc.dataSource.DataSourceTransactionManager">
<property name="dataSource" ref="dataSource">
</bean>
@Bean
public DataSourceTransactionManager dataSourceTransactionManager(){DataSourceTransactionManager dataSourceTransactionManager = new DataSourceTransactionManager();dataSourceTransactionManager.setDataSource(dataSource);return dataSourceTransactionManager;
}
3.事务属性
@Transactional()
@Service
public class EmpServiceImpl implements EmpService{@Autowiredprivate EmpDao empDao;@Overridepublic void register(Emp emp) {empDao.add(emp);}
}
4.基于Schema的事务配置
<tx:annotation-driven transaction-manage="dataSourceTransactionManage"/>
@EnableTransactionManger--配置Bean
package mybatis;import org.springframework.beans.factory.annotation.Autowired;
import org.springframework.context.annotation.Bean;
import org.springframework.context.annotation.Configuration;
import org.springframework.context.annotation.EnableAspectJAutoProxy;
import org.springframework.jdbc.datasource.DataSourceTransactionManager;
import org.springframework.transaction.annotation.EnableTransactionManagement;import javax.sql.DataSource;//Mybatis已经配置过扫描了
@Configuration
@EnableTransactionManagement
public class TransactionAutoConfiguration {//跨配置注入@Autowiredprivate DataSource dataSource;@Beanpublic DataSourceTransactionManager dataSourceTransactionManager(){DataSourceTransactionManager dataSourceTransactionManager = new DataSourceTransactionManager();dataSourceTransactionManager.setDataSource(dataSource);return dataSourceTransactionManager;}
}
Spring与YAML文件整合
1.什么是YML
YAML是一种新形式的配置文件,比XML更简单,比Properties更强大
2.Properties进行配置问题
1.Properties表达过于繁琐,无法表达数据的内在联系
2.Properties无法表达对象 集合类型
3.YAML语法简洁
1.定义yml文件
xxx.yml xxx.yaml
2.语法
1.基本语法
key:空格value
name: suns
password:123456
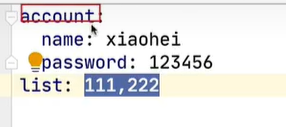
2.对象概念
account:
id:1
password:123456
3.定义集合
service
-1111
-2222
4.Spring与YML集成思路分析
1.准备yml配置文件
init.yml
name: suns
password: 123456
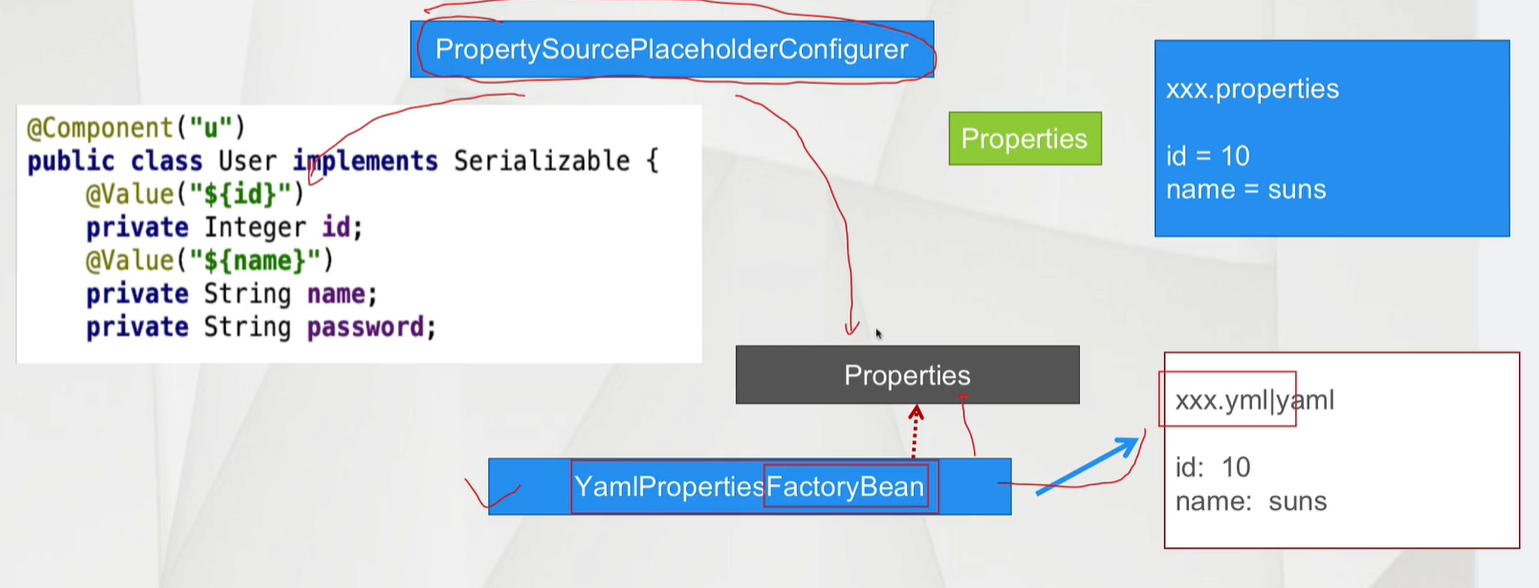
2.读取yml 转换成 Properties
YamlPropertiesFactoryBean.setResources(yml配置文件路径) new ClassPathResources();
YamlPropertiesFactoryBean.getObject()---->Properties
3.应用PropertSourcePlaceholderConfigurer
PropertySourcePlaceholderConfigurer.setProperties();
4.类中@Value注解注入
5.Spring与YML集成编码
环境搭建
<dependency><groupId>org.yaml</groupId><artifactId>snakeyaml</artifactId><version>1.29</version>
</dependency>
最低版本1.18
编码
1.准备yml配置文件
2.配置Bean中操作 完成YAML读取 与PropertySourcePlaceholderConfigure的创建
3.类 加入@Value注解
account:name: gaopassword: 123456package yml;import org.springframework.beans.factory.config.YamlPropertiesFactoryBean; import org.springframework.context.annotation.Bean; import org.springframework.context.annotation.ComponentScan; import org.springframework.context.annotation.Configuration; import org.springframework.context.support.PropertySourcesPlaceholderConfigurer; import org.springframework.core.io.ClassPathResource;import java.util.Properties;@Configuration @ComponentScan(basePackages = "yml") public class YmlAutoConfiguration {@Beanpublic PropertySourcesPlaceholderConfigurer propertySourcePlaceholderConfigurer() {YamlPropertiesFactoryBean yamlPropertiesFactoryBean = new YamlPropertiesFactoryBean();yamlPropertiesFactoryBean.setResources(new ClassPathResource("init.yml"));Properties properties = yamlPropertiesFactoryBean.getObject();PropertySourcesPlaceholderConfigurer configurer = new PropertySourcesPlaceholderConfigurer();configurer.setProperties(properties);return configurer;} }
集成问题
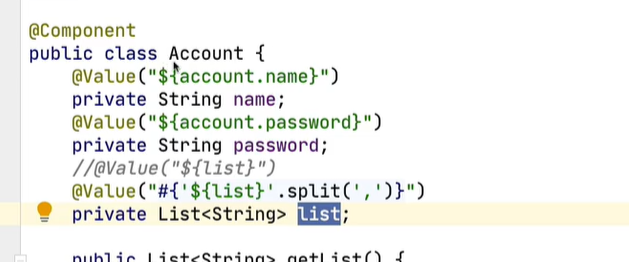
1.集合处理问题
SpringEL表达式解决
@Value("#{'${list}'/split(',')}")
2.对象类型的YAML进行配置时 过于繁琐
@Value("${account.name}")SpringBoot @ConfigurationProperties