文章目录
- 1 starter介绍
- 2 starter原理
- 3 自定义starter
- 3.1 开发一个简单starter
- 3.2 使用starter
1 starter介绍
Spring Boot在配置上相比Spring要简单许多, 其核心在Spring Boot提供了spring-boot-starter。starter简单来讲就是引入了一些相关依赖和初始化配置。
我们在使用Spring Boot搭建一个项目时, 只需要引入官方提供的starter, 就可以直接使用对应的组件,从而免去各种配置。
Spring官方提供了很多starter,第三方也可以自定义starter。为了加以区分,starter的名称有如下规范:
-
Spring官方提供的starter名称为:spring-boot-starter-xxx
例如Spring官方提供的spring-boot-starter-web
-
第三方提供的starter名称为:xxx-spring-boot-starter
例如由MyBatis提供的mybatis-spring-boot-starter
2 starter原理
Spring Boot之所以能够简化项目的搭建和开发过程,主要是基于它提供的起步依赖和自动配置。
起步依赖,就是将具备某种功能的依赖打包到一起,从而简化依赖导入的过程。 例如,导入spring-boot-starter-web这个starter,则和web开发相关的jar包都被一起导入到项目中了。如下图所示:

自动配置,就是无须手动配置xml,由容器自动配置并管理Bean,可以简化开发过程。
SpringBoot是如何完成自动配置的,可以查阅我的一个专栏:SpringBoot源码解读与原理分析,该专栏非常详细地通过源码解读搞明白了SpringBoot的整个自动装配过程。
3 自定义starter
3.1 开发一个简单starter
- 1)创建maven工程
hello-spring-boot-starter,并配置其pom.xml文件如下
<?xml version="1.0" encoding="UTF-8"?>
<project xmlns="http://maven.apache.org/POM/4.0.0"xmlns:xsi="http://www.w3.org/2001/XMLSchema-instance"xsi:schemaLocation="http://maven.apache.org/POM/4.0.0 http://maven.apache.org/xsd/maven-4.0.0.xsd"><modelVersion>4.0.0</modelVersion><parent><groupId>org.springframework.boot</groupId><artifactId>spring-boot-starter-parent</artifactId><version>2.7.12</version><relativePath/></parent><groupId>com.hsgx</groupId><artifactId>hello-spring-boot-start</artifactId><version>1.0-SNAPSHOT</version><properties><maven.compiler.source>8</maven.compiler.source><maven.compiler.target>8</maven.compiler.target><project.build.sourceEncoding>UTF-8</project.build.sourceEncoding></properties><dependencies><dependency><groupId>org.springframework.boot</groupId><artifactId>spring-boot-starter</artifactId></dependency><dependency><groupId>org.springframework.boot</groupId><artifactId>spring-boot-autoconfigure</artifactId></dependency></dependencies>
</project>
- 2)创建配置属性类
HelloProperties
package com.hsgx.config;import org.springframework.boot.context.properties.ConfigurationProperties;// 读取配置文件中以 hello 为前缀的配置
@ConfigurationProperties(prefix = "hello")
public class HelloProperties {private String name;private String address;// getter setter ...
}
- 3)创建业务类
HelloService
package com.hsgx.service;public class HelloService {private String name;private String address;public HelloService(String name, String address) {this.name = name;this.address = address;}public String sayHello() {return "你好!我的名字叫" + name + ",我来自" + address + "!";}
}
- 4)创建自动配置类
HelloServiceAutoConfiguration
package com.hsgx.config;import com.hsgx.service.HelloService;
import org.springframework.boot.autoconfigure.condition.ConditionalOnMissingBean;
import org.springframework.boot.context.properties.EnableConfigurationProperties;
import org.springframework.context.annotation.Bean;
import org.springframework.context.annotation.Configuration;@Configuration
@EnableConfigurationProperties(HelloProperties.class)
public class HelloServiceAutoConfiguration {private HelloProperties helloProperties;// 通过构造方法注入配置属性对象HelloPropertiespublic HelloServiceAutoConfiguration(HelloProperties helloProperties) {this.helloProperties = helloProperties;}// 实例化HelloService并载入Spring IoC容器@Bean@ConditionalOnMissingBeanpublic HelloService helloService(){return new HelloService(helloProperties.getName(), helloProperties.getAddress());}}
- 5)在resources目录下创建
META-INF/spring.factories,新增以下内容
org.springframework.boot.autoconfigure.EnableAutoConfiguration=\
com.hsgx.config.HelloServiceAutoConfiguration
至此,starter开发完成,接下来就可以将其引入到其他maven项目中使用。
3.2 使用starter
- 1)创建maven工程
hello-app,并配置其pom.xml文件如下
<?xml version="1.0" encoding="UTF-8"?>
<project xmlns="http://maven.apache.org/POM/4.0.0"xmlns:xsi="http://www.w3.org/2001/XMLSchema-instance"xsi:schemaLocation="http://maven.apache.org/POM/4.0.0 http://maven.apache.org/xsd/maven-4.0.0.xsd"><modelVersion>4.0.0</modelVersion><parent><groupId>org.springframework.boot</groupId><artifactId>spring-boot-starter-parent</artifactId><version>2.7.12</version><relativePath/></parent><groupId>com.hsgx</groupId><artifactId>hello-app</artifactId><version>1.0-SNAPSHOT</version><properties><maven.compiler.source>8</maven.compiler.source><maven.compiler.target>8</maven.compiler.target><project.build.sourceEncoding>UTF-8</project.build.sourceEncoding></properties><dependencies><dependency><groupId>org.springframework.boot</groupId><artifactId>spring-boot-starter-web</artifactId></dependency><!--导入自定义的starter--><dependency><groupId>com.hsgx</groupId><artifactId>hello-spring-boot-start</artifactId><version>1.0-SNAPSHOT</version></dependency></dependencies>
</project>
- 2)在resources目录下创建配置文件application.yml
server:port: 8081hello:name: 张三address: 中国广州
- 3)创建
HelloController
package com.hsgx.controller;import com.hsgx.service.HelloService;
import org.springframework.beans.factory.annotation.Autowired;
import org.springframework.web.bind.annotation.GetMapping;
import org.springframework.web.bind.annotation.RequestMapping;
import org.springframework.web.bind.annotation.RestController;@RestController
@RequestMapping("/hello")
public class HelloController {// HelloService在自定义的starter中已经完成了自动配置,所以此处可以直接注入@Autowiredprivate HelloService helloService;@GetMapping("/say")public String sayHello(){return helloService.sayHello();}
}
- 4)创建启动类
HelloApp
package com.hsgx;import org.springframework.boot.SpringApplication;
import org.springframework.boot.autoconfigure.SpringBootApplication;@SpringBootApplication
public class HelloApp {public static void main(String[] args) {SpringApplication.run(HelloApp.class, args);}
}
- 5)启动服务,访问
http://127.0.0.1:8081/hello/say
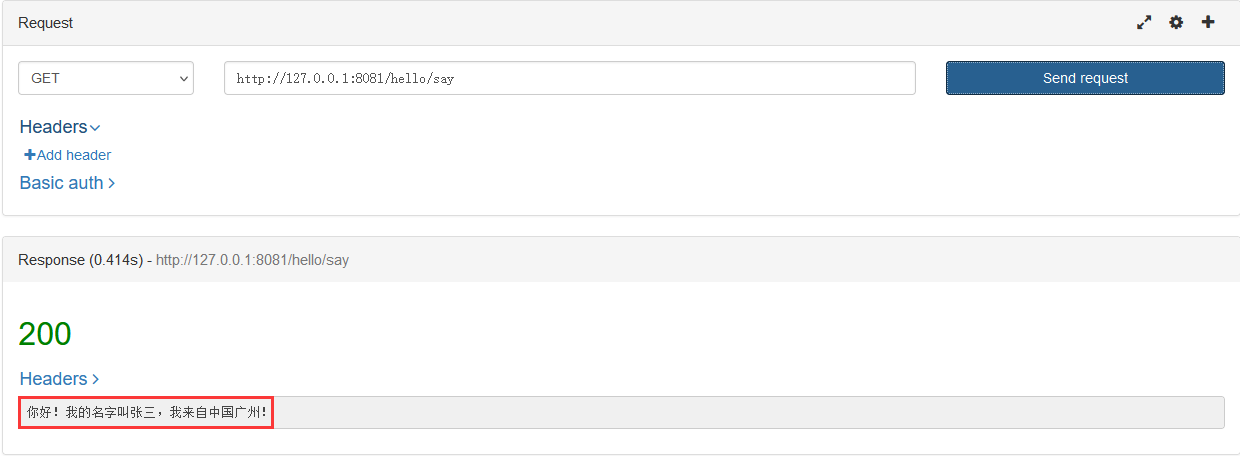
由结果可知,HelloService确实在自定义的starter中完成了自动配置,导入自定义的starter的项目可以直接使用。
…
本节完,更多内容查阅:后台管理系统的通用权限解决方案
延伸阅读:SpringBoot源码解读与原理分析


